GenAI Inferencing on UCS X-Series with 5th Gen Intel Xeon Scalable Processors on Red Hat OpenShift AI
Available Languages
Bias-Free Language
The documentation set for this product strives to use bias-free language. For the purposes of this documentation set, bias-free is defined as language that does not imply discrimination based on age, disability, gender, racial identity, ethnic identity, sexual orientation, socioeconomic status, and intersectionality. Exceptions may be present in the documentation due to language that is hardcoded in the user interfaces of the product software, language used based on RFP documentation, or language that is used by a referenced third-party product. Learn more about how Cisco is using Inclusive Language.
- US/Canada 800-553-2447
- Worldwide Support Phone Numbers
- All Tools
 Feedback
 Feedback

In partnership with:
![]()

About the Cisco Validated Design Program
The Cisco Validated Design (CVD) program consists of systems and solutions designed, tested, and documented to facilitate faster, more reliable, and more predictable customer deployments. For more information, go to: http://www.cisco.com/go/designzone.
Generative AI is transforming various sectors by facilitating tasks like text-to-image creation, lifelike voice synthesis, and the development of innovative scientific materials. The implementation of generative AI involves intricate algorithms, extensive data processing, and distributed computing frameworks. Yet, to fully harness the capabilities of these advanced models, a resilient and finely tuned infrastructure is essential. Given their reliance on vast datasets and complex algorithms, generative AI models place considerable computational strain, particularly during inference stages.
Embracing generative AI early on holds the promise of revolutionizing industries, streamlining processes, and fostering innovation on a monumental scale. By adopting generative AI technologies ahead of the curve, businesses position themselves to lead in the adoption of emerging trends, harness diverse applications, and secure a competitive advantage in a rapidly evolving AI landscape.
Deploying Generative AI at scale presents unique challenges:
● Substantial computational requirements: Executing large-scale models demands significant computational resources. Inadequate resources may lead to sluggish responses in practical scenarios. Additionally, various stages of the inference process, ranging from preprocessing to post-processing, necessitate diverse computing capabilities.
● Complexity and size of models: Large Language Models (LLMs) can encompass billions of parameters, surpassing the memory limits of individual devices. Employing distributed inference across multiple ma-chines introduces challenges in model segmentation and necessitates optimization techniques.
● Extensive network demands: Real-time responsiveness is often paramount in AI applications, underscoring the importance of low latency. When large-scale models are distributed across servers, substantial traffic may ensue between them. Any performance degradation can impact Job Completion Time (JCT).
● Infrastructure intricacies: Effectively managing and orchestrating large-scale AI deployments demands robust infrastructure and intelligent automation.
● Latency prerequisites: Many applications mandate low-latency inference to ensure prompt responsiveness.
The solution outlined in this guide aims to tackle the afore mentioned challenges encountered by organizations when adopting Generative AI models. The combination of Cisco UCS X-Series Modular System featuring 5th Gen Intel Xeon Scalable processors within a VMware-based Red Hat OpenShift environment, supplemented by the distinctive add-on service Red Hat OpenShift AI, offers a compelling solution for Generative AI models.
● Optimal performance: Cisco UCS with Intel Xeon Scalable processors with specialized AI accelerators and optimized software frameworks significantly improves inferencing performance and scalability. Cisco Nex-us 9000 switches provide high bandwidth, low latency, congestion management mechanisms, and telemetry to meet the demanding networking requirements of AI/ML applications.
● Balanced architecture: Cisco UCS excels in both Deep Learning and non-Deep Learning compute, critical for the entire inference pipeline. This balanced approach leads to better overall performance and resource utilization.
● Scalability on demand: Cisco UCS seamlessly scales with your Generative AI inferencing needs. Add or remove servers, adjust memory capacities, and configure resources in an automated manner as your models evolve and workloads grow using Cisco Intersight®.
● Faster inferencing with cost efficiency: Intel® AMX brings a range of efficiency improvements, leading to cost reduction, boosts deep learning task performance by optimizing inference, lower total cost of owner-ship (TCO), and progress towards sustainability objectives.
● Adoptability: Red Hat® OpenShift® AI offers a versatile and scalable MLOps platform equipped with tools for building, deploying, and managing AI-driven applications. Red Hat OpenShift AI facilitates the entire lifecycle of AI/ML experiments and models, offering a fully supported sandbox environment for rapid development, training, and testing of machine learning models in the public cloud before deployment in production.
This chapter contains the following:
● Audience
We acknowledge that applications become less interdependent when transitioning to a containerized environment. This shift is particularly beneficial for AI workloads, as containerization reduces costs and streamlines maintenance of the production environment. With Red Hat® OpenShift® AI, AI models can be designed, tested, and deployed more efficiently within a supported environment.
This document is intended for, but not limited to, sales engineers, technical consultants, solution architecture and enterprise IT, and machine learning teams interested in design, deployment, and life cycle management of generative AI systems.
This document outlines a reference architecture featuring VMware-based Red Hat OpenShift deployed on Cisco UCS X210c M7 Compute Nodes equipped with 5th Gen Intel Xeon Scalable processors. It illustrates the execution of Intel® Extension for PyTorch (IPEX) with DeepSpeed benchmark tests on an OpenShift node. Additionally, the document showcases inferencing utilizing the Intel OpenVINO toolkit for optimizing and deploying AI inference on Red Hat OpenShift AI.
Red Hat® OpenShift® AI offers an AI-focused suite of tools covering the entire AI/ML experimentation and model lifecycle. Collaborating with Red Hat, Intel provides proven, optimized libraries and toolkits such as the Intel® oneAPI AI Analytics Toolkit (AI Kit) and Intel® OpenVINO™ Pro Enterprise Toolkit. These solutions empower data scientists with cutting-edge tools and technologies tailored for Intel architecture-based hardware, such as Intel Xeon processors optimized for AI inferencing and training. A solution based on Cisco UCS® with Intel® Xeon® Scalable Processors and Cisco Nexus® offers a compelling and scalable foundation for deploying generative AI at scale.
The Cisco UCS X-Series Modular System supports 5th Gen Intel Xeon Scalable Processors so that you have the option to run inferencing in the data center or at the edge. The Cisco UCS X-Series Modular System, powered by Intersight, is a versatile and forward-looking solution designed to streamline IT operations and keep pace with software-driven innovations.
● By consolidating onto this platform, you can benefit from the density and efficiency of blade servers combined with the scalability of rack servers.
● Embrace emerging technologies and mitigate risks with a system engineered to seamlessly support future advancements, with management delivered through Software as a Service (SaaS).
● Adapt to the demands of your business with agility and scalability, shaping the X-Series to match your workload requirements using Cisco Intersight.
5th Gen Intel Xeon processors are engineered to seamlessly handle demanding AI workloads, including inference and fine-tuning on models containing up to 20 billion parameters, without an immediate need for additional hardware. Furthermore, the compatibility of 5th Gen with 4th Gen Intel Xeon processors facilitates a smooth upgrade process for existing solutions, minimizing the need for extensive testing and validation.
Intel Xeon processors are equipped with:
● Intel Advanced Matrix Extensions (Intel AMX) accelerator, an AI accelerator, is built into each core to significantly speed up deep-learning applications when 8-bit integer (INT8) or 16-bit float (bfloat16) datatypes are used.
● Higher core frequency, larger last-level cache, and faster memory with DDR5 speed up compute processing and memory access.
● Improved cost-effectiveness is provided by combining the latest-generation AI hardware with software optimizations, which potentially lowers TCO by enabling the use of built-in accelerators to scale-out inferencing performance rather than relying on discrete accelerators, making generative AI more accessible and affordable.
● DeepSpeed provides high-performance inference support for large transformer-based models with billions of parameters, through enablement of multi-CPU inferencing. It automatically partitions models across the specified number of CPUs and inserts necessary communications to run multi-CPU inferencing for the model.
Intel and Red Hat have joined forces to optimize Red Hat OpenShift for Intel® Xeon® Scalable processors family. This has enabled data scientists to benefit from a diverse set of tools, collaborative environments, and accelerated time-to-market within a unified platform. With reduced friction in collaboration, teams can efficiently deliver intelligent applications, ultimately enhancing business value.
This enhancement is pivotal across various domains such as image and video recognition, scientific computing, financial modeling, healthcare, and natural language processing, offering accelerated insights and potentially reduced compute costs.
Red Hat OpenShift AI, paired with Intel oneAPI Analytics Toolkit and Intel OpenVINO Pro Enterprise Toolkit, offers a range of benefits for data scientists, researchers, and programmers, including:
● Easy access to sample code, proven models, and components from Red Hat ecosystem.
● Eliminating complex ITOps setup tasks. Managing software life cycles efficiently through a choice of a managed cloud service or traditional software deployment methods.
● Providing specialized components and integrated independent software vendor (ISV) support within the user interface (UI).
● Allowing development and deployment on any environment across the data center, the edge, and public clouds.
● Serving models and automating data science pipelines at scale to simplify MLOps processes.
● Support for AI/ML experimentation and innovation.
● Simplified integration into intelligent applications.
The reference architecture outlined in this guide presents a systematic approach to deploying an enterprise-ready Red Hat OpenShift Container Platform solution tailored for AI/ML workloads on Cisco UCS infrastructure. Cisco UCS X-Series servers are engineered to swiftly adapt to evolving business demands, facilitating the on-demand deployment of new computing resources to enhance business outcomes. With Cisco UCS, organizations can fine-tune their environments to accommodate the specific requirements of each application, consolidating all server workloads under the centralized management of Cisco Intersight.
Cisco UCS offers the versatility of both nonvirtualized and virtualized systems in a manner unmatched by other server architectures, leading to cost reductions and improved return on investment (ROI). Recognized for its commitment to sustainability, Cisco UCS X-Series earned the 2023 SEAL Sustainable Product Award for products that are “purpose-built” for a sustainable future.
Managed through Cisco Intersight and fueled by Intel Xeon Scalable Processors, Cisco UCS X-Series servers integrated with the leading container platform Red Hat OpenShift offer a compelling solution to address these challenges and optimize generative AI performance. Here are some of the benefits:
● Streamlined Management: Cisco Intersight provides centralized management for Cisco UCS X-Series servers, simplifying operations and enhancing efficiency.
● Powerful Processing: Leveraging Intel Xeon Scalable Processors, the Cisco UCS X-Series servers deliver robust computational power, enabling accelerated AI model training and inference.
● Containerized Environment: Red Hat OpenShift offers a containerized platform that enhances scalability, flexibility, and resource utilization for AI workloads.
● Enhanced Performance: By combining Cisco UCS X-Series servers with Red Hat OpenShift, organizations can achieve improved performance for generative AI tasks, ensuring faster insights and decision-making.
● Scalability and Agility: The solution offers scalability to accommodate growing AI workloads and agility to adapt to evolving business requirements seamlessly.
● Integrated Ecosystem: Cisco UCS X-Series servers, Cisco Intersight, Intel Xeon Scalable processors, and Red Hat OpenShift form an integrated ecosystem, providing a cohesive infrastructure for AI-driven applications.
Overall, this solution enables organizations to harness the full potential of generative AI while overcoming challenges related to management, processing power, and scalability.
This chapter contains the following:
● Cisco UCS X-Series Modular System
● Cisco UCS 6500 Series Fabric Interconnect
● Cisco Nexus Switching Fabric
● Intel Xeon Scalable Processor Family
● Red Hat OpenShift Container Platform
Cisco UCS X-Series Modular System
The Cisco Unified Computing System X-Series (Cisco UCSX) is a modular, next-generation data center platform that builds upon the unique architecture and advantages of the previous Cisco UCS 5108 system. The Cisco UCS X-Series is a standards-based open system designed to be deployed and automated quickly in a hybrid cloud environment. The following key enhancements in Cisco UCS X-Series simplify IT operations:
● Cloud-managed infrastructure: With Cisco UCS X-Series, the management of the network infrastructure is moved to the cloud, making it easier and simpler for IT teams to respond quickly and at scale to meet the needs of your business. The Cisco Intersight cloud-operations platform allows you to adapt the resources of the Cisco UCS X-Series Modular System to meet the specific requirements of a workload. Additionally, you can seamlessly integrate third-party devices such as Pure Storage and VMware vCenter. This integration also enables global visibility, monitoring, optimization, and orchestration for all your applications and infrastructure.
● Adaptable system designed for modern applications: Today's cloud-native and hybrid applications are dynamic and unpredictable. Application and DevOps teams frequently deploy and redeploy resources to meet evolving requirements. To address this, the Cisco UCS X-Series provides an adaptable system that doesn't lock you into a fixed set of resources. It combines the density, manageability, and efficiency of blade servers with the expandability of rack servers, allowing you to consolidate multiple workloads onto a single platform. This consolidation results in improved performance, automation, and efficiency for both hybrid and traditional data center applications.
● Platform engineered for the future: The Cisco UCS X-Series is designed to adapt to emerging technologies with minimal risk. It is a modular system that can support future generations of processors, storage, nonvolatile memory, accelerators, and interconnects. This eliminates the need to purchase, configure, maintain, power, and cool separate management modules and servers. Cloud-based management through Intersight ensures automatic updates and access to new capabilities delivered through a software-as-a-service model.
● Broad support for diverse workloads: The Cisco UCS X-Series supports a broad range of workloads, reducing the need for different products which lowers support costs, training costs, and gives you more flexibility in your data center environment.
The Cisco UCS X-Series chassis is engineered to be adaptable and flexible. With a midplane-free design, I/O connectivity for the Cisco UCS X9508 chassis is accomplished with front-loading vertically oriented computing nodes that intersect with horizontally oriented I/O connectivity modules in the rear of the chassis. A unified Ethernet fabric is supplied with the Cisco UCS 9108 IFMs. Cisco UCS X9508 Chassis’ superior packaging enables larger compute nodes, thereby providing more space for actual compute components, such as memory, GPU, drives, and accelerators. Improved airflow through the chassis enables support for higher power components, and more space allows for future thermal solutions (such as liquid cooling) without limitations.

The Cisco UCS X9508 Chassis (Figure 1) provides the following features and benefits:
● The 7RU chassis has 8 front-facing flexible slots. These slots can house a combination of computing nodes and a pool of future I/O resources, which may include graphics processing unit (GPU) accelerators, disk storage, and nonvolatile memory.
● Two Cisco UCS 9108 IFMs at the top of the chassis connect the chassis to upstream Cisco UCS 6400 Series Fabric Interconnects (FIs). Each IFM offers these features:
◦ The module provides up to 100 Gbps of unified fabric connectivity per computing node.
◦ The module provides eight 25-Gbps Small Form-Factor Pluggable 28 (SFP28) uplink ports.
◦ The unified fabric carries management traffic to the Cisco Intersight cloud-operations platform, Fibre Channel over Ethernet (FCoE) traffic, and production Ethernet traffic to the fabric interconnects.
● At the bottom of the chassis are slots used to house Cisco UCS X9416 X-Fabric Modules which enables GPU connectivity to the Cisco UCS X210c Compute Nodes.
● Six 2800-watt (W) power supply units (PSUs) provide 54 volts (V) of power to the chassis with N, N+1, and N+N redundancy. A higher voltage allows efficient power delivery with less copper wiring needed and reduced power loss.
● Efficient, 4 x 100-mm, dual counter-rotating fans deliver industry-leading airflow and power efficiency. Optimized thermal algorithms enable different cooling modes to best support the network environment. Cooling is modular, so future enhancements can potentially handle open- or closed-loop liquid cooling to support even higher-power processors.
The Cisco UCS X210 M7 server is a high-performance and highly scalable server designed for data centers and enterprise environments. Some of the key benefits of this server are:
● Performance: The Cisco UCS X210 M7 server is built to deliver exceptional performance. It features the latest Intel Xeon Scalable processors, providing high processing power for demanding workloads such as virtualization, database management, and analytics. The server's architecture is designed to optimize performance across a wide range of applications.
● Scalability: The Cisco UCS X210 M7 server offers excellent scalability options, allowing organizations to easily scale their computing resources as their needs grow. With support for up to eight CPUs and up to 112 DIMM slots, the server can accommodate large memory configurations and high core counts, enabling it to handle resource-intensive applications and virtualization environments.
● Memory Capacity: The server supports a large memory footprint, making it suitable for memory-intensive workloads. It can accommodate a vast amount of DDR4 DIMMs, providing a high memory capacity for applications that require significant data processing and analysis.
● Enhanced Virtualization Capabilities: The Cisco UCS X210 M7 server is designed to optimize virtualization performance. It includes features such as Intel Virtualization Technology (VT-x) and Virtual Machine Device Queues (VMDq), which improve virtual machine density and network performance in virtualized environments. These capabilities enable organizations to consolidate their workloads and achieve efficient resource utilization.
● Simplified Management: The Cisco Unified Computing System (Cisco UCS) management software provides a unified and streamlined approach to server management. The Cisco UCS Manager software allows administrators to manage multiple servers from a single interface, simplifying operations and reducing management complexity. Additionally, the server integrates with Cisco's ecosystem of management tools, providing enhanced visibility, automation, and control.
● High Availability and Reliability: The Cisco UCS X210 M7 server is built with redundancy and fault tolerance in mind. It includes features such as hot-swappable components, redundant power supplies, and redundant fans, ensuring high availability and minimizing downtime. The server's architecture is designed to support mission-critical applications that require continuous operation.
● Energy Efficiency: Cisco UCS servers are designed to be energy-efficient. The Cisco UCS X210 M7 server incorporates power management features that optimize power usage and reduce energy consumption. This not only helps organizations reduce their carbon footprint but also lowers operating costs over time.

Cisco UCS Virtual Interface Cards (VICs)
● Cisco UCS X210c M7 Compute Nodes support multiple Cisco UCS VIC cards. This design uses the Cisco UCS VIC 15000 adapter.
● Cisco UCS X210c M7 Compute Nodes support the following Cisco UCS VIC cards:
◦ Cisco UCS VIC 15231
Cisco UCS VIC 15231 fits the mLOM slot in the Cisco UCS X210c Compute Node and enables up to 100 Gbps of unified fabric connectivity to each of the chassis IFMs for a total of 200 Gbps of connectivity per server. Cisco UCS VIC 15231 connectivity to the IFM and up to the fabric interconnects is delivered through 100Gbps. Cisco UCS VIC 15231 supports 512 virtual interfaces (both FCoE and Ethernet) along with the latest networking innovations such as NVMeoF over FC or TCP, VxLAN/NVGRE offload, and so forth.

Cisco UCS VIC 15420
Cisco UCS VIC 15420 fits the mLOM slot in the Cisco X210c Compute Node and enables up to 50 Gbps of unified fabric connectivity to each of the chassis IFMs for a total of 100 Gbps of connectivity per server. Cisco UCS VIC 15420 connectivity to the IFM and up to the fabric interconnects is delivered through 4x 25-Gbps connections, which are configured automatically as 2x 50-Gbps port channels. Cisco UCS VIC 15420 supports 512 virtual interfaces (both Fibre Channel and Ethernet) along with the latest networking innovations such as NVMeoF over RDMA (ROCEv2), VxLAN/NVGRE offload, and so on.

Cisco UCS VIC 15422
The optional Cisco UCS VIC 15422 fits the mezzanine slot on the server. A bridge card (UCSX-V5-BRIDGE) extends this VIC’s 2x 50 Gbps of network connections up to the mLOM slot and out through the mLOM’s IFM connectors, bringing the total bandwidth to 100 Gbps per fabric for a total bandwidth of 200 Gbps per server.

Cisco UCS 6500 Series Fabric Interconnect
The Cisco UCS Fabric Interconnects (FIs) provide a single point of connectivity and management for the entire Cisco UCS system. Typically deployed as an active/active pair, the system’s FIs integrate all components into a single, highly available management domain controlled by the Cisco UCS Manager or Cisco Intersight. Cisco UCS FIs provide a single unified fabric for the system, with low-latency, lossless, cut-through switching that supports LAN, SAN, and management traffic using a single set of cables.

The Cisco UCS 6536 Fabric Interconnect utilized in the current design is a One-Rack-Unit (1RU) 1/10/25/40/100 Gigabit Ethernet, FCoE, and Fibre Channel switch offering up to 7.42 Tbps throughput and up to 36 ports. The switch has 32 40/100-Gbps Ethernet ports and 4 unified ports that can support 40/100-Gbps Ethernet ports or 16 Fiber Channel ports after breakout at 8/16/32-Gbps FC speeds. The 16 FC ports after breakout can operate as an FC uplink or FC storage port. The switch also supports two ports at 1-Gbps speed using QSA, and all 36 ports can breakout for 10- or 25-Gbps Ethernet connectivity. All Ethernet ports can support FCoE.
The Cisco UCS 6536 Fabric Interconnect (FI) is a core part of the Cisco Unified Computing System, providing both network connectivity and management capabilities for the system. The Cisco UCS 6536 Fabric Interconnect offers line-rate, low-latency, lossless 10/25/40/100 Gigabit Ethernet, Fibre Channel, NVMe over Fabric, and Fibre Channel over Ethernet (FCoE) functions.
The Cisco UCS 6536 Fabric Interconnect provides the communication backbone and management connectivity for the Cisco UCS X-Series compute nodes, Cisco UCS X9508 X-series chassis, Cisco UCS B-Series blade servers, Cisco UCS 5108 B-Series server chassis, and Cisco UCS C-Series rack servers. All servers attached to a Cisco UCS 6536 Fabric Interconnect become part of a single, highly available management domain. In addition, by supporting a unified fabric, Cisco UCS 6536 Fabric Interconnect provides both LAN and SAN connectivity for all servers within its domain.
From a networking perspective, the Cisco UCS 6536 uses a cut-through architecture, supporting deterministic, low-latency, line-rate 10/25/40/100 Gigabit Ethernet ports, a switching capacity of 7.42 Tbps per FI and 14.84 Tbps per unified fabric domain, independent of packet size and enabled services. It enables 1600Gbps bandwidth per X9508 chassis with X9108-IFM-100G in addition to enabling end-to-end 100G ethernet and 200G aggregate bandwidth per X210c compute node. With the X9108-IFM-25G and the IOM 2408, it enables 400Gbps bandwidth per chassis per FI domain. The product family supports Cisco low-latency, lossless 10/25/40/100 Gigabit Ethernet unified network fabric capabilities, which increases the reliability, efficiency, and scalability of Ethernet networks. The Cisco UCS 6536 Fabric Interconnect supports multiple traffic classes over a lossless Ethernet fabric from the server through the fabric interconnect. Significant TCO savings come from the Unified Fabric optimized server design in which network interface cards (NICs), Host Bus Adapters (HBAs), cables, and switches can be consolidated.
As applications and data become more distributed from core data center and edge locations to public clouds, a centralized management platform is essential. IT agility will be struggle without a consolidated view of the infrastructure resources and centralized operations. Cisco Intersight provides a cloud-hosted, management and analytics platform for all Cisco UCS and other supported third-party infrastructure across the globe. It provides an efficient way of deploying, managing, and upgrading infrastructure in the data center, ROBO, edge, and co-location environments.
Cisco Intersight API can help you to programmatically:
● Simplify the way they manage their infrastructure.
● Automate configurations and provision for their data center.
● Save long provisioning time.

The main benefits of Cisco Intersight infrastructure services follow:
● Simplify daily operations by automating many daily manual tasks.
● Combine the convenience of a SaaS platform with the capability to connect from anywhere and manage infrastructure through a browser or mobile app.
● Stay ahead of problems and accelerate trouble resolution through advanced support capabilities.
● Gain global visibility of infrastructure health and status along with advanced management and support capabilities.
● Upgrade to add workload optimization when needed.
The Cisco Nexus 9000 Series Switches offer both modular and fixed 1/10/25/40/100 Gigabit Ethernet switch configurations with scalability up to 60 Tbps of nonblocking performance with less than five-microsecond latency, wire speed VXLAN gateway, bridging, and routing support.
![]()
The Cisco Nexus 9000 series switch featured in this design is the Cisco Nexus 93180YC-FX3 configured in NX-OS standalone mode. NX-OS is a purpose-built data center operating system designed for performance, resiliency, scalability, manageability, and programmability at its foundation. It provides a robust and comprehensive feature set that meets the demanding requirements of virtualization and automation.
The Cisco Nexus 93180YC-FX3 Switch is a 1RU switch that supports 3.6 Tbps of bandwidth and 1.2 bpps. The 48 downlink ports on the 93180YC-FX3 can support 1-, 10-, or 25-Gbps Ethernet, offering deployment flexibility and investment protection. The six uplink ports can be configured as 40- or 100-Gbps Ethernet, offering flexible migration options.
Intel Xeon Scalable Processor Family
The Intel® Xeon® Scalable processors come with built-in accelerators and featured technologies that help optimize workload-specific performance, accelerate AI capabilities, reduce data center latency, reduce data bottlenecks, and balance resource consumption. Intel® Accelerator Engines are purpose-built integrated accelerators on Intel® Xeon® Scalable processors that deliver performance and power efficiency advantages across today’s fastest-growing workloads.
Intel Xeon Scalable processors are designed to meet your organization's computing needs whether it is empowering solid foundations for AI innovation and HPC, supporting critical workloads at the edge, building a secure cloud. They offer optimized performance, scale, and efficiency across a broad range of data center, edge, and workstation workloads.
5th Gen Intel Xeon Scalable Processors
5th Gen Intel Xeon Scalable processors are designed to help boost performance, reduce costs, and improve power efficiency for today’s demanding workloads, enabling you to achieve greater business outcomes.
These processors deliver impressive performance-per-watt gains across all workloads, with higher performance and lower total cost of ownership (TCO) for AI, databases, networking, storage, and high-performance computing (HPC). They offer more compute, larger shared last-level cache, and faster memory at the same power envelope as the previous generation. They are also software- and platform compatible with the 4th Gen Intel Xeon processors, so you can minimize testing and validation when deploying new systems for AI and other workloads.
Some of the key features of 5th Gen Intel Xeon Scalable processors include[1]:
● Built-in AI accelerators on every core, Intel® Advanced Matrix Extensions (Intel®AMX) for a big leap in DL inference and training performance.
● Intel AI software suite of optimized open-source frameworks and tools.
● Out-of-the-box AI performance and E2E productivity with 300+ DL models validated.
● The 5th Gen Intel Xeon processor provides higher core count, better scalability for training and inferencing parallel tasks.
● 5th Gen Intel Xeon processor supports 5600MT/s DDR5 memory speed -16% increase over 4th Gen.
● Boost performance for memory-bound and latency-sensitive workloads with faster memory.
● With up to 320 MB last-level cache shared across all cores — an up to 2.7x increase in last-level cache[2].
Intel Advanced Matrix Extensions (Intel AMX)
Intel Advanced Matrix Extensions (Intel AMX) enables Intel Xeon processors to boost the performance of deep-learning training and inferencing workloads by balancing inference, which is the most prominent use case for a CPU in AI applications, with more capabilities for training. Customers can experience up to 14x better training and inference vs. 3rd Gen Intel Xeon processors[3].
Primary benefits of Intel AMX include:
● Improved performance
CPU-based acceleration can improve power and resource utilization efficiencies, giving you better performance for the same price.
For example, 5th Gen Intel Xeon Platinum 8592+ with Intel AMX BF16 has shown up to 10.7x higher real-time speech recognition inference performance (RNN-T) and 7.9x higher performance/watt vs. 3rd Gen Intel Xeon processors with FP32.4.
● Reduced Total Cost of Ownership (TCO)
Intel Xeon processors with Intel AMX enable a range of efficiency improvements that help with decreasing costs, lowering TCO, and advancing sustainability goals.
As an integrated accelerator on Intel Xeon processors, Intel AMX enables you to maximize the investments you have already made and get more from your CPU, removing the cost and complexity typically associated with the addition of a discrete accelerator.
Intel Xeon processors with Intel AMX can also provide a more cost-efficient server architecture compared to other available options, delivering both power and emission reduction benefits.
● Reduced development time
To simplify the process of developing deep-learning applications, Intel works closely with the open-source community, including the TensorFlow and PyTorch projects, to optimize frameworks for Intel hardware, upstreaming Intel’s newest optimizations and features so they are immediately available to developers. This enables you to take advantage of the performance benefits of Intel AMX with the addition of a few lines of code, reducing overall development time.
For more information, see: https://www.intel.com/content/www/us/en/products/docs/accelerator-engines/advanced-matrix-extensions/overview.html
Intel® Extension for PyTorch
Intel® Extension for PyTorch is an open-source extension that optimizes DL performance on Intel® processors. Intel releases its newest optimizations and features in Intel® Extension for PyTorch* before upstreaming them into open source PyTorch.
With a few lines of code, you can use Intel Extension for PyTorch to:
● Take advantage of the most up-to-date Intel software and hardware optimizations for PyTorch.
● Automatically mix different precision data types to reduce the model size and computational workload for inference.
● Add your own performance customizations using APIs.
For more information, see: https://www.intel.com/content/www/us/en/developer/tools/oneapi/optimization-for-pytorch.html
Intel® OpenVINO™ toolkit
The Intel® OpenVINO™ toolkit enables developers and enterprises to rapidly optimize and deploy deep learning models and accelerate AI workloads. It is an opensource toolkit that accelerates AI inference with lower latency and higher throughput while maintaining accuracy, reducing model footprint, and optimizing hardware use. It streamlines AI development and integration of deep learning in domains like computer vision, large language models, and generative AI.
For more information, see: https://www.intel.com/content/www/us/en/developer/tools/openvino-toolkit/overview.html
Red Hat OpenShift Container Platform
The Red Hat OpenShift Container Platform (OCP) is a container application platform that brings together CRI-O and Kubernetes and provides an API and web interface to manage these services. CRI-O is a lightweight implementation of the Kubernetes CRI (Container Runtime Interface) to enable using Open Container Initiative (OCI) compatible runtimes including runc, crun, and Kata containers.
OCP allows you to create and manage containers. Containers are standalone processes that run within their own environment, independent of the operating system and the underlying infrastructure. OCP helps develop, deploy, and manage container-based applications. It provides a self-service platform to create, modify, and deploy applications on demand, thus enabling faster development and release life cycles. OCP has a microservices-based architecture of smaller, decoupled units that work together and is powered by Kubernetes with data about the objects stored in etcd, a reliable clustered key-value store.

Red Hat OpenShift is an application platform that drives innovation, anywhere. It empowers organizations to modernize their applications and infrastructure, build new cloud-native applications, accelerate their digital transformation, and fuel growth. AI/ML workloads typically run as docker containers or on Linux virtual machines. Red Hat OpenShift AI leverages OpenShift’s capabilities in application development and container infrastructure management to enable a robust, scalable, and secure environment for model delivery and MLOps. OpenShift Administrators manage all aspects of the underlying infrastructure, from GPU resources to storage to user access. This eases the operational burden on ML engineers and data scientists, enabling them to focus on model delivery and less on managing the infrastructure. This operational benefit is a key advantage of using OpenShift AI such as the underlying infrastructure is administered by IT teams that currently manage OpenShift. The provisioned resources (for example - CPUs, GPUs), and other aspects such as identity management and user access are seamlessly available and integrated into OpenShift AI, making it significantly easier to use the platform.
Kubernetes Infrastructure
Within OpenShift Container Platform, Kubernetes manages containerized applications across a set of CRI-O runtime hosts and provides mechanisms for deployment, maintenance, and application scaling. The CRI-O service packages, instantiates, and runs containerized applications.
A Kubernetes cluster consists of one or more control plane nodes and a set of worker nodes. This solution design includes HA functionality at the hardware as well as the software stack. An OCP cluster is designed to run in HA mode with 3 control plane nodes and a minimum of 2 worker nodes to help ensure that the cluster has no single point of failure.
Kubernetes Operator
AI/ML workloads, like many modern applications, are using containers and Kubernetes (K8S) orchestration as the de facto development environment for model development and AI-enabled applications. Kubernetes offer several benefits, but one key attribute is its extensibility. Kubernetes provides an Operator framework that vendors and open-source communities can use to develop and deploy self-contained operators that extend the capabilities of the K8s cluster. These operators generally require minimum provisioning and are usually self-managed with automatic updates (unless disabled) and handle life-cycle management. Kubernetes operators are probably the closest thing to an easy-button in infrastructure provisioning (short of IaC). In the Red Hat OpenShift environment that this solution uses, it is even easier to deploy and use operators. Red Hat OpenShift provides an embedded OperatorHub, directly accessible from the cluster console. The Red Hat OperatorHub has hundreds of Red Hat and community certified operators that can be deployed with a few clicks.
To support AI/ML workloads and OpenShift AI, the following Red Hat OpenShift operators are deployed in this solution to enable CPU, storage, and other resources:
● Red Hat Node Feature Discovery Operator to identify and label hardware resources (for example, NVIDIA GPUs)
● Red Hat Data OpenShift AI Operator deploys OpenShift AI on any OpenShift cluster
● OpenShift Pipelines for automating model pipelines in OpenShift AI
For more information on Red Hat OpenShift Operators, see: https://www.redhat.com/en/technologies/cloud-computing/openshift/what-are-openshift-operators.
Red Hat Hybrid Cloud Console
Red Hat Hybrid Cloud Console is a centralized SaaS-based management console for deploying and managing multiple OCP clusters. It is used in this solution to provide consistent container management across a hybrid environment. The SaaS model enables Enterprises to develop, deploy, and innovate faster across multiple infrastructures and quickly take advantage of new capabilities without the overhead of managing the tool. The console gives Enterprises more control and visibility as environments grow and scale. The Hybrid Cloud Console also provides tools to proactively address issues, open and manage support cases, manage cloud costs, subscriptions, and more.
For more information, see: Red Hat Hybrid Cloud Console product page on redhat.com.
Installation Options
Red Hat Enterprise Linux CoreOS (RHCOS) is deployed automatically using configurations in the ignition files. The OCP installer creates the Ignition configuration files necessary to deploy the OCP cluster with RHCOS. The configuration is based on the user provided responses to the installer. These files and images are downloaded and installed on the underlying infrastructure by the installer.
● Openshift-install is a command line utility for installing openshift in cloud environments and on-prem. It collects information from the user, generates manifests, and uses terraform to provision and configure infrastructure that will compose a cluster.
● Assisted Installer is a cloud-hosted installer available at https://console.redhat.com as both an API and a guided web UI. After defining a cluster, the user downloads a custom “discovery ISO” and boots it on the systems that will be provisioned into a cluster, at which point each system connects to console.redhat.com for coordination. Assisted installer offers great flexibility and customization while ensuring success by running an extensive set of validations prior to installation.
● Agent-based installer is a command line utility that delivers the functionality of the Assisted Installer in a stand-alone format that can be run in disconnected and air-gapped environments, creating a cluster without requiring any other running systems besides a container registry.
● Red Hat Advanced Cluster Management for Kubernetes (see the section below) includes the Assisted Installer running on-premises behind a Kubernetes API in addition to a web UI. OpenShift’s baremetal platform features, especially the baremetal-operator, can be combined with the Assisted Installer to create an integrated end-to-end provisioning flow that uses Redfish Virtual Media to automatically boot the discovery ISO on managed systems.
For more information on installation options, see: https://console.redhat.com/openshift/create/datacenter
Red Hat Enterprise Linux CoreOS (RHCOS)
RHCOS is a lightweight operating system specifically designed for running containerized workloads. It is based on the secure, enterprise-grade Red Hat Enterprise Linux (RHEL). RHCOS is the default operating system on all Red Hat OCP cluster nodes. RHCOS is tightly controlled, allowing only a few system settings to be modified using the Ignition configuration files. RHCOS is designed to be installed as part of an OCP cluster installation process with minimal user configuration. Once the cluster is deployed, the cluster will fully manage the RHCOS subsystem configuration and upgrades.
RHCOS includes:
● Ignition – for initial bootup configuration and disk related tasks on OCP cluster nodes
Ignition serves as a first boot system configuration utility for initially bringing up and configuring the nodes in the OCP cluster. Starting from a tightly-controlled OS image, the complete configuration of each system is expressed and applied using ignition. It also creates and formats disk partitions, writes files, creates file systems and directories, configures users, and so on. During a cluster install, the control plane nodes get their configuration file from the temporary bootstrap machine used during install, and the worker nodes get theirs from the control plane nodes. After an OCP cluster is installed, subsequent configuration of nodes is done using the Machine Config Operator to manage and apply ignition.
● CRI-O – Container Engine running on OCP cluster nodes
CRI-O is a stable, standards-based, lightweight container engine for Kubernetes that runs and manages the containers on each node. CRI-O implements the Kubernetes Container Runtime Interface (CRI) for running Open Container Initiative (OCI) compliant runtimes. OCP’s default container runtime is runc. CRI-O has a small footprint and a small attack surface, with an emphasis on security and simplicity. CRI-O is a Cloud Native Computing Foundation (CNCF) incubating project.
● Kubelet – Kubernetes service running on OCP cluster nodes
Kubelet is a Kubernetes service running on every node in the cluster. It communicates with the control plane components and processes requests for running, stopping, and managing container workloads.
● Set of container tools
Container Tools: RHCOS includes a set of container tools (including podman, skopeo, and crictl) for managing containers and container image actions such as start, stop, run, list, remove, build, sign, push, and pull.
● rpm-ostree combines RPM package management with libostree’s immutable content-addressable operating system image management. RHCOS is installed and updated using libostree, guaranteeing that the installed OS is in a known state, with transactional upgrades and support for rollback.
Note: RHCOS was used on all control planes and worker nodes to support the automated OCP 4 deployment.
Red Hat OpenShift AI
Red Hat OpenShift AI (previously known as Red Hat OpenShift Data Science or RHODS) is a flexible and scalable platform for MLOps using Red Hat OpenShift as the foundation. Along with OpenShift AI, all AI/ML workloads, including ML models and AI-enabled applications can be hosted on OpenShift. IT operations teams that manage Kubernetes cluster resources for existing application environments, can continue to do the same for OpenShift AI and AI/ML workloads. Once provisioned, the resources will be directly accessible from the OpenShift AI console for AI/ML teams to use.
Figure 11 illustrates how the model operation life cycle integrates with the initial offering of OpenShift Data Science as a common platform. It provides a core data science workflow as a Red Hat managed service, with the opportunity for increased capabilities and collaboration through ISV-certified software. Models are either hosted on OpenShift cloud service or exported for integration into an intelligent application.
Core tools and capabilities provided with OpenShift AI offer a solid foundation:
● Jupyter notebooks. Data scientists can conduct exploratory data science in JupyterLab with access to core AI/ML libraries and frameworks, including TensorFlow and PyTorch.
● Source-to-image (S2I). Models can be published as endpoints via S2I for integration into intelligent applications and can be rebuilt and redeployed based on changes to the source notebook.
● Optimized inference. Deep learning models can be converted into optimized inference engines to accelerate experiments.

Red Hat OpenShift AI includes key capabilities to accelerate the delivery of AI/ML models and applications in a seamless, consistent manner, at scale. The platform provides the development environment, tools, and frameworks that data scientists and machine learning teams need to build, deploy, and maintain AI/ML models in production. OpenShift AI streamlines the ML model delivery process from development to production deployment (model serving) with efficient life cycle management and pipeline automation. From the OpenShift AI console, AI teams can select from a pre-integrated, Red Hat supported set of tools and technologies or custom components that are enterprise managed, providing the flexibility that teams need to innovate and operate with efficiency. OpenShift AI also makes it easier for multiple teams to collaborate on one or more efforts in parallel.
OpenShift AI is compatible with leading AI tools and frameworks such as TensorFlow, PyTorch, and can work seamlessly with NVIDIA GPUs, to accelerate AI workloads. It provides pre-configured Jupyter notebook images with popular data science libraries. Other key features of OpenShift AI include:
● Collaborative Workspaces: OpenShift offers a collaborative workspace where teams can work together and collaborate on one or more models in parallel.
● Development Environments: ML teams can use Jupyter notebooks as a service using pre-built images, common Python libraries and open-source technologies such as TensorFlow and PyTorch to work on their models. In addition, administrators can add customized environments for specific dependencies or for additional IDEs such as RStudio and VSCode.
● Model Serving at scale: Multiple Models can be served for integration into intelligent AI-enabled applications using inferencing servers (for example, Intel OpenVINO, NVIDIA Triton) using GPU or CPU resources provided by the underlying OpenShift cluster without writing a custom API server.
● Innovate with open-source capabilities: Like Red Hat OpenShift, OpenShift AI integrates with open-source tools and leverages a partner ecosystem to enhance the capabilities of the platform, minimizing vendor lock-ins.
● Data Science Pipelines for GUI-based automation using OpenShift pipelines: OpenShift AI leverages OpenShift pipelines to automate ML workflow using an easy to drag-and-drop web UI as well as code driven development of pipelines using a Python SDK.
By using Red Hat OpenShift AI, enterprises can manage and maintain AI/ML models and the applications that use the models on a single, unified platform that IT organizations may already be using.
Red Hat OpenShift ODF
Red Hat OpenShift Data Foundation is a highly integrated collection of cloud storage and data services for Red Hat OpenShift Container Platform. It is available as part of the Red Hat OpenShift Container Platform Service Catalog, packaged as an operator to facilitate simple deployment and management.
Red Hat OpenShift Data Foundation services are primarily made available to applications by way of storage classes that represent the following components:
● Block storage devices, catering primarily to database workloads. Prime examples include Red Hat OpenShift Container Platform logging and monitoring, and PostgreSQL.
● Shared and distributed file system, catering primarily to software development, messaging, and data aggregation workloads. Examples include Jenkins build sources and artifacts, Wordpress uploaded content, Red Hat OpenShift Container Platform registry, and messaging using JBoss AMQ.
● Multicloud object storage, featuring a lightweight S3 API endpoint that can abstract the storage and retrieval of data from multiple cloud object stores.
● On premises object storage, featuring a robust S3 API endpoint that scales to tens of petabytes and billions of objects, primarily targeting data intensive applications. Examples include the storage and access of row, columnar, and semi-structured data with applications like Spark, Presto, Red Hat AMQ Streams (Kafka), and even machine learning frameworks like TensorFlow and PyTorch.
Red Hat OpenShift Data Foundation version 4.x integrates a collection of software projects, including:
● Ceph, providing block storage, a shared and distributed file system, and on-premises object storage
● Ceph CSI, to manage provisioning and lifecycle of persistent volumes and claims
● NooBaa, providing a Multicloud Object Gateway
● OpenShift Data Foundation, Rook-Ceph, and NooBaa operators to initialize and manage OpenShift Data Foundation services.
This chapter contains the following:
● Hardware and Software Components
The Cisco UCS X-Series Modular System, powered by 5th Gen Intel Xeon Scalable processors with Red Hat OpenShift AI solution, is designed to achieve the following objectives:
● Simplify and Streamline Operations for AI/ML: The solution aims to simplify operations for AI/ML tasks while ensuring seamless integration into existing deployments and processes.
● Flexible Design: With a flexible design, the solution offers options for various tools, technologies, and individual components, enabling easy modifications in terms of network, compute, and storage to accommodate evolving needs.
● Modular Architecture: The solution features a modular design where subsystem components such as links, interfaces, models, and platforms can be expanded or upgraded as required, providing scalability and adaptability.
● Scalability: As the deployment scales, compute resources can be effortlessly scaled up or out to meet growing demands, ensuring optimal performance and resource utilization.
● Resilient Infrastructure: The solution is built with a resilient design across all layers of the infrastructure, eliminating single points of failure and enhancing reliability and availability for critical AI/ML workloads.
The following sections explains the solution architecture and design that meets these design requirements.

This solution consists of:
● Cisco UCS X210c M7 Compute Nodes in Cisco UCS X9508 Chassis.
● VMware vSphere 8.0 cluster is formed with Cisco UCS X210c M7 Compute Nodes.
● Each compute node is equipped with the 5th Gen Intel Xeon Scalable processors.
● Red Hat OpenShift 4.14 cluster deployed on VMware vSphere 8.0U2 (Assisted Installer provisioned infrastructure). Control plane and worker nodes are running as virtual machines on VMware vSphere 8.0.U2 cluster.
● Large Language Models and other Generative AI models are running on the inferencing servers.
● Toolkit for deploying and serving Generative AI models like CPU based LLM inferencing on Llama2 models available in Hugging Face.
● Enterprise ready infrastructure On Red Hat OpenShift to run Intel IPEX with DeepSpeed using Kubeflow MPI operator.
● Red Hat OpenShift AI and OpenVINO operators for running pre-trained popular DL models to run on Intel® Xeon® Scalable processors.
Solution Topology
As shown in Figure 13 we deployed VMware based Red Hat OpenShift on Cisco X210c compute nodes powered by 5th Gen Intel Xeon Scalable processors.
It’s an enterprise-ready Red Hat OpenShift architecture with 3x control-plane nodes for HA. There is a 1x worker node configured specifically to run intel IPEX with DeepSpeed tests using MPI operator model. There is also a deployed Red Hat OpenShift AI to demonstrate a few Intel OpenVINO based pre-trained DL models using Jupyter notebook. Cisco Unified Computing System with 4th Generation Fabric Technology (4th Generation Fabric Interconnects 6536 and Cisco UCS X9108-IFM-25G IFM) provide 2x25GbE uplink network connectivity to a pair of Cisco Nexus switches deployed in a vPC configuration. Cisco Nexus Switches ensure high-bandwidth and lossless communication.

Hardware and Software Components
Table 1 lists the details about the hardware and software components used in this solution.
Table 1. Hardware and Software components
| Component name |
Details |
Image version |
Quantity |
| Computing |
Cisco UCS X-Series blade chassis can host combination of Cisco UCS X210c M7 compute nodes and a pool of IO resources that include GPU accelerators, disk storage and non-volatile memory. The Chassis has UCS 9108 100G IFM proving 100G connectivity to the compute nodes on each side of the Fabric. |
|
1 |
| Cisco UCS X210c M7 compute node |
Each node is equipped with 2x Intel 5th Gen Intel Xeon Scalable processors 8568Y+ each with 48 cores running at 2.3GHz base frequency. Each node has 16x 32G memory (total of 512GB) running at 5600 MTs. Each compute node has one Cisco UCS VIC 15231 providing 100Gbps connectivity on each side of the Fabric. |
5.2(1.240010) |
4 |
| Cisco UCS 6536 Fabric Interconnect |
Cisco UCS 6536 Fabric Interconnect providing both network connectivity and management capabilities for the system. |
4.3(2.230117) |
2 |
| Cisco Nexus Switch |
Cisco Nexus 93360YC-FX2 for high-bandwidth lossless connectivity |
NXOS version 10.2(5) |
2 |
| VMware vSphere |
VMware vSphere ESXi 8.0U2 Hypervisor |
8.0U2 |
4 |
| VMware vCenter Appliance |
VMware vCenter for managing vSphere environment 8.0.2.00000 |
8.0.2.00000 |
1 |
| Red Hat OpenShift |
Red Hat OpenShift Container Platform 4.14 |
4.14 |
1 |
| Intel IPEX |
Intel Extension for PyTorch |
2.2 |
|
This chapter contains the following:
● Cisco Intersight for Infrastructure
● Intel IPEX with DeepSpeed Benchmark
● Deploy Red Hat AI and Intel OpenVINO Toolkit
This chapter provides insight into the deployment process followed. The AI/ML infrastructure proposed in this solution incorporates Cisco UCS M7 Platform X-Series servers. We deployed VMware based Red Hat OpenShift on 4x X210c M7 blade servers. VMware vSphere 8 serves as the foundational design for containerized AI/ML workloads running on Red Hat OpenShift, Intel OpenVINO for inferencing model deployment and maintenance using Red Hat OpenShift AI.
Check Cisco UCS Hardware Compatibility List for Intel CPU support on Cisco UCS for the VMware vSphere version and upgrade UCS server firmware as needed.
Cisco Intersight for Infrastructure
Cisco UCS X-Series Configuration - Cisco Intersight Managed Mode can be shown with this configuration diagram:

The following stages are as follows:
1. Set Up Cisco UCS Fabric Interconnect for Cisco Intersight Managed Mode.
During the initial configuration, for the management mode the configuration wizard enables customers to choose whether to manage the fabric interconnect through Cisco UCS Manager or the Cisco Intersight platform. Customers can switch the management mode for the fabric interconnects between Cisco Intersight and Cisco UCS Manager at any time; however, Cisco UCS FIs must be set up in Intersight Managed Mode (IMM) for configuring the Cisco UCS X-Series system.
2. Claim a Cisco UCS Fabric Interconnect in the Cisco Intersight Platform.
After setting up the Cisco UCS 6536 Fabric Interconnect for Cisco Intersight Managed Mode, FIs can be claimed to a new or an existing Cisco Intersight account. When a Cisco UCS Fabric Interconnect is successfully added to Cisco Intersight, all future configuration steps are completed in the Cisco Intersight portal.
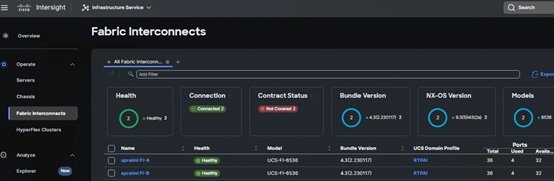
You can verify whether a Cisco UCS Fabric Interconnect is in Cisco UCS Manager managed mode or Cisco Intersight Managed Mode by clicking on the fabric interconnect name and looking at the detailed information screen for the FI.

3. Cisco UCS Domain Profile.
A Cisco UCS domain profile configures a fabric interconnect pair through reusable policies, allows configuration of the ports and port channels, and configures the VLANs and VSANs to be used in the network. It defines the characteristics of and configures the ports on the fabric interconnects. One Cisco UCS domain profile can be assigned to one fabric interconnect domain.
Some of the characteristics of the Cisco UCS domain profile are:
● A single domain profile is created for the pair of Cisco UCS fabric interconnects.
● Unique port policies are defined for the two fabric interconnects.
● The VLAN configuration policy is common to the fabric interconnect pair because both fabric interconnects are configured for the same set of VLANs.
● The Network Time Protocol (NTP), network connectivity, and system Quality-of-Service (QoS) policies are common to the fabric interconnect pair.

The Cisco UCS X9508 Chassis and Cisco UCS X210c M7 Compute Nodes are automatically discovered when the ports are successfully configured using the domain profile as shown in the following screenshot.

4. Server Profile Template.
A server profile template enables resource management by simplifying policy alignment and server configuration. A server profile template is created using the server profile template wizard. The server profile template wizard groups the server policies into the following four categories to provide a quick summary view of the policies that are attached to a profile:
◦ Compute policies: BIOS, boot order, and virtual media policies.
◦ Network policies: adapter configuration and LAN connectivity. The LAN connectivity policy requires you to create Ethernet network policy, Ethernet adapter policy, and Ethernet QoS policy.
◦ Storage policies: configuring local storage for application.
◦ Management policies: device connector, Intelligent Platform Management Interface (IPMI) over LAN, Lightweight Directory Access Protocol (LDAP), local user, network connectivity, Simple Mail Transfer Protocol (SMTP), Simple Network Management Protocol (SNMP), Secure Shell (SSH) and so on.
Some of the characteristics of the server profile template for our solution are:
◦ BIOS policy is created to specify various server parameters in accordance with the solution best practices.
◦ Boot order policy defines virtual media (KVM mapper DVD), local storage and UEFI Shell.
◦ IMC access policy defines the management IP address pool for KVM access.
◦ Local user policy is used to enable KVM-based user access.
◦ LAN connectivity policy is used to create virtual network interface cards (vNICs) — Various policies and pools are also created for the vNIC configuration.

5. Derive and deploy Server Profiles.
Server profiles are derived from server-profile templates and deployed on baremetal UCS servers that are claimed in Cisco Intersight. When the server profiles are deployed successfully, you can see the profile status as shown in the screenshot below.

Once the server profile is deployed, an automated OS install can be triggered from Cisco Intersight.
Note: We installed VMware ESXi 8.0U2 on the Cisco UCS X-Series X210c blade servers to facilitate VMware based Red Hat OpenShift on these servers.
Prior to deploying Red Hat OpenShift on VMware, make sure VMware ESXi is installed on all the nodes and the hosts are added to the vCenter. For version compatibility, see: https://ucshcltool.cloudapps.cisco.com/public/
Note: In our solution we installed VMware ESXi 8.0.u2 on the Cisco UCS X210c blade servers and the vCenter version used to manage these ESXi hosts are 8.0.2.00000.

● Deploy an installer workstation for deploying a Red Hat OpenShift cluster.
● Valid Red Hat account to access Red Hat Hybrid Cloud Console (HCC) for deploying OpenShift.
● Identify the vSphere infrastructure (hosts, cluster, storage) for hosting the OpenShift cluster.
● Identify a VLAN, IP subnet and DNS domain for the Red Hat OpenShift cluster to use:
◦ Add DNS records for API VIP and Ingress Virtual IP (VIP)
◦ Add DHCP pool or assign static IPs by providing IPs to the MAC addresses of the VMs
◦ Add NTP server for OpenShift cluster to use
◦ Add Gateway IP for OpenShift subnet to use
◦ Generate public SSH keys on the installer to enable SSH access to OpenShift cluster post-install
◦ Download VMware vCenter root CA certificates to installer’s system trust for secure access
◦ Download installation files, tools, and pull-secret from Red Hat HCC for VMware vSphere
● Install OpenShift using the Automated (Assisted Installer) or Installer Provisioned Infrastructure (IPI) method.
● After the deploying Red Hat OpenShift, perform post-deployment verification:
◦ Verify access to OpenShift cluster by navigation to cluster console URL
◦ Setup/Verify NTP setup on all OpenShift cluster virtual machines (master and worker nodes)
◦ Verify cluster is registered with console.redhat.com


Intel IPEX with DeepSpeed Benchmark
The Intel Extensions for PyTorch (IPEX) with benchmarking test for both single-node single processing and scaling to multiprocessors using DeepSpeed was performed on a VMware based Red Hat OpenShift worker node. VMware based Red Hat OpenShift was deployed on 4x Cisco UCS X210c blade servers. The OpenShift cluster is deployed with 3x control-plane nodes scheduled to take workload and 1x worker node to run Intel benchmark for IPEX with DeepSpeed.
IPEX with DeepSpeed uses Kubeflow’s Cloud-Native ML help machine learning (ML) engineers and data scientists to leverage cloud assets (public or on-premise) for ML workloads. Kubeflow Message Passing Interface (MPI) Operator, one of the core components of Kubeflow, makes it easy to run synchronized, allreduce model of distributed training on Kubernetes. On deploying MPI Operator, the deployment process creates a CustomResourceDefinition for an mpijob object, which is how you will define the MPIJob that you want the cluster to run. This will also create a namespace with all the required elements to deploy the operator.
MPI Operator defines a training job on a single CPU/GPU, multiple CPU/GPUs, and multiple nodes. It also implements a custom controller to manage the CRD, create dependent resources, and reconcile the desired states. MPI Operator contains a custom controller that listens for changes in MPIJob resources.
1. When a new MPIJob is created controller creates a configmap that contains a hostfile that lists the pods in the worker Statefulset and the available slots CPUs (or GPUs) in each pod.
2. It then creates a RBAC resources such as Role, ServiceAccount, RoleBinding to allow remote execution.
3. Once the pods are ready, it creates the launcher job. It runs under the ServiceAccount created in step 2 and sets up the necessary environment variables for executing mpirun commands remotely.
4. After the launcher job finishes, set the replicas to 0 in the worker StatefulSet.
This section explains the YAML definition for running IPEX with DeepSpeed MPIJobs. It also provides details on the baseline tests performed by running the Llama 2 models from Hugging Face.
The MPI operator-based IPEX 2.2 with DeepSpeed tests are run on a Red Hat OpenShift worker node.

Procedure 1. Perform the IPEX 2.2 with DeepSpeed tests on VMware based Red Hat OpenShift
Step 1. Download the Dockerfile from IPEX 2.2 GitHub link: https://github.com/intel/intel-extension-for-pytorch/blob/v2.2.0%2Bcpu/examples/cpu/inference/python/llm/Dockerfile
Step 2. Build the IPEX 2.2 Docker image using docker or podman commands:
docker build --network host --build-arg http_proxy=$http_proxy --build-arg https_proxy=$https_proxy --build-arg no_proxy="" -t pytorch-ipex22-deepspeed -f Dockerfile
Step 3. For tagging the image and setting up pull policy, see: https://docs.openshift.com/container-platform/4.14/openshift_images/managing_images/managing-images-overview.html
Step 4. Execute the following command to run the MPI training operator:
oc apply -k "github.com/kubeflow/training-operator/manifests/overlays/standalone?ref=v1.7.0"
Note: As mentioned earlier, IPEX with DeepSpeed uses Kubeflow’s MPI to simplify the execution of synchronized, allreduce model for distributed training on Kubernetes environment.
Step 5. Before applying the pytorch-llm-ipex-deepspeed yaml, it is recommended to apply the required feature gates. Feature gates are a set of key=value pairs that describe Kubernetes features. The following options can be enabled using featuregate yaml as shown below and applied on the worker node:
---
apiVersion: config.openshift.io/v1
kind: FeatureGate
metadata:
name: cluster
spec:
featureSet: CustomNoUpgrade
customNoUpgrade:
enabled:
- TopologyManagerPolicyOptions
- TopologyManagerPolicyAlphaOptions
- TopologyManagerPolicyBetaOptions
- CPUManagerPolicyOptions
- CPUManagerPolicyAlphaOptions
- CPUManagerPolicyBetaOptions
- MemoryManager
Note: For more information on CPU manager/topology manager policies fine-tuning, see: https://kubernetes.io/docs/tasks/administer-cluster/topology-manager/#topology-manager-policy-options
Step 6. Create and apply the following kubelet-config yaml to enable topology manager and CPU manager. Ensure that the kubelet-config yaml has “custom-kubelet” key with value “cpumanager-enabled”:
---
apiVersion: machineconfiguration.openshift.io/v1
kind: KubeletConfig
metadata:
name: cpumanager-enabled
spec:
machineConfigPoolSelector:
matchLabels:
custom-kubelet: cpumanager-enabled
kubeletConfig:
topologyManagerPolicy: single-numa-node
topologyManagerPolicyOptions:
prefer-closest-numa-nodes: "true"
cpuManagerPolicy: static
cpuManagerPolicyOptions:
full-pcpus-only: "true"
distribute-cpus-across-numa: "false"
align-by-socket: "false"
memoryManagerPolicy: Static
reservedMemory:
- limits:
memory: 1124M
numaNode: 0
evictionHard:
memory.available: "100M"
systemReserved:
cpu: 500m
memory: 512M
kubeReserved:
cpu: 500m
memory: 512M
Step 7. Also, it is important to apply latency tuning profile on the worker node. Follow this yaml sample to enable tuning of network-latency:
---
apiVersion: tuned.openshift.io/v1
kind: Tuned
metadata:
name: openshift-node-llm-compute
namespace: openshift-cluster-node-tuning-operator
spec:
profile:
- data: |
[main]
summary=Custom OpenShift node profile for LLM compute workloads
include=network-latency
[bootloader]
cmdline_openshift_node_llm_compute=+intel_pstate=active
name: <worker-node-name>
recommend:
- machineConfigLabels:
machineconfiguration.openshift.io/role: "worker"
priority: 20
profile: <worker-node-name>
Step 8. Based on the CPU and Memory allocation on the OpenShift worker node (VM). Assign the resources appropriately to the mpi-worker replicas in the pytorch-llm-ipex-deepspeed yaml manifest.
Note: We used static provisioning in the yaml manifest for the mpi-worker replicas, to share access to a directory named llm, which is mounted on an NVMe drive. NVMe drive of the node is leveraged for faster data access and performance. The mounted directory path is provided as the hostpath in the yaml manifest. This directory holds all the training data, models, and training scripts. Make sure the IPEX 2.2 based “run_generation_with_deepspeed_torch22” python script and the prompt file in the json format is loaded on to the mounted directory as per the instructions in the IPEX 2.2 GitHub link: https://github.com/intel/intel-extension-for-pytorch/tree/v2.2.0%2Bcpu/examples/cpu/inference/python/llm. Also, the Meta Llama 2 7b and 13b models from Hugging Face and the respective checkpoint files for these models are uploaded to the mounted folder as shown in the screenshot below. You can also use different directories and PVs for training data.

Note: Refer to Appendix A for the IPEX 2.2 python script and Appendix B, for the pytorch-llm-ipex-deepspeed yaml sample.
Step 9. Apply the pytorch-llm-ipex-deepspeed yaml after modifying the yaml based on your environment.
Step 10. OpenShift layer demands security context constraints (SCC) to be set prior running the mpijobs on the test nodes. By default, OpenShift does not allow containers to run as specific users/UIDs, and it randomizes them. While OpenSSH (for MPI) and OpenFOAM can be made to work with completely randomized UIDs, it's a lot of effort, and, for this example, it was decided to relax the SCC defaults to allow AnyUID with the command:
oc adm policy add-scc-to-user anyuid -z default
Note: For this solution, we limited our scope to testing DeepSpeed performance on a single Red Hat OpenShift VM with a single mpi-worker replica.
Using a script that varies hyperparameters for LLMs, we tested bfloat16 and int8 precisions based on Meta’s Llama 2 models:
● meta-llama/Llama-2-7b-hf
● meta-llama/Llama-2-13b-hf
We captured the performance on 5th Gen Intel Xeon Scalable processors by varying some of the parameters while running the benchmark scripts. When benchmarking using LLM-based models, it is important to understand the parameters associated with model training/inferencing performance. The following are some of the most important parameters (limited to those used in the DeepSpeed benchmark script):
● Tokens: in LLMs, tokens can be regarded as units of text that the models process and generate. They can represent an individual character, word, sub-word, or even larger linguistic unit, depending on the specific tokenization approach used. Tokens act as a bridge between the raw text data and the numerical representations that LLMs can work with.
● Tokenization: tokenization is the process of breaking a chunk of text into tokens. It involves segmenting the text into meaningful units to capture its semantic and syntactic structure. Various tokenization techniques are employed, such as word-level tokenization, subword-level tokenization, or character-level tokenization. Each technique has its advantages and tradeoffs, depending on the specific language and task requirements.
● Input tokens: for running the benchmark script, JSON file (prompts.json) with basic input prompts based on the varying input token sizes (input token size can be provided by the user) were used. The IPEX benchmark code reads the value that is provided and retrieves the correct prompt from the JSON file.
● Output tokens: this is the number of tokens it will end up sending to the screen in real-time (the output token size can also be provided by the user).
● Batch sizes: batching the dataset means dividing the datasets into smaller parts to be fed into the algorithm. The concept of batching is used in the scenario where multiple requests need to be processed and completed at once. Batch sizes can be loosely tied to the concept of number of concurrent user requests.
● First (1st) token latency: the latency of the 1st token signifies the time duration the LLM model takes to generate the initial token following receipt of a user prompt.
● Second (2nd) token latency: once the 1st token is generated, the time taken to provide the 2nd token is termed the 2nd token latency. The evaluation of token latencies plays a crucial role in establishing a positive user experience, maintaining conversation flow, enabling interactivity, and enhancing the effectiveness and engagement of language models across a wide array of applications.
Benchmark Results
We did performance characterization on meta-llama/Llama-2-7b-hf and meta-llama/Llama-2-13b-hf models. The increased memory capacity of the 5th Gen Intel Xeon Scalable processors allow for low-latency LLM execution with DeepSpeed on a single node, making it particularly suitable for conversational AI and text summarization applications. This evaluation focuses on the latency observed while executing the mentioned Llama 2 models on a single node with two sockets for both bfloat16 and int8 precisions. Support for SmoothQuant in the Intel Extension for PyTorch ensures good accuracy with int8 precision models.
Note: Though the Intel IPEX with DeepSpeed benchmark script supports different models, our testing efforts are focused on Meta Llama 2 models. This choice is driven by the recognition of Meta Llama 2 as a compelling alternative to ChatGPT LLM. Meta Llama 2 stands out for its optimized variations, enhanced safety measures, rendering it our preferred option for evaluation.
Considering the need for LLM applications to generate tokens rapidly to match the reading speed of fast readers, Intel has chosen token latency (the time taken to generate each token) as the primary performance metric to report. As a benchmark, the reading speed of a fast human reader, which equates to approximately 100ms per token, is used. Therefore, less than 100ms of 2nd token latency is regarded as an industry-accepted latency.
Various tests conducted on Cisco UCS X210c Compute Nodes with 8568Y+ CPUs in a VMware based Red Hat OpenShift Container Platform has demonstrated token latencies of less than100ms for meta-llama/Llama-2-7b-hf and meta-llama/Llama-2-13b-hf models, utilizing both weight-only-quantized int8 and bfloat16 precisions. These tests encompass model generation inference with low-precision scenarios across these two models, ensuring optimal performance and accuracy.
During the execution of the IPEX 2.2 DeepSpeed benchmark script, we maintained a consistent output tokens parameter set to 256 across all tests. Specifically, we focused on capturing the 2nd token latency for the models "meta-llama/Llama-2-7b-hf" and "meta-llama/Llama-2-13b-hf" with both bfloat16 and int8 precisions. Our tests involved varying the batch sizes to1, 4 and 8 for input token sizes 256,1024 and 2048.
The following graphs depict the latencies observed during greedy search for different precisions and benchmark parameters on VMware based OpenShift Container Platform deployed on Cisco UCS X210c Compute Nodes equipped with 5th Gen Intel Xeon Platinum 8568Y+ processors.
In Figure 14, we compared the results obtained while running the IPEX with DeepSpeed script on the Meta Llama 2 model with 7b parameters for weight-only-quantized int8 and bfloat16 precisions. In this comparison study, while the output tokens were set to 256, the 2nd token latency was captured by varying input tokens: 256, 1024 and 2048 with batch sizes: 1, 4 and 8. Varying batch sizes can be loosely tied to the number of concurrent users’ requests. From the graph, we see that the 2nd token latency is well within the 100ms.
The comparison study showed that the weight-only-quantized int8 performed better than with bfloat16, adhering to the expectations of a quantized model.
We also ran accuracy tests to verify the accuracy of the Meta Llama 2 models. For the models “meta-llama/Llama-2-7b-hf,” the accuracy obtained was 73.59 percent and “meta-llama/Llama-2-13b-hf” the accuracy obtained was 76.69 percent, meeting typical expectations for accuracy.
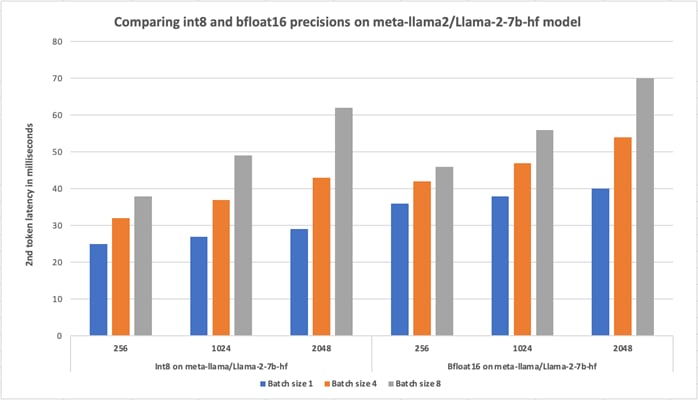
Figure 15 shows the performance of Meta Llama 2 model with 13b parameters for weight-only-quantized int8 and bfloat16 precisions. In this comparison study, while the output tokens were set to 256, the 2nd token latency was captured by varying input tokens: 256, 1024 and 2048 with batch sizes: 1, 4 and 8. The comparison study showed that the weight-only-quantized int8 performed better than with bfloat16 as expected. Results show that, with varying batch sizes and input tokens, the 2nd token latency remained less than 100ms.

We observed that the IPEX 2.2 with DeepSpeed test results on a VMware based Red Hat OpenShift worker node did not significantly differ from tests conducted on a baremetal node (Cisco UCS X210c M7 blade server) powered by the 5th Gen Intel Xeon Scalable processors (8568Y+). Tests on both these environments confirmed 2nd token latency of less than 100ms. This highlights that even in a virtualized environment, we could achieve near-native performance for GenAI workloads.
Deploying LLMs on Red Hat Single Node OpenShift (SNO)
Red Hat SNO offers a practical and an efficient solution for Edge computing deployments, addressing the unique challenges and requirements of Edge environments while providing the scalability and flexibility of Kubernetes-based container orchestration.
Red Hat SNO is increasingly being adopted for AI/ML workloads as it optimizes resource usage by consolidating all components onto a single node. This approach ensures efficient utilization of compute, storage, and memory resources, which is crucial for running resource-intensive AI/ML workloads. It offers a flexible, scalable, and secure platform for deploying AI/ML workloads, making it an attractive choice for organizations looking to harness the power of AI/ML technologies.
We leveraged the Red Hat SNO capabilities to validate Intel IPEX 2.2 with DeepSpeed test on a VMware based Red Hat SNO deployed on Cisco X210c blade server powered with 5th Gen Intel Xeon Scalable processors.
Deploy Red Hat AI and Intel OpenVINO Toolkit
Red Hat® OpenShift® AI is built using opensource technologies, provides trusted, operationally consistent capabilities for teams to experiment, serve models, and deliver innovative apps. It supports the full lifecycle of AI/ML experiments and models, on-premise and in the public cloud. Also offers a fully supported environment where ML models can be developed, trained, and tested quickly before being deployed in a real-world. This platform includes a wide range of commercially available partners and open-source tools and frameworks such as Jupyter Notebooks, TensorFlow, PyTorch, and OpenVINO for data scientists to use in their workflows. Red Hat OpenShift Data Science provides a secure and scalable environment. We leveraged Intel OpenVINO tool kit and deployed a few models to demonstrate the ease with which models can be deployed and tested.
To deploy Red Hat AI and OpenVINO tool kit operators, ensure these prerequisites are met:
1. Verify/Setup an image repository for the Red Hat OpenShift Cluster.
2. OpenShift Data Foundation (ODF) is deployed on VMware vSphere. For details, see: https://access.redhat.com/documentation/en-us/red_hat_openshift_data_foundation/4.14/html-single/deploying_openshift_data_foundation_on_vmware_vsphere/index
3. Node Feature Discovery Operator is applied to detect CPUs that support Intel AMX. kernel detects Intel AMX feature at run-time, so explicit enablement and configuration is not required. NFD operator is deployed to allow easy detection and consumption of Intel features and accelerators such as Intel AMX.

Once applied successfully, you will see the labels that verify Intel AMX is available as shown in the screenshot below:

Procedure 1. Deploy Red Hat AI and OpenVINO tool kit operators
Step 1. Install Red Hat OpenShift AI from the OperatorHub.

Step 2. Install Intel OpenVINO Operator from the OperatorHub.

Once both are installed successfully, you will see them listed under installed Operator:

Step 3. Create a Notebook instance in OpenVINO.

Step 4. When the Red Hat AI is successfully installed, you can launch the Red Hat AI console as shown below:

Step 5. Create a Jupyter Notebook using IntelVINO tool kit. When it is successfully installed, you will see the “launch application” button activated.

Step 6. When launching the application, you will be able to see the option to access the terminal.

You are now set to use the Intel OpenVINO tool kit and run models on Jupyter Notebook.
Step 7. Clone the Open Model Zoo GitHub repository that contains the demo source code:
git clone --recurse-submodules https://github.com/openvinotoolkit/open_model_zoo.git
Step 8. To see all compiled instructions and control the usage of Intel AMX, set the ONEDNN_VERBOSE environment variable:
export ONEDNN_VERBOSE=1
Sample Models Deployed on Red Hat AI using Intel OpenVINO Toolkit
Utilizing the Intel OpenVINO toolkit, it's possible to develop chatbots empowered by LLMs. These chatbots excel in handling intricate, multi-turn queries and engage users in a conversational manner akin to human interaction, leveraging contextual memory. With Language Models, chatbots are evolving to exhibit heightened intelligence, adept at comprehending and delivering responses to human language with impressive precision.
You can setup a Llama 2 based chatbot with OpenVINO tool kit easily. OpenVINO uses Python and does the all the job of installing dependencies, pre-trained model downloading and conversion, and compressing the model weights to the desired data types with optimization. Opensource Python libraries like Gradio can be used to build interactive user-friendly interfaces in real-time. Gradio provides a quick and an easy means to demonstrate the Llama 2 model using a user-friendly web interface, ensuring accessibility for all users.
For more information on setting up a chatbot using OpenVINO and chatbot pipeline for Gradio, see: https://docs.openvino.ai/2024/notebooks/254-llm-chatbot-with-output.html
In this section, model deployments tailored for various GenAI workloads such as NLP tasks like BERT, text-to-image generation models like Stable Diffusion, and image-to-image conversion models such as Monocular Depth Estimation are demonstrated. These models are deployed on a Red Hat OpenShift cluster equipped with Red Hat AI and the OpenVINO toolkit.
BERT Language Model
Bidirectional Encoder Representations from Transformers (BERT) is a powerful pre-trained language model designed for NLP tasks like sentiment analysis (movie reviews), Q/A (chatbots), text predictions (writing emails), text generation (articles) and so on.
● BERT Q/A model application reads command line parameters as it runs and loads a model to OpenVINO™ Runtime plugin.
● It fetches data from the user-provided url to populate the text based on the "context” and the text is then used to search answers for the questions asked.
● When the question answer model is served, the answers are like a natural conversation.
● The input URL to this BERT Q/A is on Sesame Street, an American educational children’s series that combines live-action, Sketch, comedy, animation, and puppetry.
● BERT has an automatic evaluation metric for text generation called “score.”
● Score in Bert computes a similarity score for each token in the input sentence (question) with each token in the reference sentence (pre-trained model).

Procedure 1. Run BERT language model
Step 1. In the Jupyter Notebook terminal, navigate to the directory path: open_model_zoo/demos/bert_question_answering_demo/python, there is a file named models.lst that contains the list of models supported by the demo and can be used to download them with the following command:
omz_downloader --list models.lst
Step 2. To open the question and answer chatbot, run the following command:
python3 bert_question_answering_demo.py —vocab=/opt/app-root/src/open_model_zoo/demos/bert_question_answering_demo/python/intel/bert-small-uncased-whole-word-masking-squad-0001/vocab.txt --model=/opt/app-root/src/open_model_zoo/demos/bert_question_answering_demo/python/intel/bert-small-uncased-whole-word-masking-squad-0001/FP32/bert-small-uncased-whole-word-masking-squad-0001.xml --input_names="input_ids,attention_mask,token_type_ids" --output_names="output_s,output_e" --input="https://en.wikipedia.org/wiki/Bert_(Sesame_Street)"

Stable Diffusion Model
Stable Diffusion XL (SDXL), as its name implies, represents the latest advancement in image generation models, aiming to produce highly realistic outputs. This model offers enhanced imagery and composition compared to its predecessors, including Stable Diffusion 2.1. With SDXL, users can now generate lifelike images with improved face rendering, incorporate legible text seamlessly into images, and create natural and visually appealing art using concise prompts.

Large-scale diffusion-based generative models have demonstrated significant success in generating high-resolution images based on text prompts. During the processing pipeline, the base image undergoes iterative refinement, initially containing random noise while being conditioned on text prompts. At the outset of processing, the input text prompt undergoes sampling to generate an image closely aligned with the prompt's content. Utilizing ensemble models, text-to-image diffusion models advance through various synthesis stages.
To ensure training efficiency, a single model is initially trained and subsequently partitioned into specialized models, each dedicated to specific stages of the iterative generation process. This ensemble of diffusion models, referred to as eDiff-I, achieves enhanced text alignment while upholding consistent inference computation costs and maintaining high visual quality, surpassing previous large-scale text-to-image diffusion models.
Figure 16 illustrates the process, where the base model generates latent representations (with noise), further refined by a specialized refinement model for final denoising steps. In SDXL, the base model generates latents of the desired output size, followed by the generation of a specialized high-resolution model in the subsequent step. This is accomplished through a technique known as SDEdit (or "image to image"), applied to the latents generated in the first step, utilizing the same input prompt.
For more information on SDEdit, see: https://huggingface.co/docs/diffusers/en/api/pipelines/stable_diffusion/img2img
Procedure 1. Generate a text-to-image model using SDXL
Step 1. Install all the required packages. For using SDXL model, we will start with the base model part, which is responsible for the generation of images of the desired output size. stable-diffusion-xl-base-1.0 is available for downloading via the HuggingFace hub.
Note: HuggingFace already provides a ready-to-use model in OpenVINO format compatible with Optimum Intel.
Step 2. Model loading - to load an OpenVINO model and run an inference with OpenVINO Runtime, you need to replace diffusers StableDiffusionXLPipeline with Optimum OVStableDiffusionXLPipeline by importing using from optimum.intel.openvino import OVStableDiffusionXLPipeline.
Step 3. Select the inference device for SDXL base model for running inference. Once the device is selected, compilation process starts and compiles vae_decoder, text_encoder, vae_encoder, and so on. VAE stands for Variable Auto Encoder which is part of the neural network model in Stable Diffusion. It is responsible for encoding and decoding images from latent space to pixel space. In Stable Diffusion, images are generated in latent space and then converted into a higher-quality image with the help of VAE.

Step 4. Run the text-to-image pipeline, run the model for the generation of images using text prompts. You can choose to alter the image size to reduce the required memory by decrease num_inference_steps and image size (using height and width). You can modify them to suit your needs depending on the target hardware. While running this pipeline the model generates the base image.
Step 5. For the prompt, input as shown below:
prompt = "cute cat 4k, high-res, masterpiece, best quality, soft lighting, dynamic angle"
image = text2image_pipe(prompt, num_inference_steps=15, height=512, width=512, generator=np.random.RandomState(314)).images[0]
image.save("cat.png")

Step 6. Next, for a specialized high-resolution model for the refinement of latents previously generated, use the same prompt. The Stable Diffusion XL Refiner model is designed to transform regular images into high definition images with the help of user-specified prompt text. It can be used to improve the quality of image generation after the Stable Diffusion XL Base. The refiner model accepts latents produced by the SDXL base model and text prompt for improving generated image.
Step 7. With the following prompt, input the vae-decoder and the encoder compilation starts and a professional high definition image of the cat is generated.
prompt = "cute cat 4k, high-res, masterpiece, best quality, soft lighting, dynamic angle"
latents = base(prompt, num_inference_steps=15, height=512, width=512, generator=np.random.RandomState(314), output_type="latent").images[0]


Monocular Depth Estimation
Monocular Depth Estimation involves estimating scene depth using a single image from a sole source. The Stable Diffusion model, powered by MiDaS, is capable of inferring depth from an image. This model enables the conditioning of new image generation with text prompts and initial images, alongside depth_map preservation for image structure.
With applications spanning robotics, 3D reconstruction, medical imaging, and autonomous systems, Monocular Depth Estimation holds significant potential. MiDaS, developed by the Intelligent Systems Lab at Intel, leverages MidasNet, a model trained on a blend of diverse datasets.
The model accepts a blob input comprising a single RGB image sized 1x3x384x384. It outputs an inverse depth map, which is defined up to an unknown scale factor.
For more information on MiDaS for monocular depth estimation, see: https://huggingface.co/docs/diffusers/v0.27.0/en/api/pipelines/stable_diffusion/depth2img
Procedure 1. Generate Depth Estimated Image from a Reference Image
In this model, you provide an image file at the prompt. This goes through inference to produce monodepth image.
Step 1. Create a monodepth image of an originally input image, import all required packages to run this model:
import sys
import time
from pathlib import Path
import cv2
import matplotlib.cm
import matplotlib.pyplot as plt
import numpy as np
from IPython.display import (
HTML,
FileLink,
Pretty,
ProgressBar,
Video,
clear_output,
display,
)
from openvino.runtime import Core
sys.path.append("../utils")
from notebook_utils import load_image
Step 2. Load the model in OpenVINO Runtime. The model is in the OpenVINO Intermediate Representation (IR) format. So, the model’s .xml and .bin files get downloaded.

Step 3. Set the device type as CPU and provide the model path:
DEVICE = "CPU"
MODEL_FILE = "model/MiDaS_small.xml"
model_xml_path = Path(MODEL_FILE)
Step 4. The input image is loaded, and you can edit the size of the input image.

This is the input image:

Step 5. Run inferencing on this image:

Display monocular depth estimated image:

Procedure 2. Generate Depth Estimated Video from a reference Video Clip
Similarly, you can provide a video input file to the model to produce a monodepth video based on the video input file.
Step 1. Load the video from a VIDEO_FILE, set in the Video Settings cell above. Open the video to read the frame width and height and fps, and compute values for these properties for the monodepth video. only the first 100 frames are processed in order to quickly check that everything works. Change NUM_FRAMES in the prompt to modify this setting. In order to process the whole video set NUM_FRAMES to 0. And create the o/p directory for the generated video file.
![]()

The generated video is saved to the output directory path set in the previous step.

The generated video is displayed as shown below. It also shows the frames processed in seconds (FPS), and the total inferencing time:

The integration of Cisco UCS X-Series servers with Red Hat OpenShift, managed via Cisco Intersight and powered by Intel Xeon Scalable Processors, provides a holistic solution for optimizing inferencing generative AI workloads. This cohesive ecosystem streamlines management through Cisco Intersight, leveraging its user-friendly interface for simplified operations. With the robust computational capabilities of Intel Xeon Scalable Processors, organizations can efficiently handle demanding AI tasks. Furthermore, the containerized platform offered by Red Hat OpenShift ensures enhanced scalability, flexibility, and built-in security measures, facilitating seamless deployment and lifecycle management of AI workloads. By leveraging this solution, organizations can achieve enhanced performance and agility to meet evolving business needs effortlessly, whether deploying models on-premise, in the public cloud, or at the edge.
Sindhu Sudhir, Technical Marketing Engineer, Cisco Systems, Inc.
Sindhu is a Technical Marketing Engineer at Cisco, specializing in UCS data center solutions. Her expertise revolves around software-defined architectures, particularly with a focus on container-based solutions. Sindhu possesses a strong passion for open-source technologies, cloud-native solutions, and infrastructure automation for the Cisco UCS platform.
Abirami Prabhakaran, Principal Engineer, Intel Corporation
Abirami (Abi) Prabhakaran is currently focusing on delivering optimized Enterprise AI reference architectures with OEMs. Working across Intel and with OEM/ISV partners, she defines and delivers Xeon solutions for Enterprise AI, optimizing performance across use-cases on a distributed HW/SW stack. Abi holds a master’s degree in computer engineering from George Mason University, Virginia.
Acknowledgements
For their support and contribution to the design, validation and review of this Cisco Validated Design, the authors would like to thank:
● Babu Mahadevan, Cisco Systems, Inc.
● Sankalp Ramanujam, Intel Corporation
● Arianna Choing, Intel Corporation
● Marcin Hoffmann, Intel Corporation
● Pawel P Adamczyk, Intel Corporation
● Mishali Naik, Intel Corporation
● Amy M Wilson, Intel Corporation
● David D Hammond, Intel Corporation
Appendix
This appendix contains the following:
● Appendix A – Dockerfile for IPEX 2.2 and other Yaml References
● Appendix B – Yaml and Checkpoint Files
Appendix A – Dockerfile for IPEX 2.2 and other Yaml References
In this section, you will find Dockerfile for pytorch-ipex22-deepspeed Docker image and the IPEX 2.2 python script for running the DeepSeed benchmark tests.
● IPEX 2.2 Dockerfile for pytorch-ipex22-deepspeed Docker image:
# Copyright (c) 2023 Intel Corporation
# SPDX-License-Identifier: Apache-2.0
# Image for running Hugging Face LLM workloads using Rocky Linux 8.9, IPEX and DeepSpeed
FROM rockylinux:8.9
# Set default shell to /bin/bash
SHELL ["/bin/bash", "-eo", "pipefail", "-c"]
# Fix repo version to Rocky Linux 8.9
RUN echo "8.9" > /etc/yum/vars/releasever
# Install essential packages
RUN dnf -y install epel-release \
&& dnf makecache --refresh \
&& dnf install -y \
cmake-3.20.2 \
findutils-4.6.0 \
bzip2-1.0.6 \
gcc-8.5.0 \
gcc-c++-8.5.0 \
gcc-toolset-12-12.0 \
gcc-toolset-12-runtime-12.0 \
git-2.39.3 \
gperftools-devel-2.7-9.el8 \
libatomic-8.5.0 \
libfabric-1.18.0 \
procps-ng-3.3.15 \
python3-distutils-extra-2.39 \
python39-3.9.18 \
python39-devel-3.9.18 \
python39-pip-20.2.4 \
unzip-6.0 \
wget-1.19.5 \
which-2.21 \
&& dnf clean all \
&& alternatives --set python /usr/bin/python3.9 \
&& ln -s /usr/bin/pip3 /usr/bin/pip \
&& pip install --no-cache-dir --upgrade pip==23.2.1
# Install Intel OpenMP
RUN echo $'[oneAPI]\n\
name = Intel® oneAPI repository\n\
baseurl = https://yum.repos.intel.com/oneapi\n\
enabled = 1\n\
gpgcheck = 1\n\
repo_gpgcheck = 1\n\
gpgkey = https://yum.repos.intel.com/intel-gpg-keys/GPG-PUB-KEY-INTEL-SW-PRODUCTS-2023.PUB\n\
' > /tmp/oneAPI.repo \
&& mv /tmp/oneAPI.repo /etc/yum.repos.d \
&& dnf install -y intel-oneapi-openmp-2023.2.1 \
&& dnf clean all
# Install PSM3 libraries
RUN wget --progress=dot:mega https://downloadmirror.intel.com/789689/IntelEth-FS.RHEL88-x86_64.11.5.1.1.1.tgz -O /tmp/IntelEth-FS.RHEL88-x86_64.11.5.1.1.1.tgz \
&& tar -zxvf /tmp/IntelEth-FS.RHEL88-x86_64.11.5.1.1.1.tgz -C /tmp \
&& yum -y --disablerepo=* localinstall /tmp/IntelEth-FS.RHEL88-x86_64.11.5.1.1.1/repos/IEFS_PKGS/RPMS/libpsm3-fi-11.5.1.1-1.x86_64.rpm \
&& rm -Rf /tmp/IntelEth-FS.RHEL88-x86_64.11.5.1.1.1 /tmp/IntelEth-FS.RHEL88-x86_64.11.5.1.1.1.tgz \
&& dnf clean all
# Install PyTorch and dependencies
RUN pip install torch==2.1.2 --index-url https://download.pytorch.org/whl/cpu
RUN pip install ninja==1.11.1.1 accelerate==0.25.0 sentencepiece==0.1.99 protobuf==4.25.1 datasets==2.15.0 transformers==4.31.0 wheel==0.42.0
# Install IPEX
RUN pip install intel_extension_for_pytorch==2.1.100
# [Optional] install neural-compressor for GPT-J static quantization and running GPTQ (see below)
RUN pip install neural-compressor==2.3.1
# Install TorchCCL
RUN git clone --branch v2.1.0+cpu https://github.com/intel/torch-ccl \
&& cd torch-ccl \
&& git submodule sync && git submodule update --init --recursive \
&& sed -i "/'include\/\*.h\*',/a\\\t\t'include/oneapi/\*',\n\t\t'include/oneapi/ccl/\*',\n\t\t'include/oneapi/ccl/native_device_api/\*',\n\t\t'include/oneapi/ccl/native_device_api/empty/\*',\n\t\t'include/oneapi/ccl/native_device_api/sycl/\*'," setup.py \
&& python setup.py bdist_wheel \
&& pip install dist/*.whl \
&& cd .. \
&& rm -Rf torch-ccl
# Install mpi4py
RUN source /usr/local/lib64/python3.9/site-packages/oneccl_bindings_for_pytorch/env/setvars.sh \
&& SETUPTOOLS_USE_DISTUTILS=stdlib pip install --no-cache-dir mpi4py==3.1.4
# Install Deepspeed
RUN git clone --branch gma/run-opt-branch https://github.com/delock/DeepSpeedSYCLSupport \
&& cd DeepSpeedSYCLSupport \
&& git checkout 94873fe12cab7fc3b5729609e7e237de6e4b3951 \
&& pip install -r requirements/requirements.txt \
&& source scl_source enable gcc-toolset-12 \
&& python setup.py bdist_wheel \
&& pip install dist/*.whl \
&& cd .. \
&& rm -Rf DeepSpeedSYCLSupport
● IPEX 2.2 Python Script:
#!/usr/bin/env python
# -*- coding: utf-8 -*-
"""This is script is based on https://github.com/intel-innersource/
frameworks.ai.nlp-toolkit.intel-nlp-toolkit/blob/llm/examples/
huggingface/pytorch/text-generation/inference/run_generation_with_deepspeed.py
It's not intended for external distribution, and it suffers continues changes.
The use of this script is on your own risk."""
import gc
import json
import math
import pathlib
import os
import time
from argparse import ArgumentParser
import re
import torch
import deepspeed
from deepspeed.accelerator import get_accelerator
import deepspeed.comm as dist
from transformers.models.bloom.modeling_bloom import BloomBlock as BloomBlock
from transformers import (
AutoConfig,
AutoModelForCausalLM,
AutoTokenizer,
LlamaTokenizer,
T5ForConditionalGeneration,
)
# supported models now
MODEL_CLASSES = {
"gpt-j": (AutoModelForCausalLM, AutoTokenizer),
"gptj": (AutoModelForCausalLM, AutoTokenizer),
"gpt-neox": (AutoModelForCausalLM, AutoTokenizer),
"gptneox": (AutoModelForCausalLM, AutoTokenizer),
"llama": (AutoModelForCausalLM, LlamaTokenizer),
"opt": (AutoModelForCausalLM, AutoTokenizer),
"falcon": (AutoModelForCausalLM, AutoTokenizer),
"chatglm": (AutoModelForCausalLM, AutoTokenizer),
"bloom": (AutoModelForCausalLM, AutoTokenizer),
"codegen": (AutoModelForCausalLM, AutoTokenizer),
"chatglm": (AutoModelForCausalLM, AutoTokenizer),
"gptbigcode": (AutoModelForCausalLM, AutoTokenizer),
"t5": (T5ForConditionalGeneration, AutoTokenizer),
"mistral": (AutoModelForCausalLM, AutoTokenizer),
"auto": (AutoModelForCausalLM, AutoTokenizer),
}
# the Deepspeed team made these so it's super fast to load (~1 minute),
# rather than wait 10-20min loading time.
tp_presharded_models = [
"microsoft/bloom-deepspeed-inference-int8",
"microsoft/bloom-deepspeed-inference-fp16",
]
t_start = time.time()
parser = ArgumentParser()
parser.add_argument(
"-m",
"--model-id",
type=str,
default="EleutherAI/gpt-j-6b",
help="the huggingface model id",
)
parser.add_argument(
"--dtype",
type=str,
help="float16 or bfloat16",
choices=["bfloat16", "float32"],
default="bfloat16",
)
parser.add_argument(
"--batch-size", "--batch-size", default=1, type=int, help="batch size"
)
parser.add_argument("--num-iter", default=50, type=int, help="num iter")
parser.add_argument("--num-warmup", default=5, type=int, help="num warmup")
parser.add_argument(
"--benchmark", action="store_true", help="additionally run benchmark"
)
parser.add_argument("--greedy", action="store_true")
parser.add_argument("--profile", action="store_true")
parser.add_argument("--deployment-mode", action="store_true")
parser.add_argument("--ki", action="store_true")
parser.add_argument(
"--max-new-tokens", default=32, type=int, help="output max new tokens"
)
parser.add_argument("--input-tokens", default="32", type=str)
parser.add_argument("--prompt", default=None, type=str)
parser.add_argument("--ipex", action="store_true", help="ipex is not enabled now")
parser.add_argument(
"--ipex-weight-only-quantization",
action="store_true",
help="use ipex weight-only quantization",
)
parser.add_argument(
"--local_rank", required=False, type=int, help="used by dist launchers"
)
parser.add_argument(
"--int8-bf16-mixed",
action="store_true",
help="by default it is int8-fp32 mixed, to enable int8 mixed amp bf16 (work on platforms like SPR)",
)
parser.add_argument("--print-memory", action="store_true")
parser.add_argument("--token-latency", action="store_true")
parser.add_argument(
"--lowp-mode",
choices=["AUTO", "BF16", "FP32", "INT8", "FP16"],
default="AUTO",
type=str,
help="low precision mode for weight only quantization. "
"It indicates data type for computation for speedup at the cost "
"of accuracy. Unrelated to activation or weight data type."
"It is not supported yet to use lowp_mode=INT8 for INT8 weight, "
"falling back to lowp_mode=BF16 implicitly in this case."
"If set to AUTO, lowp_mode is determined by weight data type: "
"lowp_mode=BF16 is used for INT8 weight "
"and lowp_mode=INT8 used for INT4 weight",
)
parser.add_argument(
"--weight-dtype",
choices=["INT8", "INT4"],
default="INT8",
type=str,
help="weight data type for weight only quantization. Unrelated to activation data type or lowp-mode.",
)
parser.add_argument(
"--config-file", default=None, type=str, help="specific configuration file"
)
def validate_args(args_):
if not args_.num_iter >= 1:
parser.error("--num-iter minimum value is 1")
if not args.num_warmup >= 0:
parser.error("--num-warmup minimum value is 0")
if not args_.num_iter > args_.num_warmup:
parser.error("--num-iter needs to be greater than --num-warmup")
args = parser.parse_args()
validate_args(args)
num_tokens = args.max_new_tokens
# import extension
if args.ipex:
import intel_extension_for_pytorch as ipex
torch._C._jit_set_texpr_fuser_enabled(False)
try:
ipex._C.disable_jit_linear_repack()
except Exception:
pass
rank = int(os.environ.get("PMI_RANK"))
world_size = int(os.environ.get("PMI_SIZE"))
os.environ["RANK"] = str(rank)
os.environ["WORLD_SIZE"] = str(world_size)
deepspeed.init_distributed(
get_accelerator().communication_backend_name())
def print_rank0(*msg):
if rank != 0:
return
print(*msg)
model_name = args.model_id
if args.int8_bf16_mixed:
load_dtype = torch.bfloat16
infer_dtype = torch.bfloat16
else:
if args.dtype == "bfloat16":
load_dtype = torch.bfloat16
infer_dtype = torch.bfloat16
else:
load_dtype = torch.float32
infer_dtype = torch.float32
tp_presharded_mode = True if model_name in tp_presharded_models else False
print_rank0(f"*** Loading the model {model_name}")
model_type = next((x for x in MODEL_CLASSES.keys() if x in model_name.lower()), "auto")
model_class = MODEL_CLASSES[model_type]
tokenizer = model_class[1].from_pretrained(model_name, trust_remote_code=True)
if model_type == "auto":
if args.config_file is None:
config = AutoConfig.from_pretrained(
args.model_id, torchscript=True, trust_remote_code=True
)
else:
config = AutoConfig.from_pretrained(
args.config_file, torchscript=True, trust_remote_code=True
)
if re.search("falcon", config.architectures[0], re.IGNORECASE) or re.search(
"rw", config.architectures[0], re.IGNORECASE
):
model_type = "falcon"
if model_type == "falcon":
model_input_names = ["input_ids", "attention_mask"]
tokenizer.model_input_names = model_input_names
if args.config_file is None:
config = AutoConfig.from_pretrained(
args.model_id, torchscript=True, trust_remote_code=True
)
else:
config = AutoConfig.from_pretrained(
args.config_file, torchscript=True, trust_remote_code=True
)
if not hasattr(config, "text_max_length") and args.prompt is None:
config.text_max_length = int(args.input_tokens) + int(args.max_new_tokens)
if not hasattr(config, "lm_head_generation"):
config.lm_head_generation = True
# use one of these args to `init_inference`
# 1. injection_policy is the slower version, but it's plain pytorch so it'll always work
# 2. replace_with_kernel_inject is the faster one (fast fused kernels)
kernel_inject = args.ki
if args.benchmark:
get_accelerator().empty_cache()
gc.collect()
deepspeed.runtime.utils.see_memory_usage("pre-from-pretrained", force=True)
# Construct model with fake meta tensors, later will be replaced during ds-inference ckpt load
if world_size == 1 or model_type in ["falcon", "t5", "mistral"]:
model = model_class[0].from_pretrained(
model_name,
config=config,
low_cpu_mem_usage=True,
torch_dtype=load_dtype,
trust_remote_code=True,
)
else:
with deepspeed.OnDevice(dtype=load_dtype, device="meta"):
model = (
model_class[0].from_config(config, trust_remote_code=True).to(load_dtype)
)
if args.benchmark:
deepspeed.runtime.utils.see_memory_usage("post-from-pretrained", force=True)
model = model.eval()
model = model.to(memory_format=torch.channels_last)
if args.benchmark:
get_accelerator().empty_cache()
gc.collect()
deepspeed.runtime.utils.see_memory_usage("post-init-ds-zero-init", force=True)
# Deepspeed-Inference Loading
if args.benchmark:
get_accelerator().empty_cache()
gc.collect()
deepspeed.runtime.utils.see_memory_usage("pre-ds-inference-init", force=True)
if kernel_inject:
kwargs = dict(replace_with_kernel_inject=True)
else:
kwargs = dict(replace_with_kernel_inject=False)
repo_root = model_name
model = deepspeed.init_inference(
model,
mp_size=world_size,
base_dir=repo_root,
dtype=infer_dtype,
checkpoint=repo_root+"/checkpoints.json",
**kwargs,
)
dist.barrier()
if args.benchmark:
get_accelerator().empty_cache()
gc.collect()
deepspeed.runtime.utils.see_memory_usage("post-ds-inference-init", force=True)
model = model.module
if args.benchmark:
t_ready = time.time()
# to ipex
if args.ipex:
ipex_woq_enabled = args.ipex_weight_only_quantization
if ipex_woq_enabled:
weight_dtype = torch.quint4x2 if args.weight_dtype == "INT4" else torch.qint8
if args.lowp_mode == "INT8":
lowp_mode = ipex.quantization.WoqLowpMode.INT8
elif args.lowp_mode == "FP32":
lowp_mode = ipex.quantization.WoqLowpMode.NONE
elif args.lowp_mode == "FP16":
lowp_mode = ipex.quantization.WoqLowpMode.FP16
elif args.lowp_mode == "BF16":
lowp_mode = ipex.quantization.WoqLowpMode.BF16
else: # AUTO
if weight_dtype == torch.quint4x2:
lowp_mode = ipex.quantization.WoqLowpMode.INT8
else:
lowp_mode = ipex.quantization.WoqLowpMode.BF16
qconfig = ipex.quantization.get_weight_only_quant_qconfig_mapping(
weight_dtype=weight_dtype, lowp_mode=lowp_mode
)
model = ipex.optimize_transformers(
model.eval(),
dtype=infer_dtype,
quantization_config=qconfig if ipex_woq_enabled else None,
inplace=True,
deployment_mode=args.deployment_mode,
)
# Generate
print_rank0(f"*** Starting to generate {num_tokens} tokens with bs={args.batch_size}")
num_beams = 1 if args.greedy else 4
generate_kwargs = dict(do_sample=False, num_beams=num_beams, max_new_tokens=args.max_new_tokens, min_new_tokens=args.max_new_tokens)
if args.token_latency:
if not hasattr(model.config, "token_latency"):
model.config.token_latency = True
if re.search("gptbigcode", config.architectures[0], re.IGNORECASE):
model_type = "gptbigcode"
elif re.search("t5", model.config.architectures[0], re.IGNORECASE):
generate_kwargs["max_length"] = generate_kwargs["max_new_tokens"]
generate_kwargs.pop("max_new_tokens")
print_rank0(f"Generate args {generate_kwargs}")
# input tokens
input_sentences = []
current_path = pathlib.Path(__file__).parent.resolve()
with open(file=str(current_path) + "/prompt.json", encoding="utf-8") as f:
prompt_pool = json.load(f)
if model_type == "gptj":
model_type = "gpt-j"
if model_type == "gptneox":
model_type = "gpt-neox"
if args.prompt is not None:
input_sentences.append(args.prompt)
elif model_type == "auto":
raise SystemExit(
"[ERROR] model prompt is not supported, please use --prompt for this model: "
+ args.model_id
)
elif int(args.input_tokens) > 8192:
input_sentences.append(
prompt_pool[model_type]["8192"] * int(int(args.input_tokens) / 8192)
)
elif args.input_tokens in prompt_pool[model_type]:
input_sentences.append(prompt_pool[model_type][args.input_tokens])
else:
raise SystemExit("[ERROR] Plese use --prompt if want to use custom input.")
if args.batch_size > len(input_sentences):
# dynamically extend to support larger bs by repetition
input_sentences *= math.ceil(args.batch_size / len(input_sentences))
inputs = input_sentences[: args.batch_size]
input_size = tokenizer.batch_encode_plus(inputs, return_tensors="pt").input_ids.size(
dim=1
)
print("*** Prompt size: ", input_size)
def generate():
"""returns a list of zipped inputs, outputs and number of new tokens"""
input_tokens = tokenizer.batch_encode_plus(inputs, return_tensors="pt")
for t in input_tokens:
if torch.is_tensor(input_tokens[t]):
input_tokens[t] = input_tokens[t].to(
get_accelerator().current_device_name()
)
outputs = model.generate(**input_tokens, **generate_kwargs)
gen_ids = outputs[0] if args.token_latency else outputs
input_tokens_lengths = [x.shape[0] for x in input_tokens.input_ids]
output_tokens_lengths = [x.shape[0] for x in gen_ids]
total_new_tokens = [
o - i if model.config.model_type != "t5" else o
for i, o in zip(input_tokens_lengths, output_tokens_lengths)
]
gen_text = tokenizer.batch_decode(gen_ids, skip_special_tokens=True)
return zip(inputs, gen_text, total_new_tokens), outputs
def trace_handler(prof):
print(prof.key_averages().table(
sort_by="self_cpu_time_total", row_limit=-1))
# warmup is a must if measuring speed as it's when all the optimizations are performed
# e.g., on 8x80 a100 the first pass of 100 tokens takes 23sec, and the next one is 4secs
if not args.benchmark:
print_rank0("*** Running generate warmup")
generated, _ = generate()
print_rank0("*** Running generate")
t_generate_start = time.time()
generated, _ = generate()
t_generate_span = time.time() - t_generate_start
for i, o, _ in generated:
print_rank0(f"{'-'*60}\nin={i}\nout={o}\n")
# benchmark it!
else:
get_accelerator().empty_cache()
gc.collect()
deepspeed.runtime.utils.see_memory_usage("end-of-run", force=True)
print_rank0("*** Running benchmark")
total_time = 0.0
cycles = args.num_iter
warmup = args.num_warmup
total_list = []
if args.profile:
with torch.profiler.profile(
activities=[torch.profiler.ProfilerActivity.CPU],
schedule=torch.profiler.schedule(
wait=1,
warmup=3,
active=1),
on_trace_ready=trace_handler,
) as prof:
for i in range(5):
gen_ids, outputs = generate()
prof.step()
# latency
for i in range(cycles):
t0 = time.time()
gen_ids, outputs = generate()
t1 = time.time()
gen_ids = list(gen_ids)
print_rank0(gen_ids[0][1:])
print_rank0("Iteration: %d, Time: %.6f sec" % (i, t1 - t0))
if i >= warmup:
total_time += t1 - t0
if args.token_latency:
total_list.append(outputs[1])
latency = total_time / (cycles - warmup)
print_rank0("\n", "-" * 10, "Summary:", "-" * 10)
print_rank0("Inference latency: %.3f sec." % latency)
if args.token_latency:
import numpy as np
from itertools import chain
first_latency = np.mean([x[0] for x in total_list])
average_2n = list(chain(*[x[1:] for x in total_list]))
average_2n.sort()
average_2n_latency = np.mean(average_2n)
p90_latency = average_2n[int(len(average_2n) * 0.9)]
p99_latency = average_2n[int(len(average_2n) * 0.99)]
print_rank0("First token average latency: %.3f sec." % first_latency)
print_rank0("Average 2... latency: %.3f sec." % average_2n_latency)
print_rank0("P90 2... latency: %.3f sec." % p90_latency)
print_rank0("P99 2... latency: %.3f sec." % p99_latency)
Appendix B – Yaml and Checkpoint Files
In this section, you will find MPIJob yaml for pytorch-llm-ipex-deepspeed and the checkpoint json files needed for Meta Llama 2 7b and 13b models.
● MPIJob sample yaml for pytorch-llm-ipex-deepspeed:
---
apiVersion: kubeflow.org/v1
kind: MPIJob
metadata:
name: pytorch-llm-ipex-deepspeed
namespace: kubeflow
spec:
slotsPerWorker: 1
cleanPodPolicy: Running
mpiReplicaSpecs:
Launcher:
replicas: 1
template:
metadata:
annotations:
sidecar.istio.io/inject: "false"
spec:
# Uncomment this in case of having the need to affinitize
affinity:
nodeAffinity:
requiredDuringSchedulingIgnoredDuringExecution:
nodeSelectorTerms:
- matchExpressions:
- key: kubernetes.io/hostname
operator: In
values:
- <worker-node-name>
containers:
- name: mpi-launcher
# OpenShift deployment
image: <your image repository>/pytorch-ipex22-deepspeed:latest
imagePullPolicy: Always
securityContext:
privileged: true
runAsUser: 0
env:
- name: I_MPI_HYDRA_IFACE
value: "eth0"
- name: I_MPI_OFI_PROVIDER
value: "tcp"
# value: "psm3"
- name: I_MPI_FABRICS
value: "ofi"
- name: I_MPI_HYDRA_BOOTSTRAP
value: rsh
- name: I_MPI_HYDRA_BOOTSTRAP_EXEC
value: /etc/mpi/kubexec.sh
- name: CCL_ATL_TRANSPORT
# value: "mpi"
value: "ofi"
- name: CCL_MNIC
value: "global"
- name: CCL_MNIC_NAME
value: "eth0"
- name: CCL_WORKER_COUNT
value: "2"
- name: CCL_WORKER_AFFINITY
value: "auto"
- name: CCL_WORKER_MEM_AFFINITY
value: "auto"
# - name: CCL_ALLREDUCE
# value: "rabenseifner"
# Libfabric flags
# - name: PSM3_IDENTIFY
# value: "1"
# - name: PSM3_NIC
# value: "eth0"
# - name: PSM3_ALLOW_ROUTERS
# value: "1"
# - name: PSM3_RDMA
# value: "1"
# - name: PSM3_RV_MR_CACHE_SIZE
# value: "8192"
# - name: PSM3_NIC_SPEED
# value: "100000"
# - name: PSM3_KASSIST_MODE
# value: "none"
# - name: FI_LOG_LEVEL
# value: "debug"
- name: FI_PROVIDER
value: "tcp"
# value: "psm3"
# - name: FI_PROVIDER_PATH
# value: "/usr/lib64/libfabric"
- name: FI_TCP_IFACE
value: "eth0"
# - name: FI_SOCKETS_IFACE
# value: "net1"
# OpenMP flags
- name: KMP_AFFINITY
value: "granularity=fine,compact,1,0"
- name: KMP_SETTINGS
value: "1"
- name: KMP_BLOCKTIME
value: "infinite"
- name: KMP_FORJOIN_BARRIER_PATTERN
value: "dist,dist"
- name: KMP_PLAIN_BARRIER_PATTERN
value: "dist,dist"
- name: KMP_REDUCTION_BARRIER_PATTERN
value: "dist,dist"
- name: KMP_TPAUSE
value: "0"
- name: OMP_NUM_THREADS
value: "<Depends on the CPU allocated for worker replica>"
# TCmalloc
- name: LD_PRELOAD
value: "/usr/lib64/libstdc++.so.6:/usr/lib64/libtcmalloc.so:/opt/intel/oneapi/compiler/2023.2.1/linux/compiler/lib/intel64_lin/libiomp5.so"
- name: TCMALLOC_LARGE_ALLOC_REPORT_THRESHOLD
value: "4294967296"
# Deepspeed
- name: DS_SHM_ALLREDUCE
value: "1"
- name: DS_ACCELERATOR
value: "cpu"
# Workload
- name: DTYPE
value: "bfloat16"
# value: "float32"
- name: NUM_ITER
value: "50"
- name: NUM_WARMUP
value: "10"
- name: NUM_PROCS
value: "2"
- name: MODEL_NAME
# LLAMA2 7B
value: "/datasets/llama-2-7b-hf"
# LLAMA2 13B
# value: "/datasets/llama-2-13b-hf"
# Falcon 40B
# value: "/datasets/falcon-40b"
- name: INPUT_TOKENS
value: "256"
- name: BS
value: "1"
# This is populated by the benchmark script
- name: INT8_ARGS
value: ""
command:
- bash
args:
- -c
- 'source /opt/intel/oneapi/setvars.sh && source /usr/local/lib64/python3.9/site-packages/oneccl_bindings_for_pytorch/env/setvars.sh && cat /etc/mpi/hostfile | sed "s| slots=.*||g" > /machinefile && export MASTER_POD=$(head -n 1 /machinefile) && export MASTER_ADDR=$(/opt/kube/kubectl get pod $MASTER_POD -o wide | tail -n 1 | awk ''{print $6}'') && echo $MASTER_ADDR && export MASTER_PORT=29501 && export RDVZ_BACKEND=c10d && time mpirun -n $NUM_PROCS -ppn 1 -iface $FI_TCP_IFACE -genv OMP_NUM_THREADS=$OMP_NUM_THREADS -genv MASTER_ADDR=$MASTER_ADDR -genv MASTER_PORT=$MASTER_PORT -genv LD_PRELOAD=$LD_PRELOAD -genv TCMALLOC_LARGE_ALLOC_REPORT_THRESHOLD=$TCMALLOC_LARGE_ALLOC_REPORT_THRESHOLD -genv FI_PROVIDER_PATH=$FI_PROVIDER_PATH -f /machinefile python /datasets/run_generation_with_deepspeed.py --benchmark -m $MODEL_NAME --dtype $DTYPE --ipex --deployment-mode --token-latency --batch-size $BS --input-tokens $INPUT_TOKENS --num-iter $NUM_ITER --num-warmup $NUM_WARMUP --greedy --max-new-tokens 256 $INT8_ARGS'
resources:
limits:
cpu: 2
memory: 32Gi
volumeMounts:
- name: datasets
mountPath: /datasets
readOnly: true
volumes:
- name: datasets
hostPath:
# OpenShift deployment
path: /var/mnt/llm
Worker:
replicas: 1
template:
metadata:
annotations:
sidecar.istio.io/inject: "false"
spec:
# Uncomment this in case of having the need to affinitize
affinity:
nodeAffinity:
requiredDuringSchedulingIgnoredDuringExecution:
nodeSelectorTerms:
- matchExpressions:
- key: kubernetes.io/hostname
operator: In
values:
- <worker-node-name>
containers:
- name: mpi-worker
# OpenShift deployment
image: <your image repository>/pytorch-ipex22-deepspeed:latest
imagePullPolicy: Always
securityContext:
privileged: true
runAsUser: 0
resources:
limits:
cpu: <allocate cpu based on your VM config>
memory: 128Gi
volumeMounts:
- name: datasets
mountPath: /datasets
readOnly: true
volumes:
- name: datasets
hostPath:
# OpenShift deployment
path: /var/mnt/llm
Similarly, for running with int8 precision for meta-llama/Llama-2-7b-hf and meta-llama/Llama-2-13b-hf models make the changes to the bash args in the yaml as shown in the screenshot (replace “$INT8_ARGS” with this flag “--ipex-weight-only-quantization --weight-dtype INT8 --quant-with-amp”):

● Checkpoint json files for:
◦ Meta Llama 2 7b parameters – checkpoints-llama2-7b-hf.json:
{"type": "BLOOM", "checkpoints": ["/datasets/llama-2-7b-hf/pytorch_model-00002-of-00002.bin", "/datasets/llama-2-7b-hf/pytorch_model-00001-of-00002.bin"], "version": 1.0}
◦ Meta Llama 2 13b parameters – checkpoints-llama2-13b-hf.json:
{"type": "BLOOM", "checkpoints": ["/datasets/llama-2-13b-hf/pytorch_model-00003-of-00003.bin", "/datasets/llama-2-13b-hf/pytorch_model-00002-of-00003.bin", "/datasets/llama-2-13b-hf/pytorch_model-00001-of-00003.bin"], "version": 1.0}
For more information about Cisco UCS Servers, Cisco Intersight, and GenAI on 5th Gen Intel Xeon Scalable processors, refer to the following links:
● Unleashing Creativity with Generative AI At-a-Glance: https://www.cisco.com/c/en/us/products/collateral/servers-unified-computing/ucs-x-series-modular-system/unleashing-creativity-generative-ai-aag.html
● Mainstreaming Generative AI Inference Operations with 5th Gen Intel Xeon Scalable processors in Cisco UCS At-a-Glance: https://www.cisco.com/c/en/us/products/collateral/servers-unified-computing/ucs-x-series-modular-system/mg-ai-i-ops-5thgen-intel-xeon-ucs-aag.html
● Cisco UCS X- Series modular system: https://www.cisco.com/c/en/us/products/collateral/servers-unified-computing/ucs-x-series-modular-system/solution-overview-c22-2432175.html?ccid=cc002456&oid=sowcsm025665
● Cisco Intersight configuration: https://www.cisco.com/c/en/us/td/docs/unified_computing/Intersight/b_Intersight_Managed_Mode_Configuration_Guide.html
● Intel Extension for PyTorch (IPEX 2.2) benchmark: https://github.com/intel/intel-extension-for-pytorch/tree/v2.2.0%2Bcpu/examples/cpu/inference/python/llm
● Tokens in LLMs: https://www.linkedin.com/pulse/demystifying-tokens-llms-understanding-building-blocks-lukas-selin/
● OpenVINO interactive Python Tutorials: https://docs.openvino.ai/2024/learn-openvino/interactive-tutorials-python.html
● OpenVINO Notebook GitHub: https://github.com/openvinotoolkit/openvino_notebooks/blob/main/README.md
For comments and suggestions about this guide and related guides, join the discussion on Cisco Community at https://cs.co/en-cvds.
CVD Program
ALL DESIGNS, SPECIFICATIONS, STATEMENTS, INFORMATION, AND RECOMMENDATIONS (COLLECTIVELY, "DESIGNS") IN THIS MANUAL ARE PRESENTED "AS IS," WITH ALL FAULTS. CISCO AND ITS SUPPLIERS DISCLAIM ALL WARRANTIES, INCLUDING, WITHOUT LIMITATION, THE WARRANTY OF MERCHANTABILITY, FITNESS FOR A PARTICULAR PURPOSE AND NONINFRINGEMENT OR ARISING FROM A COURSE OF DEALING, USAGE, OR TRADE PRACTICE. IN NO EVENT SHALL CISCO OR ITS SUPPLIERS BE LIABLE FOR ANY INDIRECT, SPECIAL, CONSEQUENTIAL, OR INCIDENTAL DAMAGES, INCLUDING, WITHOUT LIMITATION, LOST PROFITS OR LOSS OR DAMAGE TO DATA ARISING OUT OF THE USE OR INABILITY TO USE THE DESIGNS, EVEN IF CISCO OR ITS SUPPLIERS HAVE BEEN ADVISED OF THE POSSIBILITY OF SUCH DAMAGES.
THE DESIGNS ARE SUBJECT TO CHANGE WITHOUT NOTICE. USERS ARE SOLELY RESPONSIBLE FOR THEIR APPLICATION OF THE DESIGNS. THE DESIGNS DO NOT CONSTITUTE THE TECHNICAL OR OTHER PROFESSIONAL ADVICE OF CISCO, ITS SUPPLIERS OR PARTNERS. USERS SHOULD CONSULT THEIR OWN TECHNICAL ADVISORS BEFORE IMPLEMENTING THE DESIGNS. RESULTS MAY VARY DEPENDING ON FACTORS NOT TESTED BY CISCO.
CCDE, CCENT, Cisco Eos, Cisco Lumin, Cisco Nexus, Cisco StadiumVision, Cisco TelePresence, Cisco WebEx, the Cisco logo, DCE, and Welcome to the Human Network are trademarks; Changing the Way We Work, Live, Play, and Learn and Cisco Store are service marks; and Access Registrar, Aironet, AsyncOS, Bringing the Meeting To You, Catalyst, CCDA, CCDP, CCIE, CCIP, CCNA, CCNP, CCSP, CCVP, Cisco, the Cisco Certified Internetwork Expert logo, Cisco IOS, Cisco Press, Cisco Systems, Cisco Systems Capital, the Cisco Systems logo, Cisco Unified Computing System (Cisco UCS), Cisco UCS B-Series Blade Servers, Cisco UCS C-Series Rack Servers, Cisco UCS S-Series Storage Servers, Cisco UCS X-Series, Cisco UCS Manager, Cisco UCS Management Software, Cisco Unified Fabric, Cisco Application Centric Infrastructure, Cisco Nexus 9000 Series, Cisco Nexus 7000 Series. Cisco Prime Data Center Network Manager, Cisco NX-OS Software, Cisco MDS Series, Cisco Unity, Collaboration Without Limitation, EtherFast, EtherSwitch, Event Center, Fast Step, Follow Me Browsing, FormShare, GigaDrive, HomeLink, Internet Quotient, IOS, iPhone, iQuick Study, LightStream, Linksys, MediaTone, MeetingPlace, MeetingPlace Chime Sound, MGX, Networkers, Networking Academy, Network Registrar, PCNow, PIX, PowerPanels, ProConnect, ScriptShare, SenderBase, SMARTnet, Spectrum Expert, StackWise, The Fastest Way to Increase Your Internet Quotient, TransPath, WebEx, and the WebEx logo are registered trade-marks of Cisco Systems, Inc. and/or its affiliates in the United States and certain other countries. (LDW_P3)
All other trademarks mentioned in this document or website are the property of their respective owners. The use of the word partner does not imply a partnership relationship between Cisco and any other company. (0809R)