Secure Remote Worker for On-Prem Design Guide
Available Languages
Bias-Free Language
The documentation set for this product strives to use bias-free language. For the purposes of this documentation set, bias-free is defined as language that does not imply discrimination based on age, disability, gender, racial identity, ethnic identity, sexual orientation, socioeconomic status, and intersectionality. Exceptions may be present in the documentation due to language that is hardcoded in the user interfaces of the product software, language used based on RFP documentation, or language that is used by a referenced third-party product. Learn more about how Cisco is using Inclusive Language.
Cisco Secure Remote Worker (SRW) design guide covers the following components:
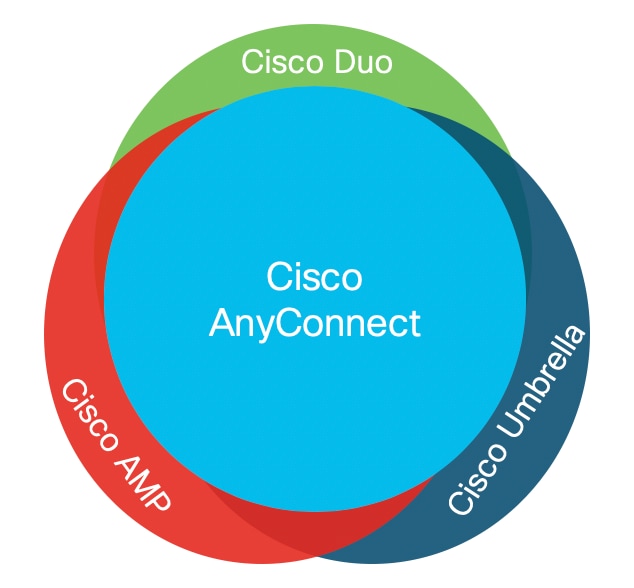
● Cisco Secure VPN (formerly known as AnyConnect Mobility Client)
● Secure connection using remote access VPN termination on Cisco hardware appliances
◦ Secure Firewall (Firepower Threat Defense on Firepower 4100)
● Authentication
◦ LDAP
◦ Duo (Two-factor authentication)
● Threat Protection
◦ Cisco Umbrella Roaming Security Module
◦ Cisco Secure Endpoint (AMP) Enabler (formerly AMP for Endpoints)
This document does not cover the following topics:
● Firepower Threat Defense (FTD) Installation
● Firepower Management Console (FMC) Installation
● Identity Services Engine (ISE)
● Windows Server setup
● Initial Duo installation
● VPNless access to private applications (Duo Network Gateway)
● Policy Enforcement in Cisco Umbrella
● Cisco Meraki MX
● Cisco Adaptive Security Appliance (ASA)
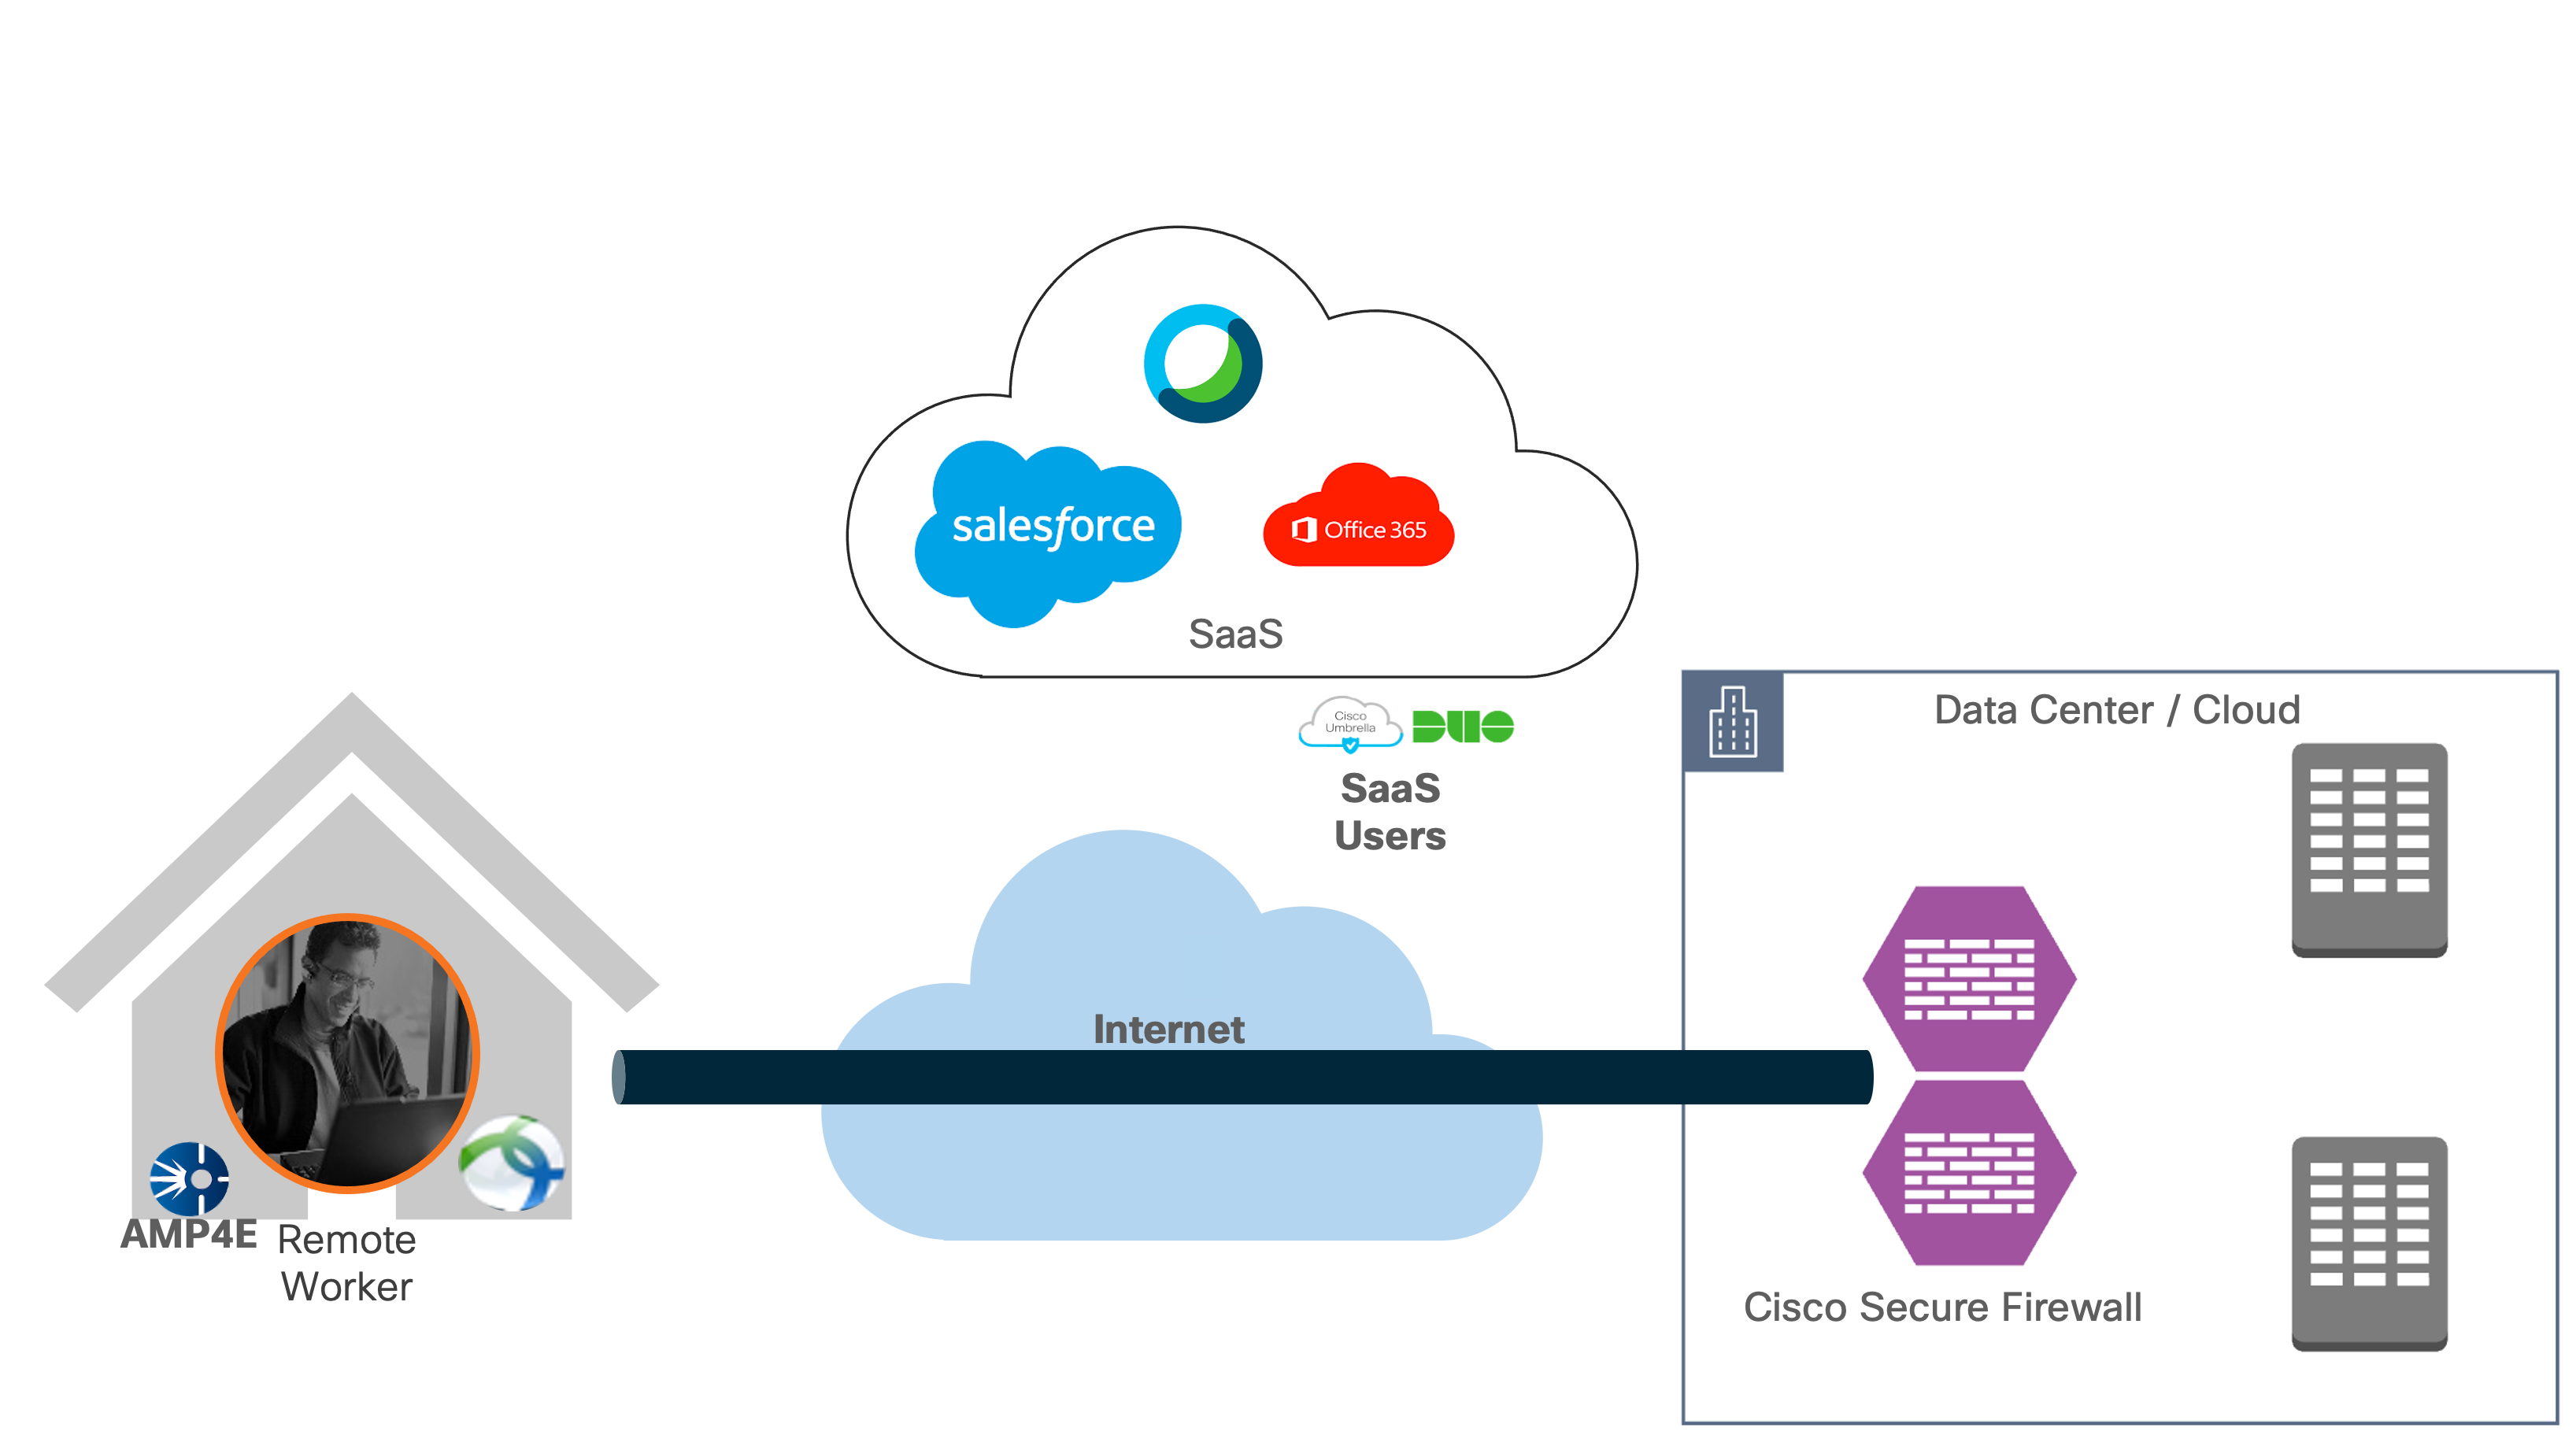
Today’s distributed workforce continues to grow, and new challenges arise for businesses of all sizes. The need to have secure remote workers access cloud, private data centers, and public internet resources is even more important now than it has been in the past. While the benefits of these resources are immense, so are the risks that come with using them.
The IT teams need to be able to trust that their users can access all these resources with minimal interactions, while being as secure as possible. To do this, we need to protect the endpoints users will be on, the connection from these devices, validate their identity, and protect data from threats.
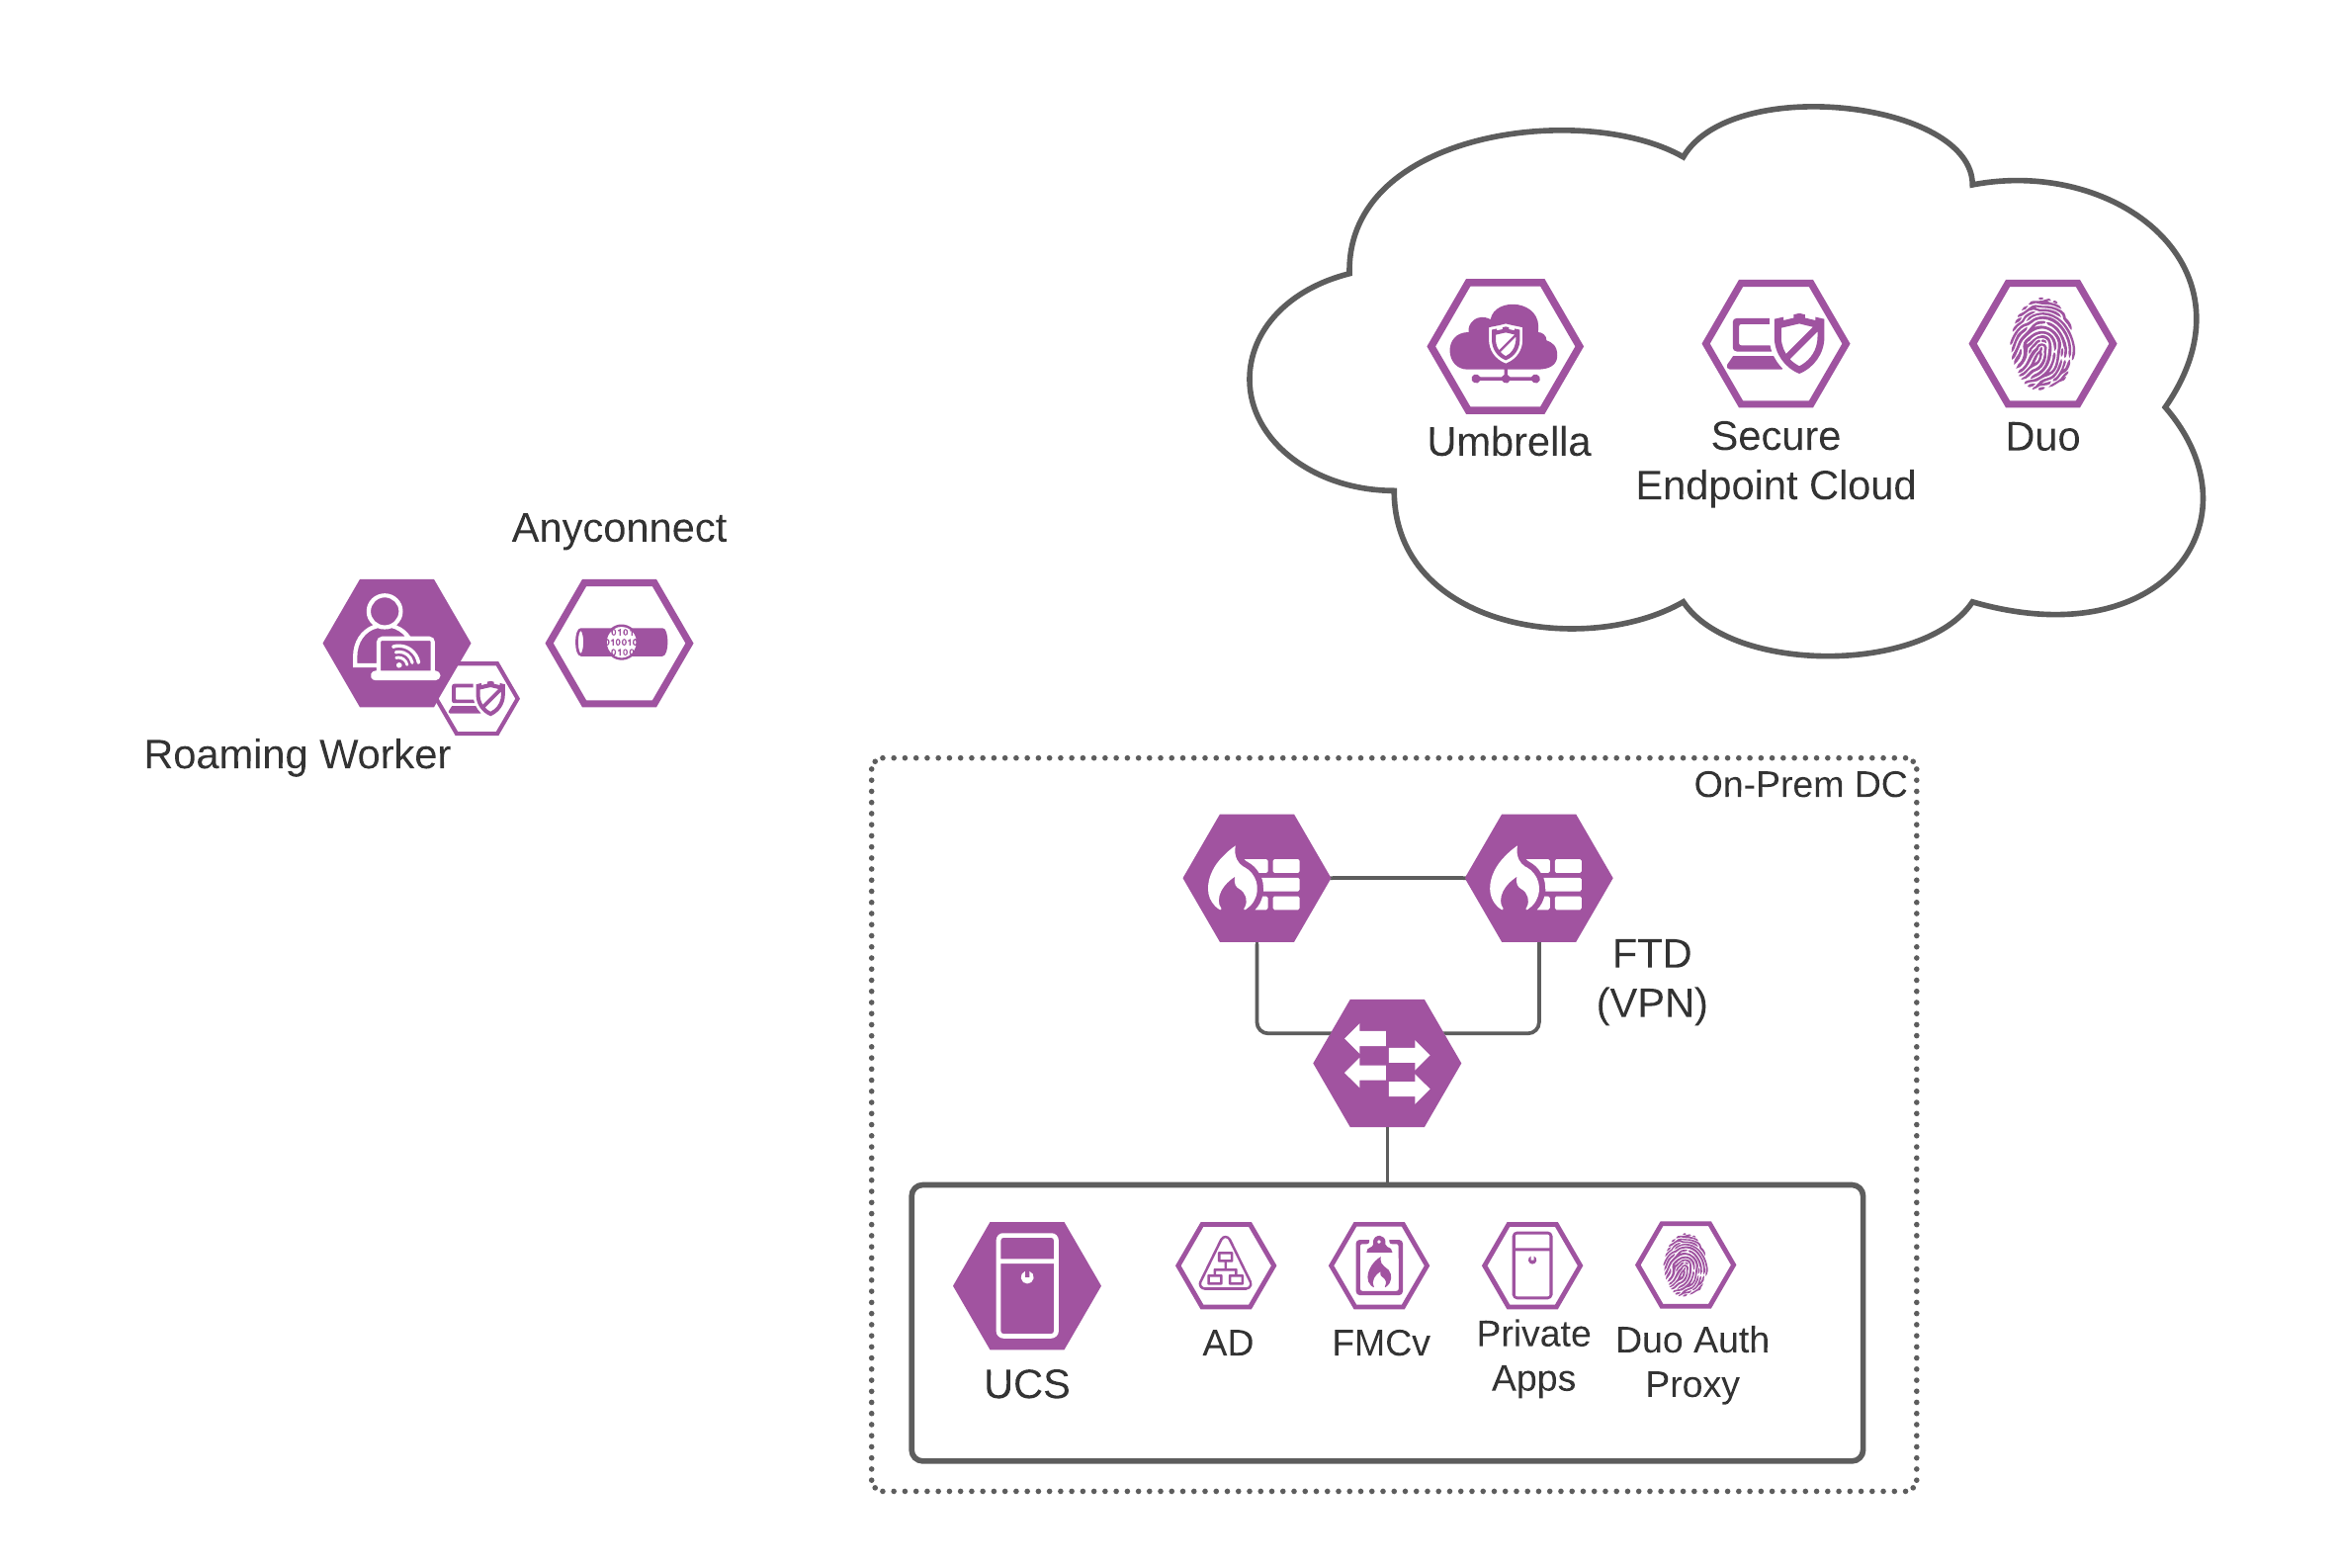
Secure Remote Worker Architecture
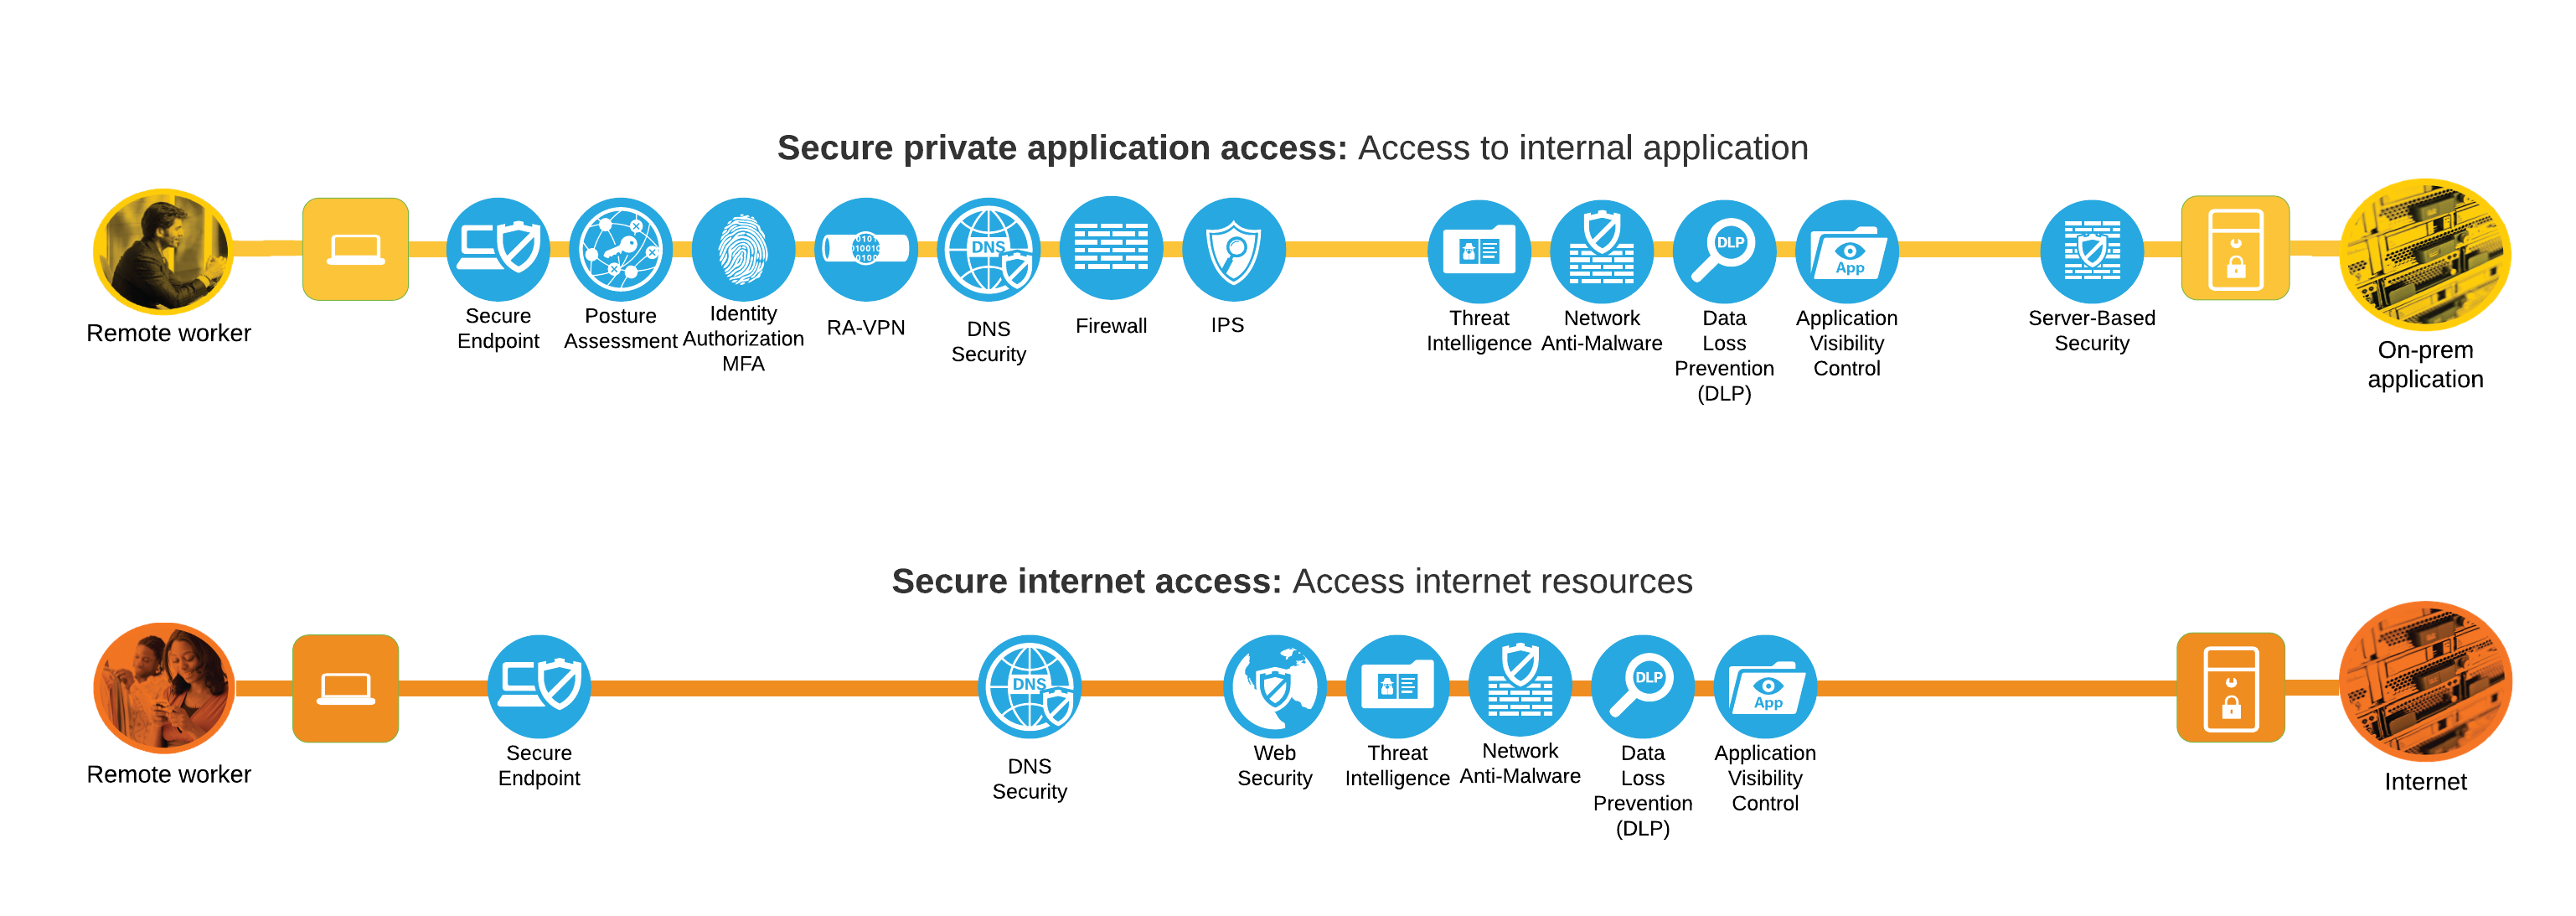
Remote workers access enterprise resources using Internet connections protected by remote access VPN (RAVPN). Internet edge is an essential segment in the enterprise network, where the corporate network meets the public Internet. The SAFE Model identifies the Internet edge as one of the places in the network (PINs). SAFE simplifies complexity across the enterprise by implementing a model that focuses on the areas that a company must secure. This model treats each area holistically, focusing on today’s threats and the capabilities needed to secure each area against those threats. Cisco has deployed, tested, and validated critical designs. These solutions provide guidance and best practices that ensure effective, secure remote access to the resources.
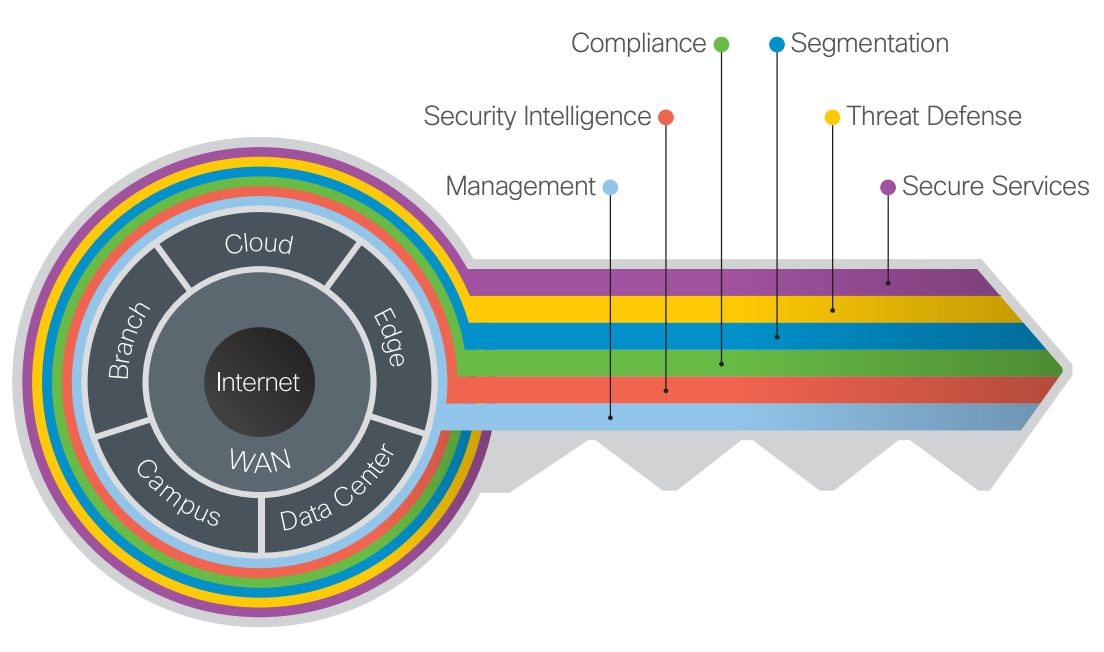
The Internet edge is the highest-risk PIN because it is the primary ingress for public traffic and the primary egress point to the Internet. Simultaneously, it is the critical resource that businesses need in today’s Internet-based economy. SAFE matches up defensive capabilities against the categories of threats today. SAFE simplifies security by starting with business flows, then addressing their respective threats with corresponding security capabilities, architectures, and designs. SAFE provides guidance that is holistic and understandable.
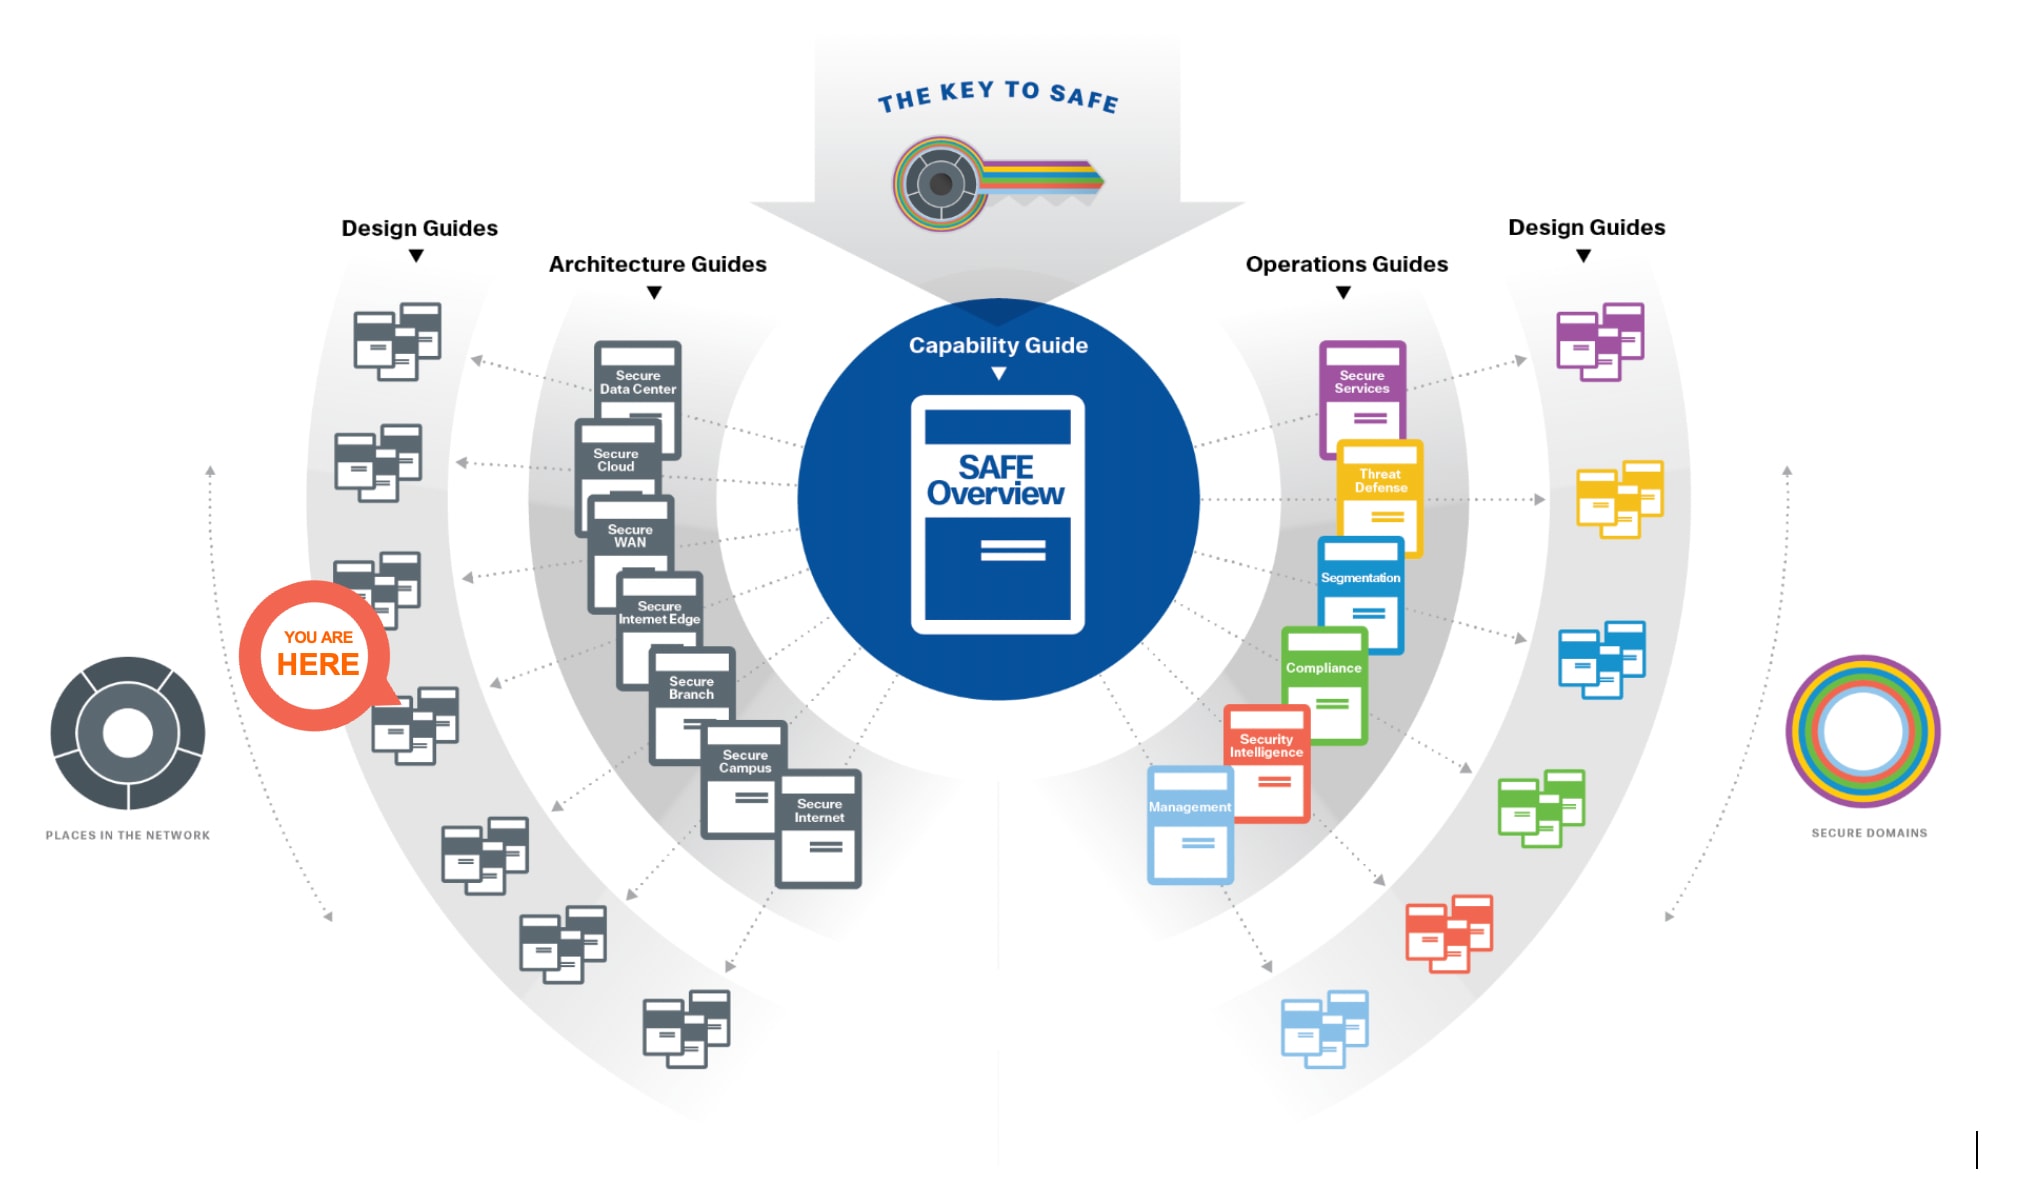
More information about how Cisco SAFE simplifies security, along with other CVDs, can be found here.
Secure Remote Worker Business Flows
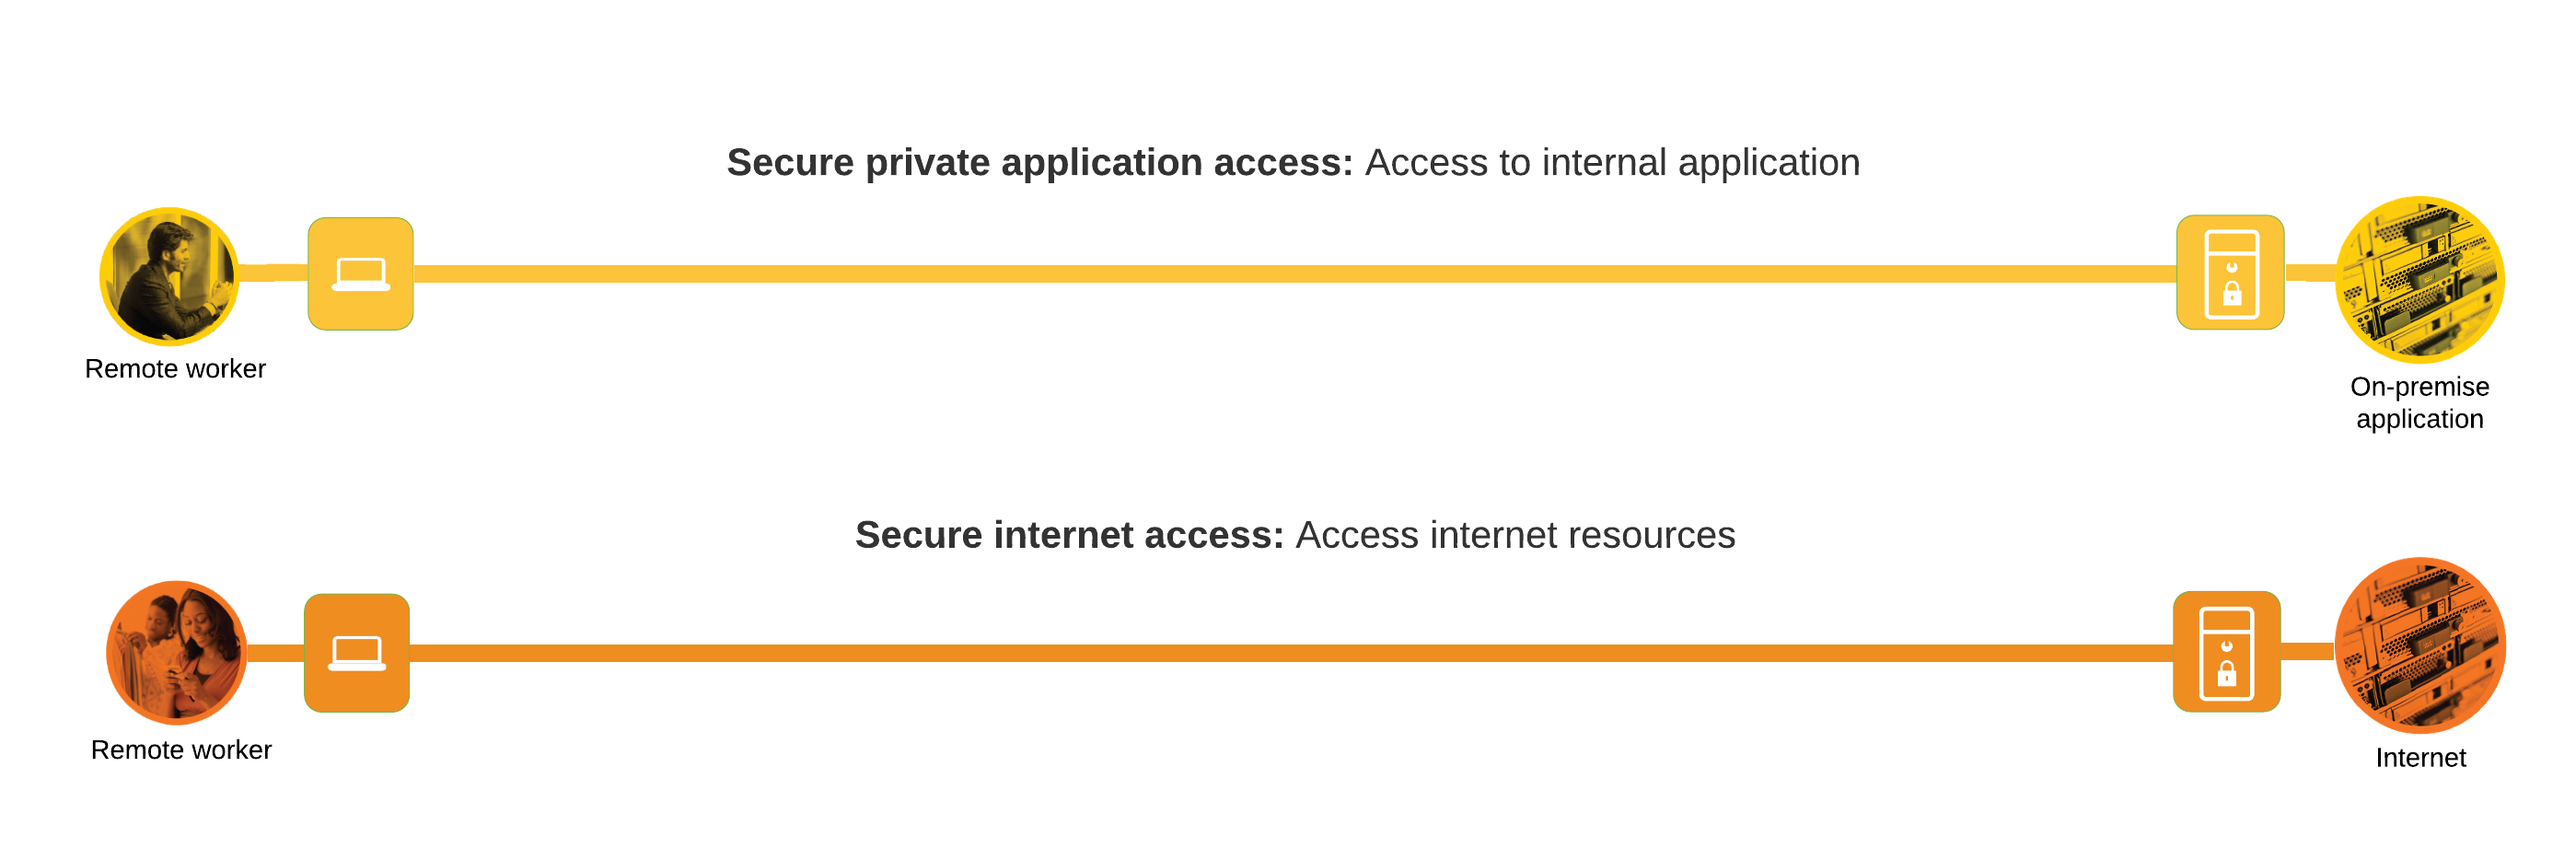
Business Flow: SAFE uses the concept of business flows to simplify the identification of threats, and this enables the selection of capabilities necessary to protect them. The Secure Remote Worker design guide focuses on remote users accessing applications hosted in a secured environment. There is a secondary focus on securing the user when accessing internet resources, however, more in depth details are explored in the Cisco Secure Access Service Edge (SASE) Design Guide.
Threat Capabilities: Not all business flows have the same requirements. Some use cases are subject to a smaller attack vector and therefore require less security. Some have multiple vectors and require more. Evaluating the business flow by analyzing the attack surfaces provides the information needed to determine and apply the correct capabilities for flow specific and effective security. This process also allows for the application of capabilities to address risk and administrative policy requirements. For more information regarding SAFE capabilities, refer to the SAFE Overview Guide.
Today’s companies are investing in enabling their workforce to have a secure remote connection to the resources hosted in their private data centers. This Cisco validated design guide (CVD) addresses a specific use case of secure remote workers covered in the Secure Remote Worker SAFE Design Guide. The secure remote worker solution uses the Cisco Secure VPN, Cisco Secure Firewall, Cisco Secure Access by Duo, Cisco Umbrella, and Cisco Secure Endpoint.
Remote access VPN key capabilities for traffic and threat management
Static Split Tunnel versus Dynamic Split Tunnel
The default behavior of a VPN client is to tunnel all traffic. The client sends everything through the tunnel unless the split tunnel is defined. Split tunnels are of two types static and dynamic.
Static Split Tunnel
Static split tunneling involves defining the IP addresses of hosts and networks that should be included in or excluded from the remote access VPN tunnel. The limitation of the static split tunnel is that it is based on IP addresses defined in the split tunnel ACL. You can enhance split tunneling by defining dynamic split tunneling.
Dynamic Split Tunnel
With dynamic split tunneling, you can fine-tune split tunneling based on DNS domain names. Because the IP addresses associated with full-qualified domain names (FQDN) can change or simply differ based on region, defining split tunneling based on DNS names provides a more dynamic definition of which traffic should, or should not, be included in the remote access VPN tunnel. If any addresses returned for excluded domain names are within the address pool included in the VPN, those addresses will then be excluded.
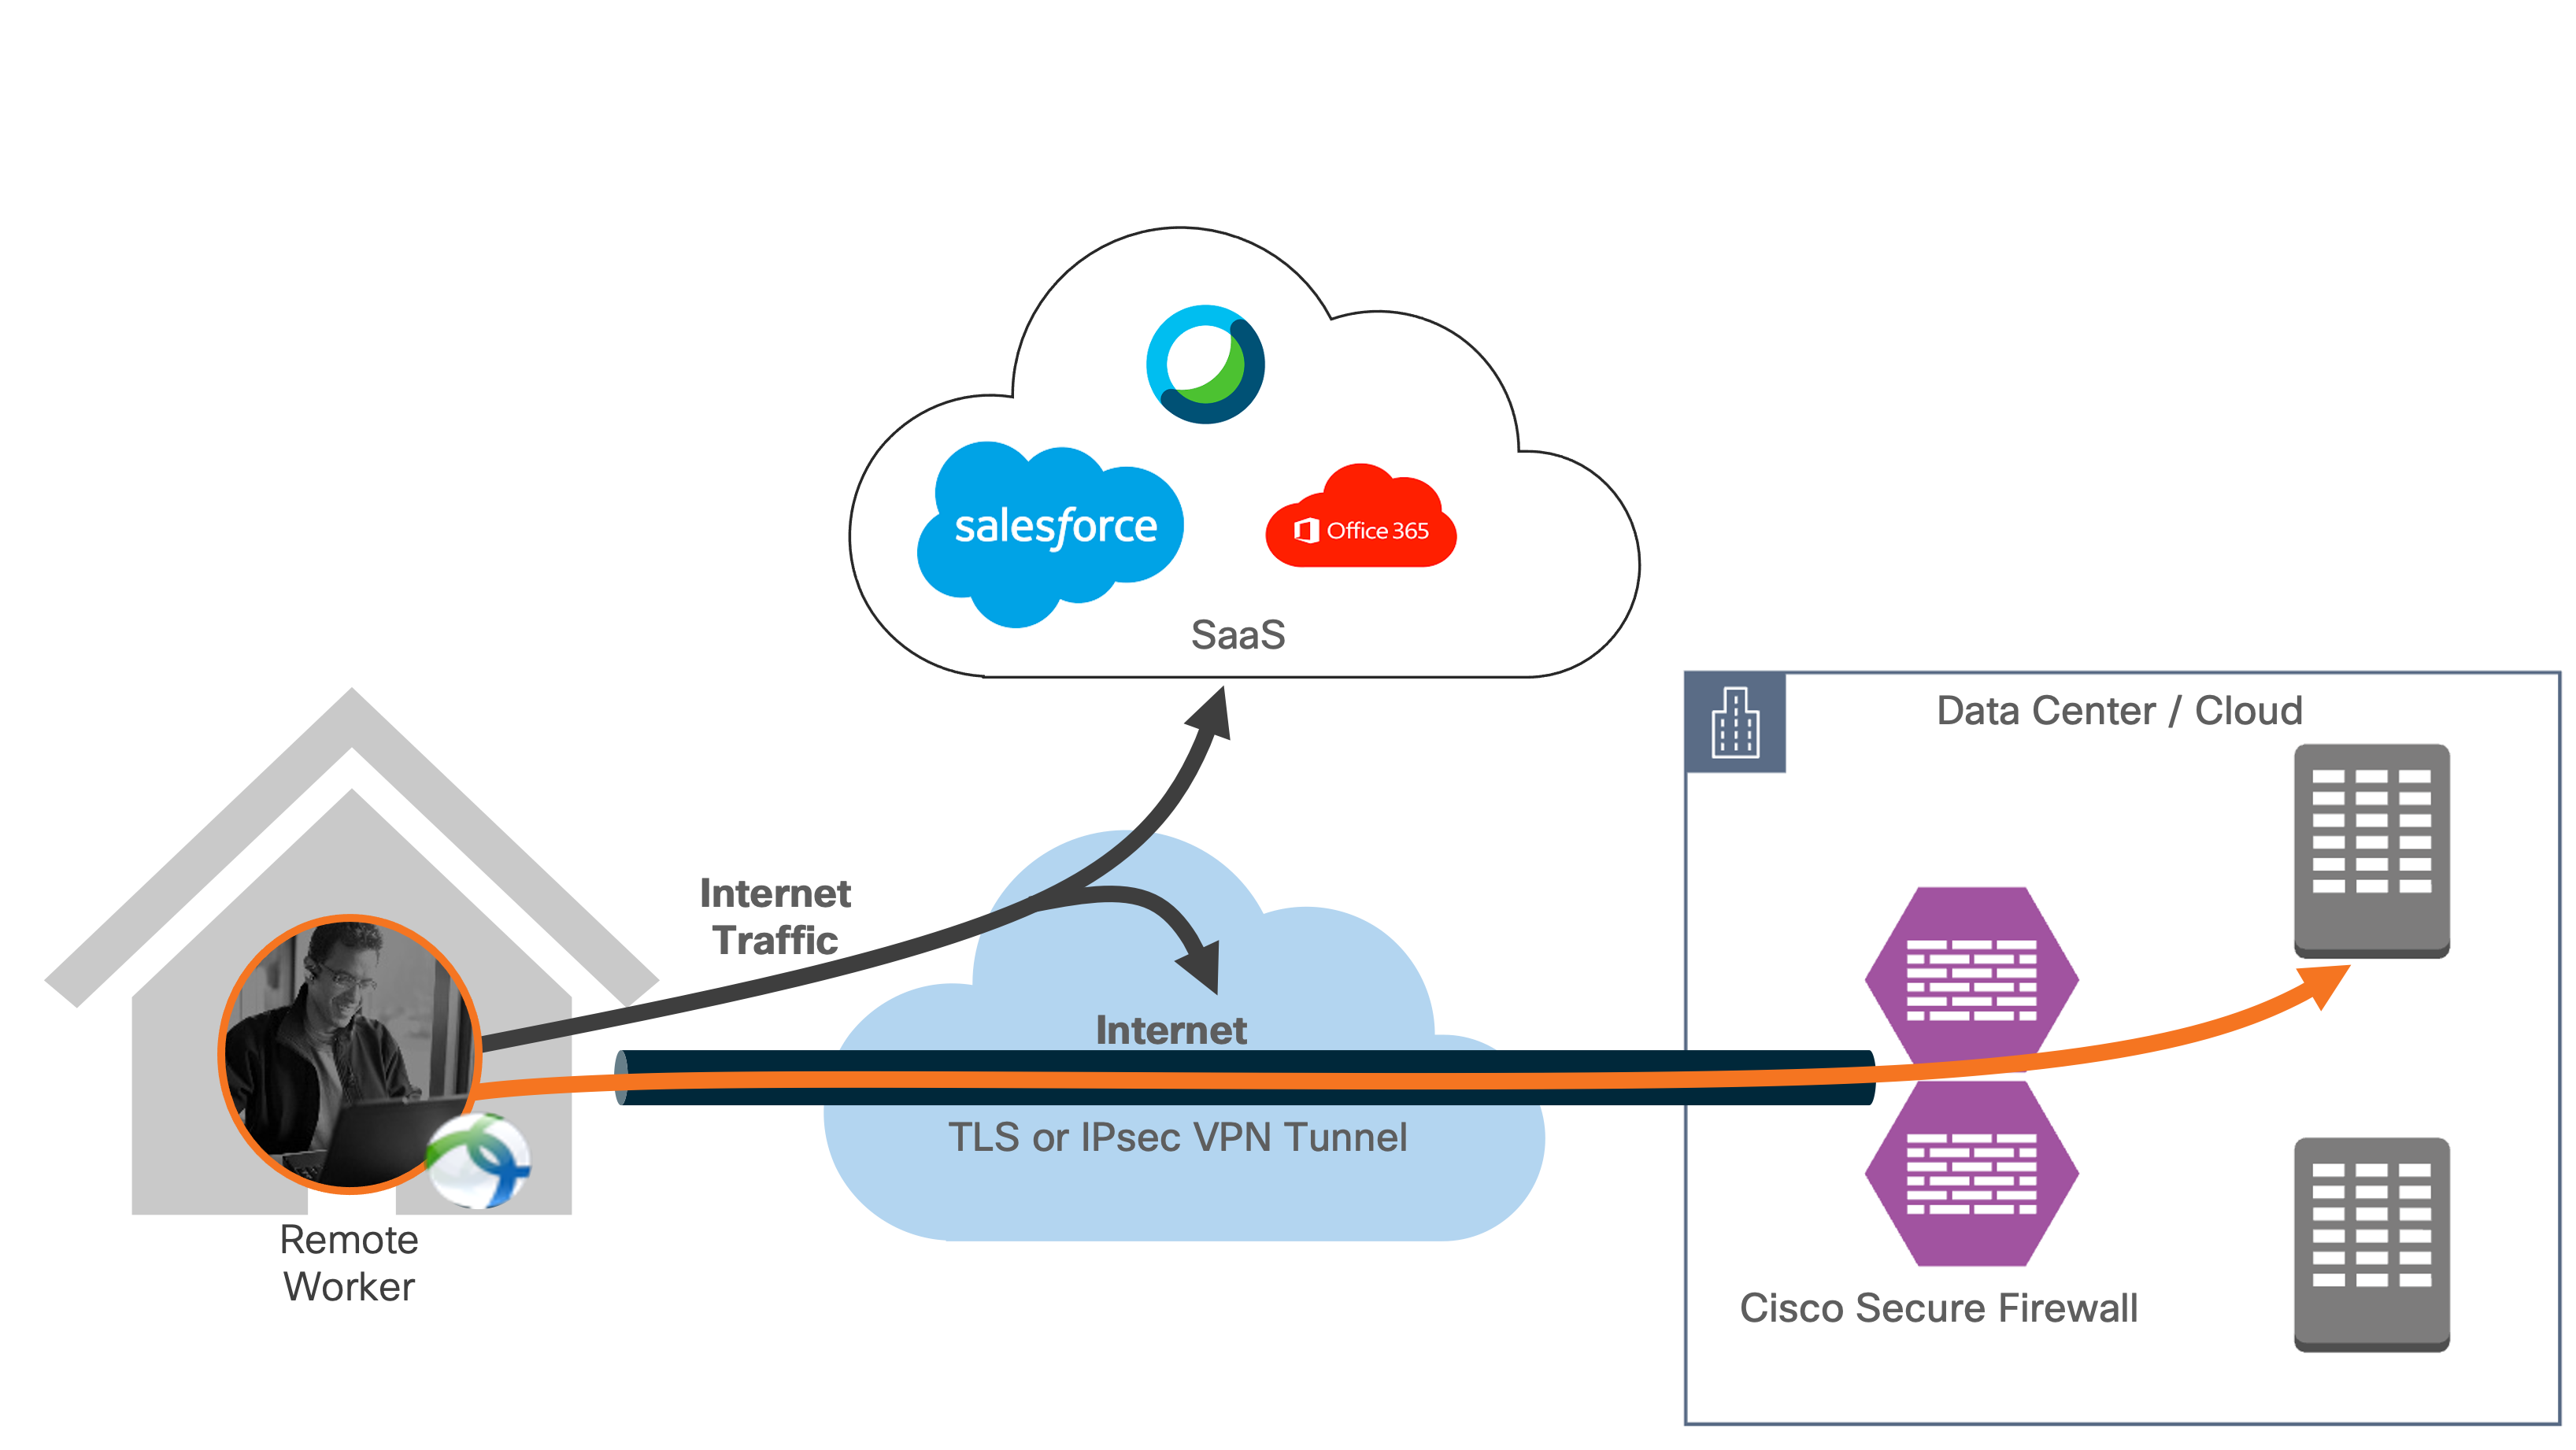
VPN with a split tunnel
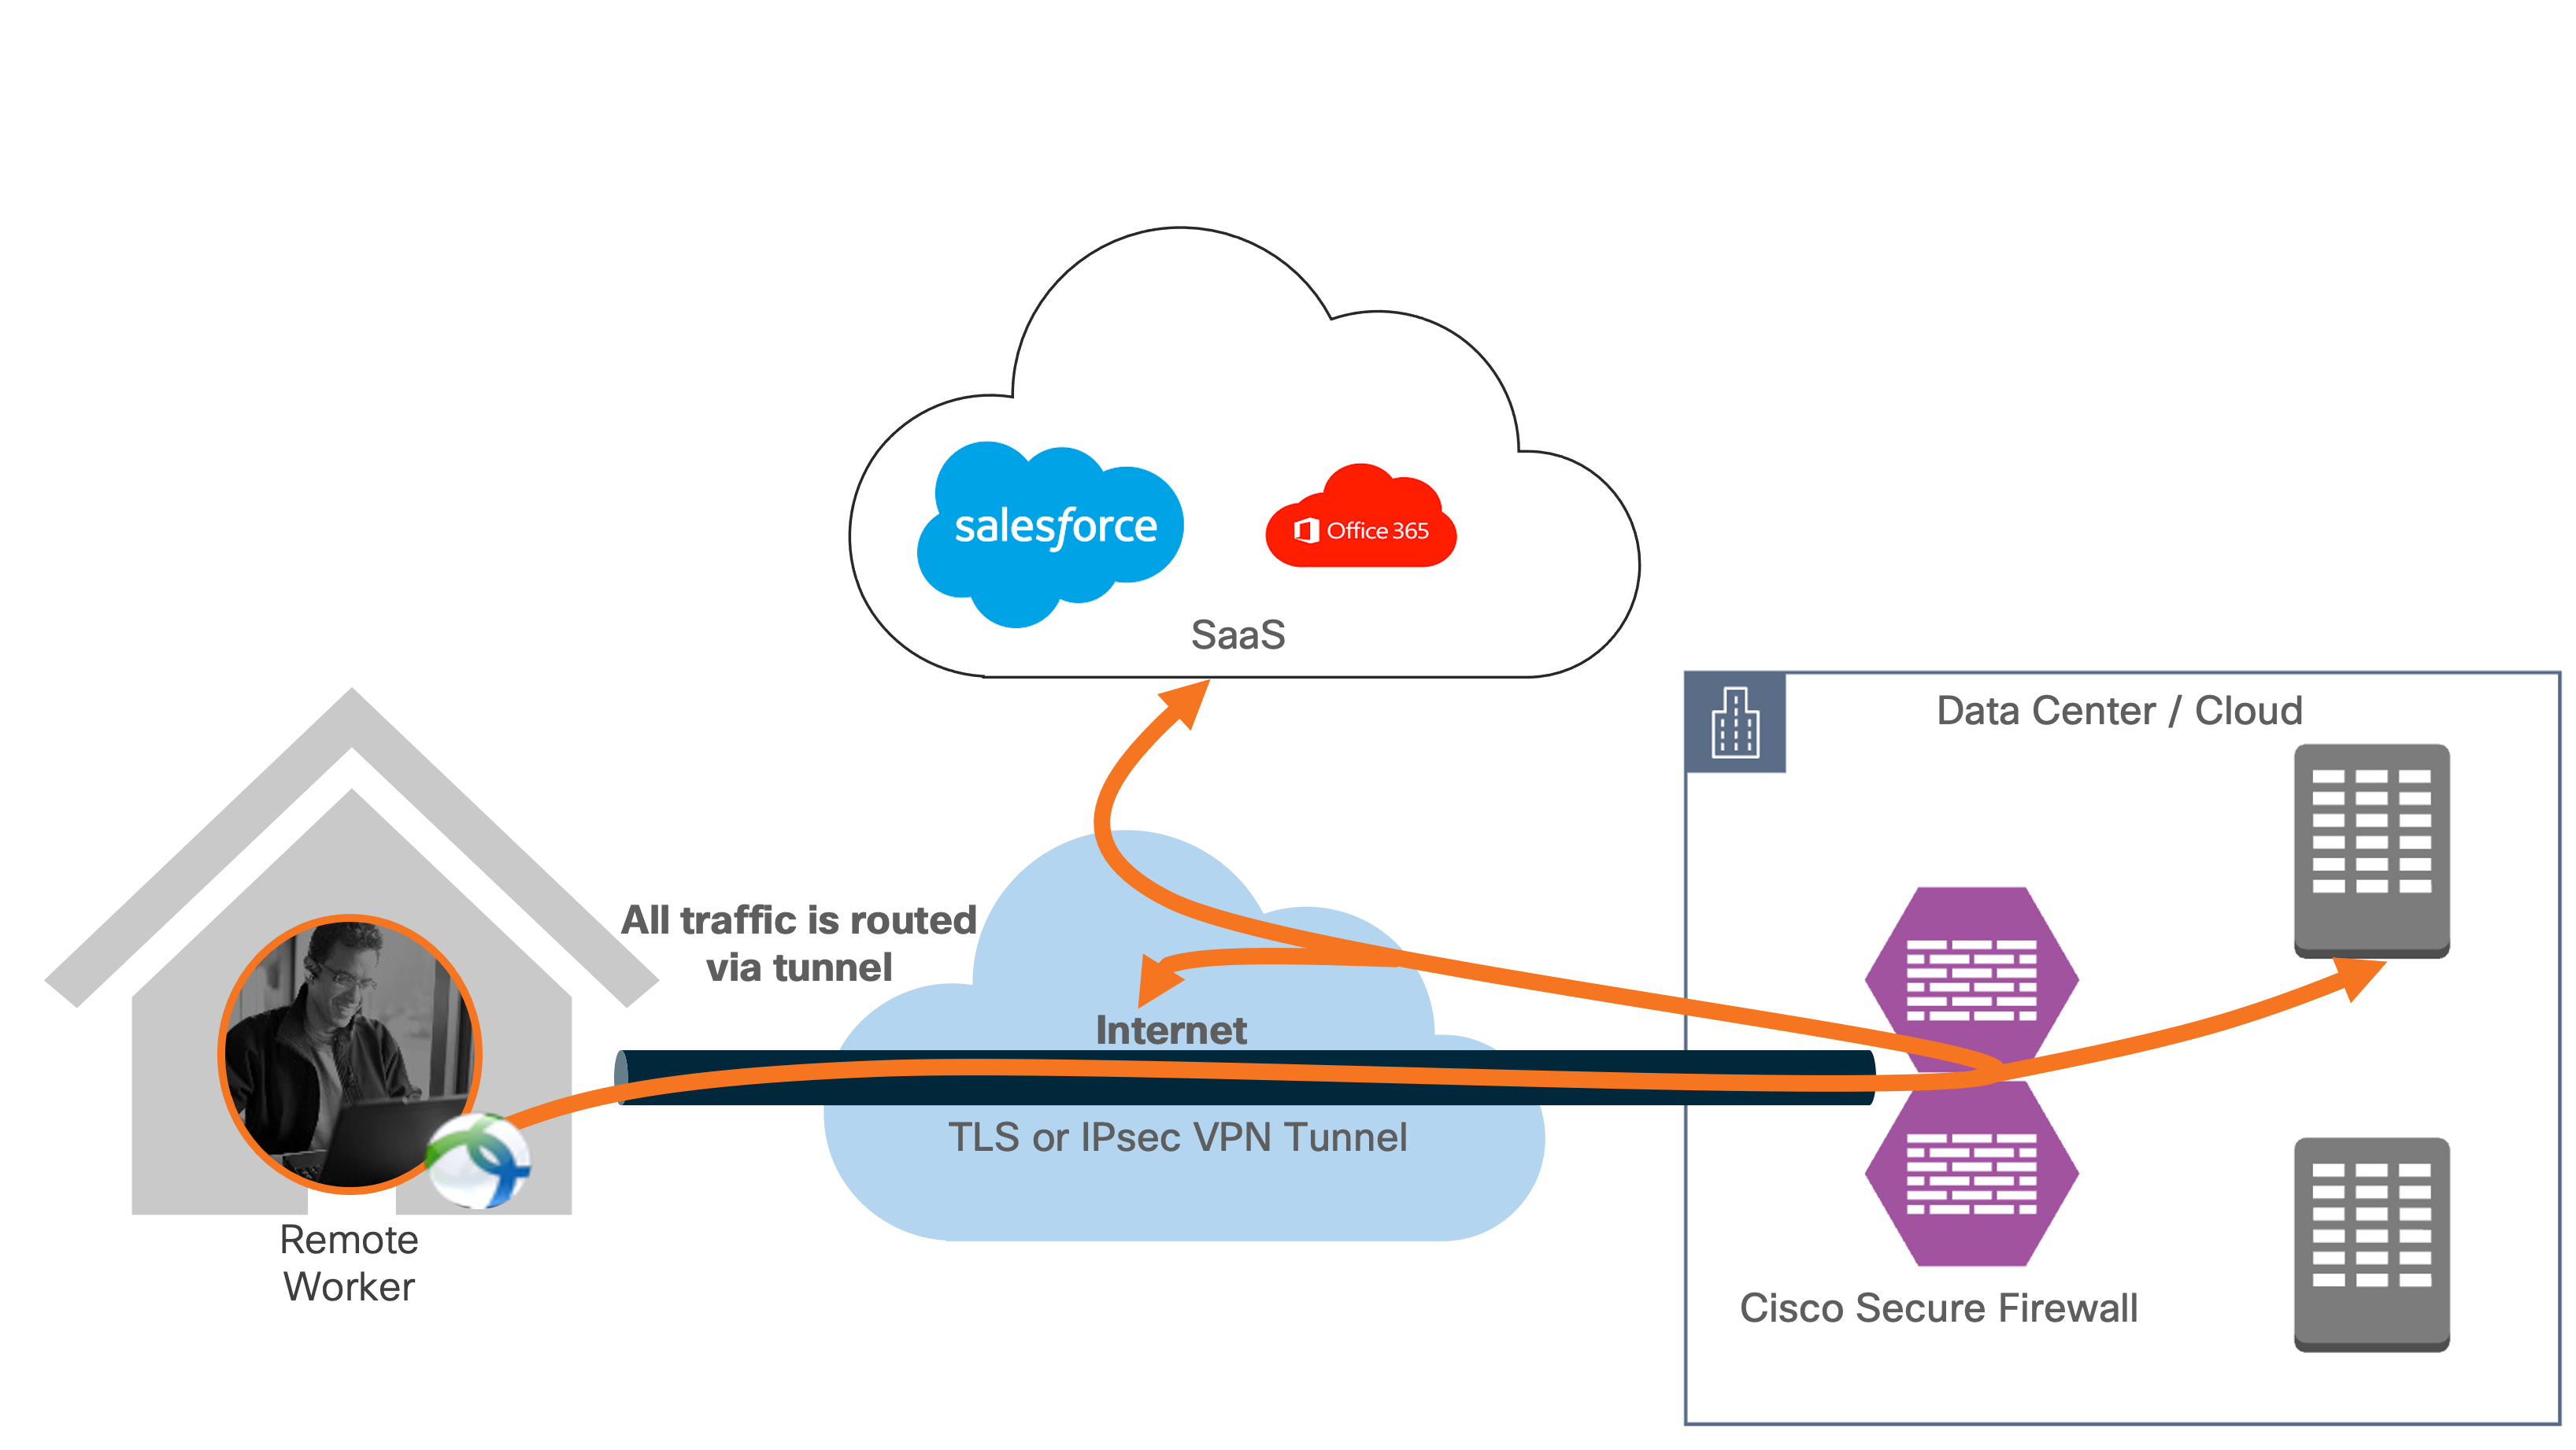
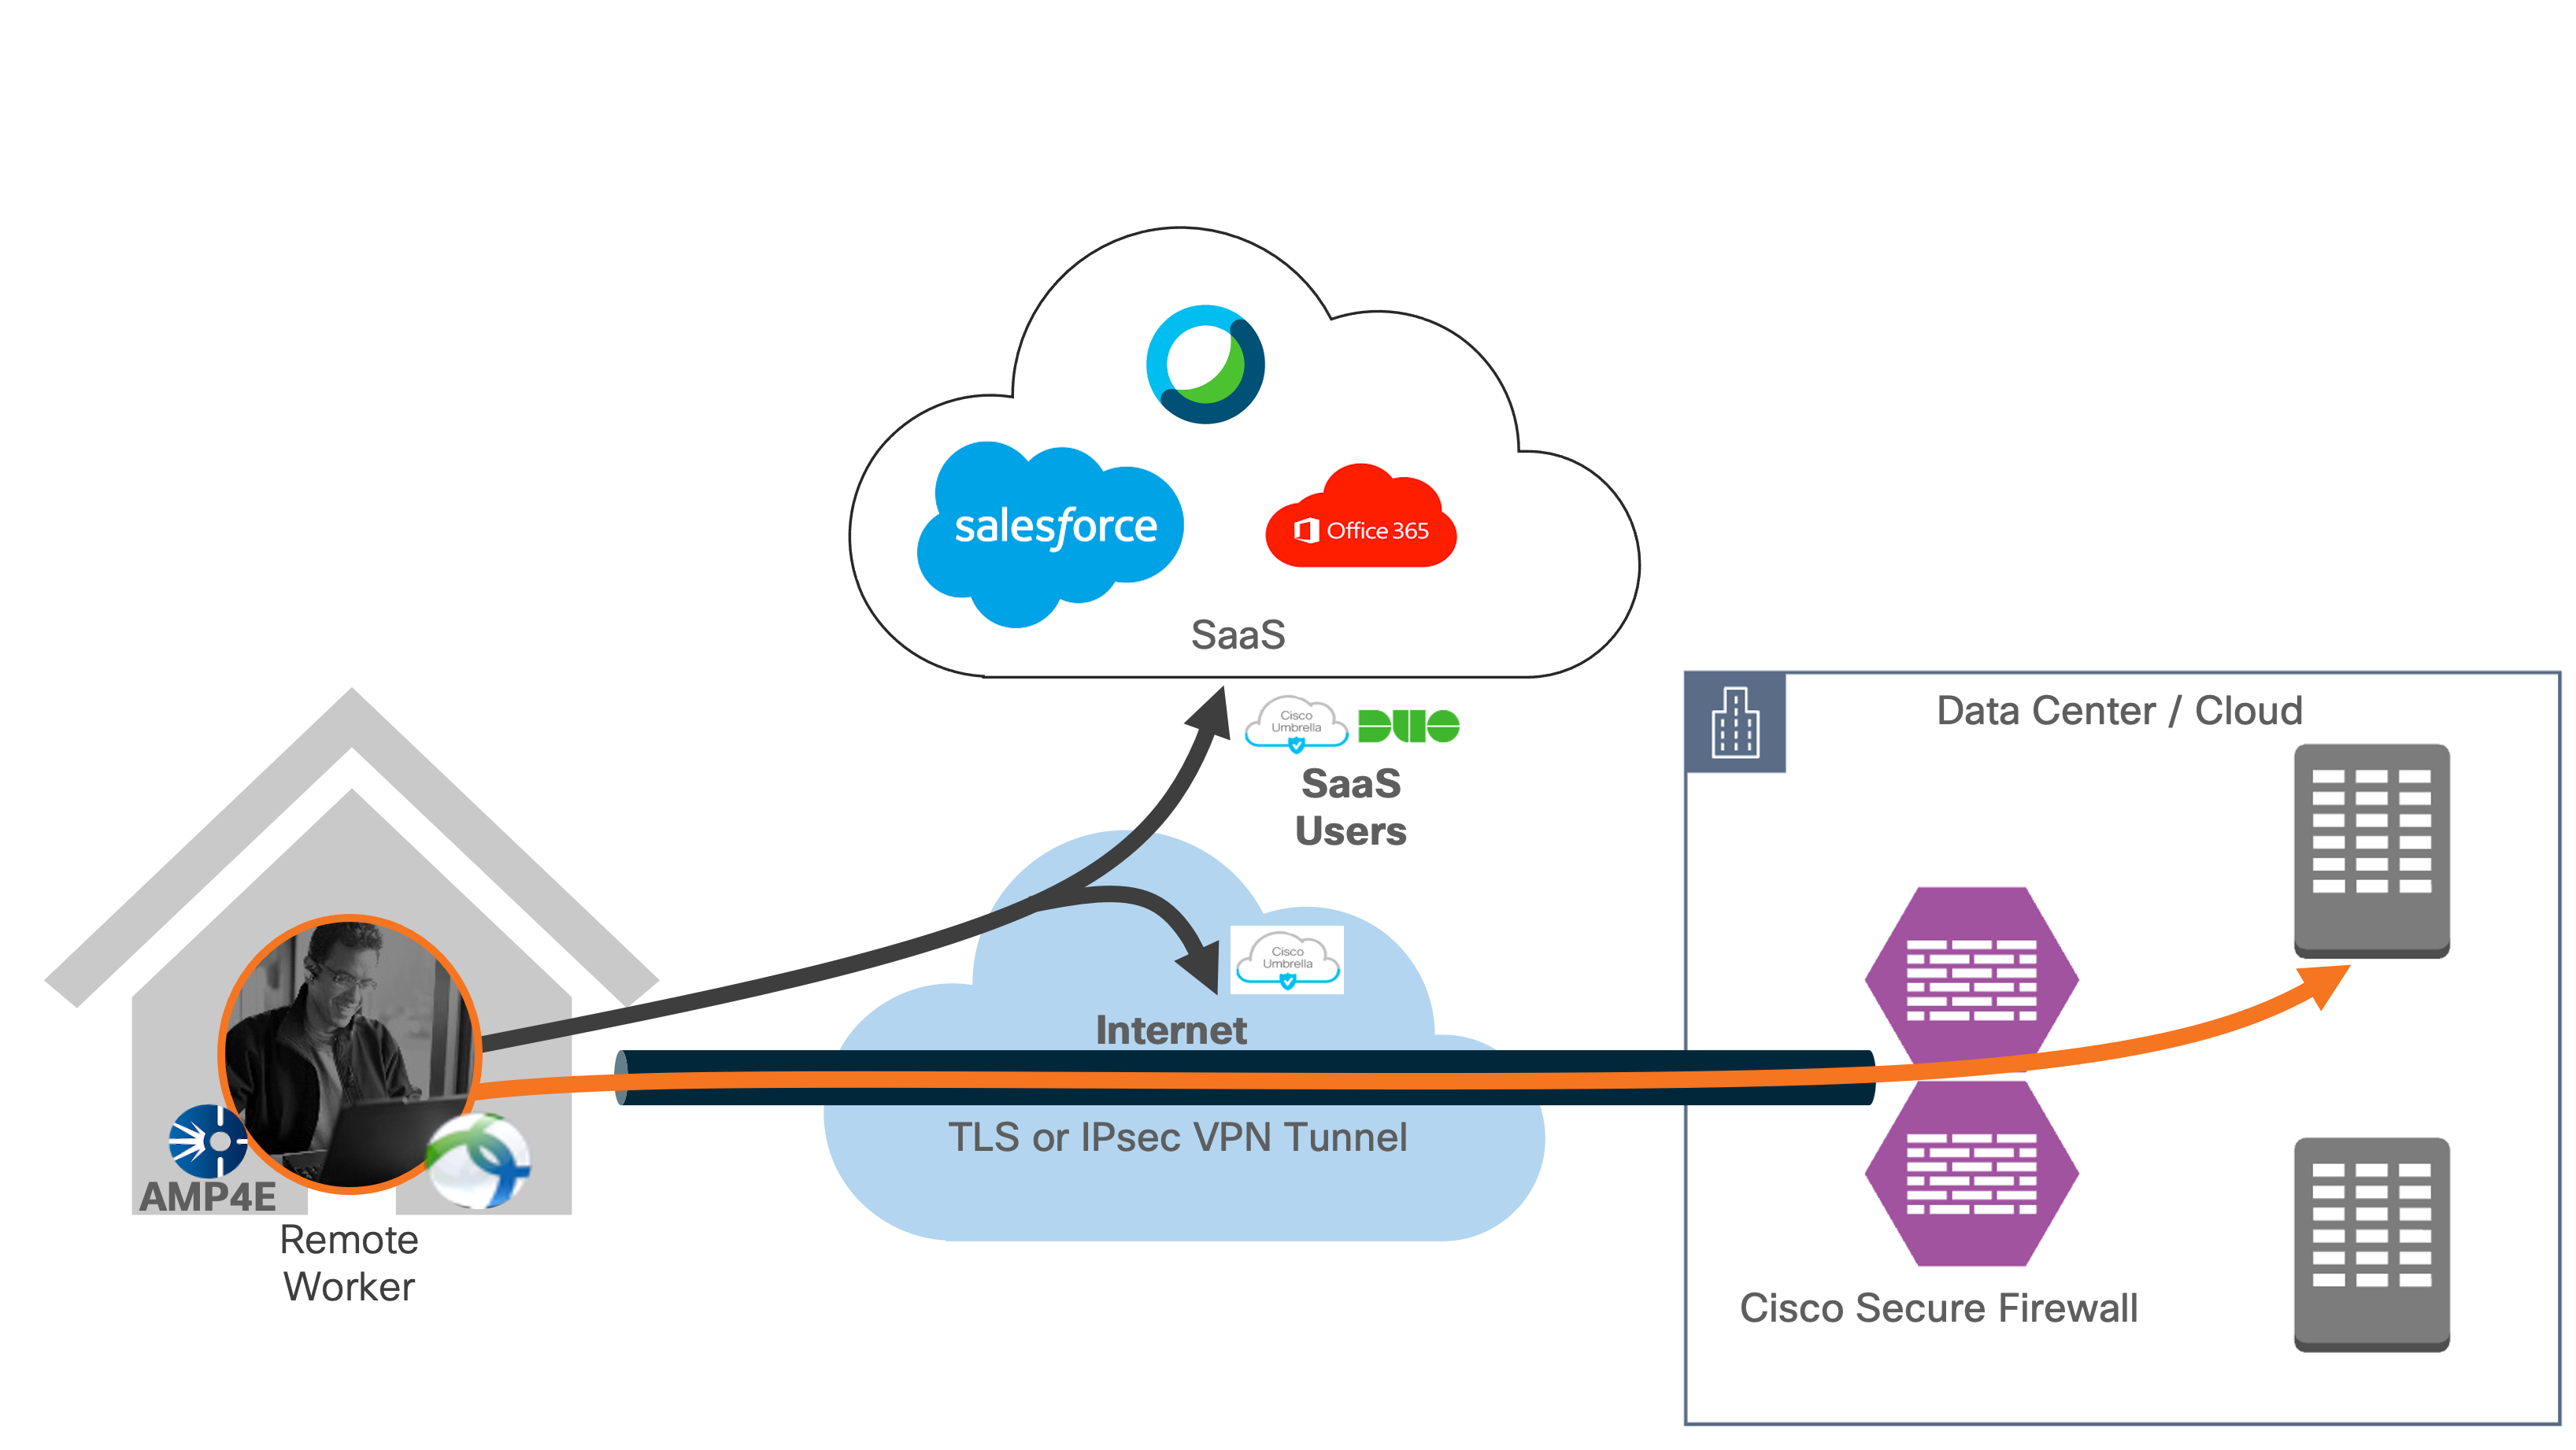
Cisco Secure VPN modules provide protection when users are on a VPN with a split tunnel enabled.
● Cisco Umbrella Roaming Module continues to provide cloud delivered security through Cisco Umbrella to traffic not destined for the VPN tunnel
● Cisco Secure Endpoint enabler continues to provide anti-virus and malware protection
● Cisco Secure Access by Duo continues to provide MFA for applications
No VPN connection
Cisco Secure VPN modules provide protection when users are not on a VPN.
● Cisco Umbrella Roaming Module continues to provide cloud delivered security through Cisco Umbrella
● Cisco Secure Endpoint continues to provide anti-virus and malware protection
● Cisco Secure Access by Duo continues to provide MFA for applications
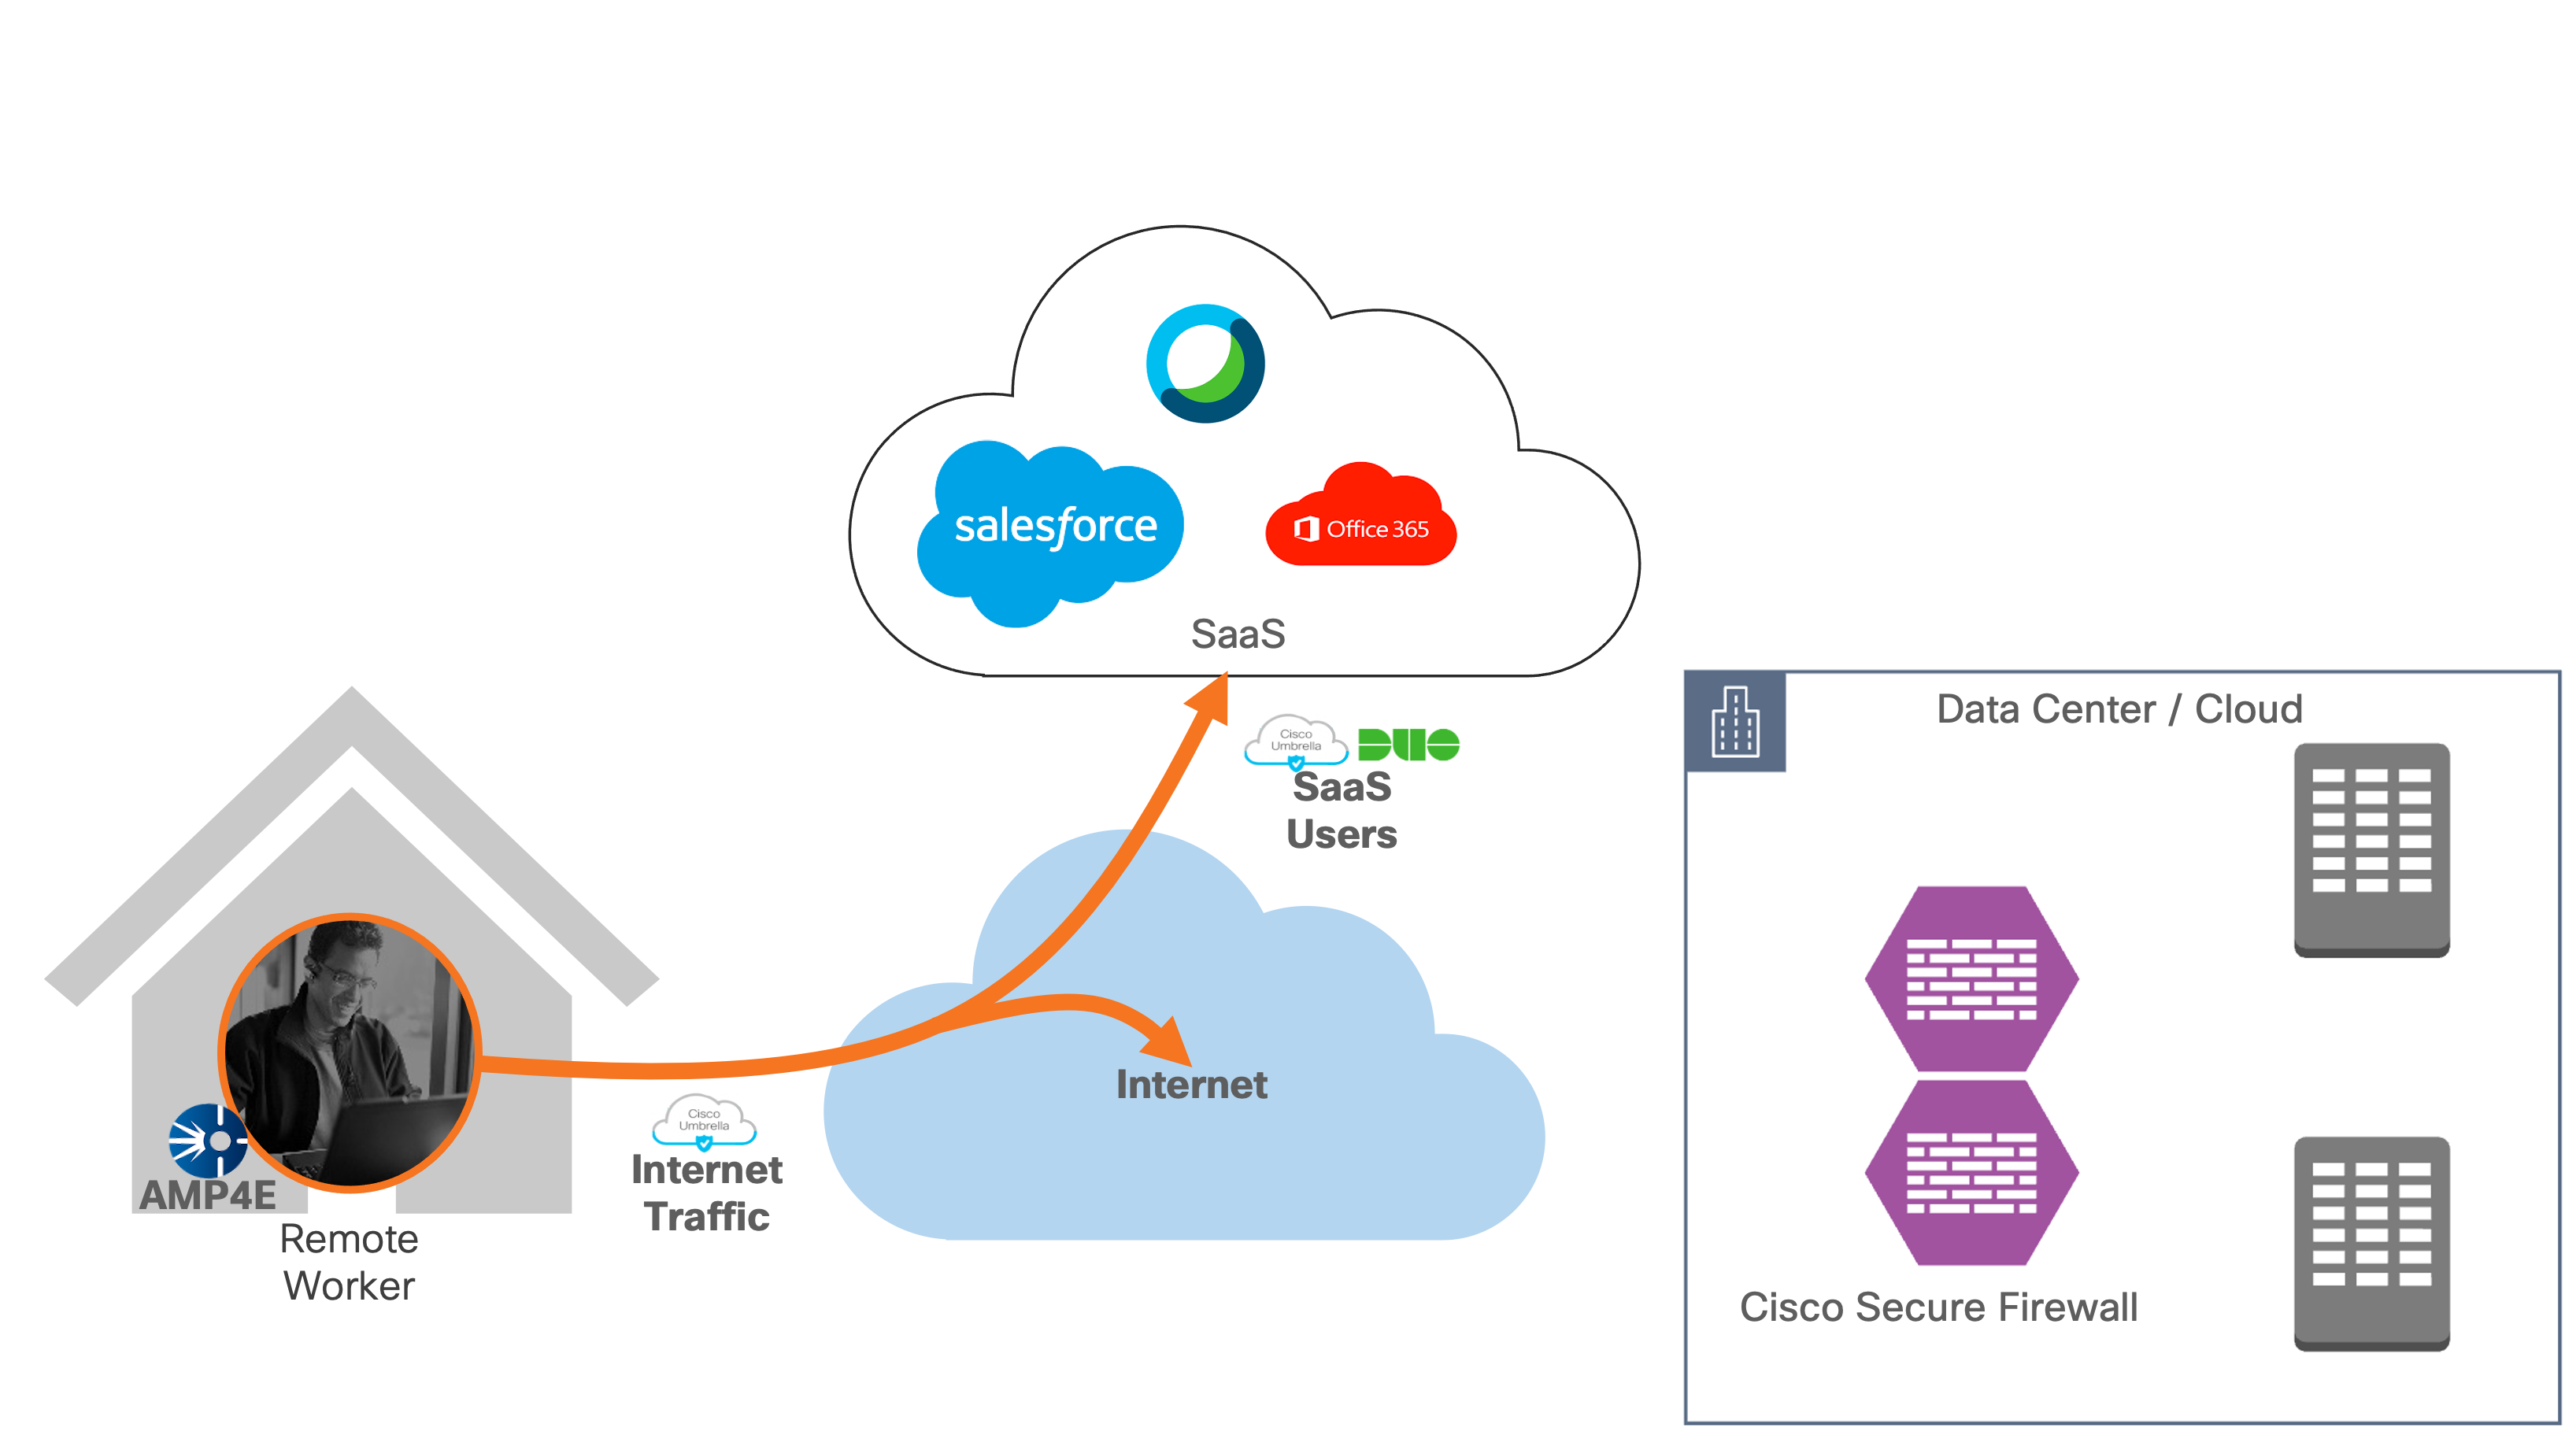
This document provides best practices and recommended solutions for remote workers accessing resources hosted in on-prem infrastructures. This solution brings together a secure architecture that includes Cisco Secure VPN Mobility Client, Cisco Secure Access by Duo, Cisco Umbrella, and Cisco Secure Endpoint to protect remote access workers even when the user is on an untrusted network. In addition to validated designs, this Cisco Validated Design (CVD) also provides recommended step-by-step configurations.
The target audience for this CVD are Solution Architects responsible for designing a secure environment for remote workers and the implementation team responsible for deploying security.
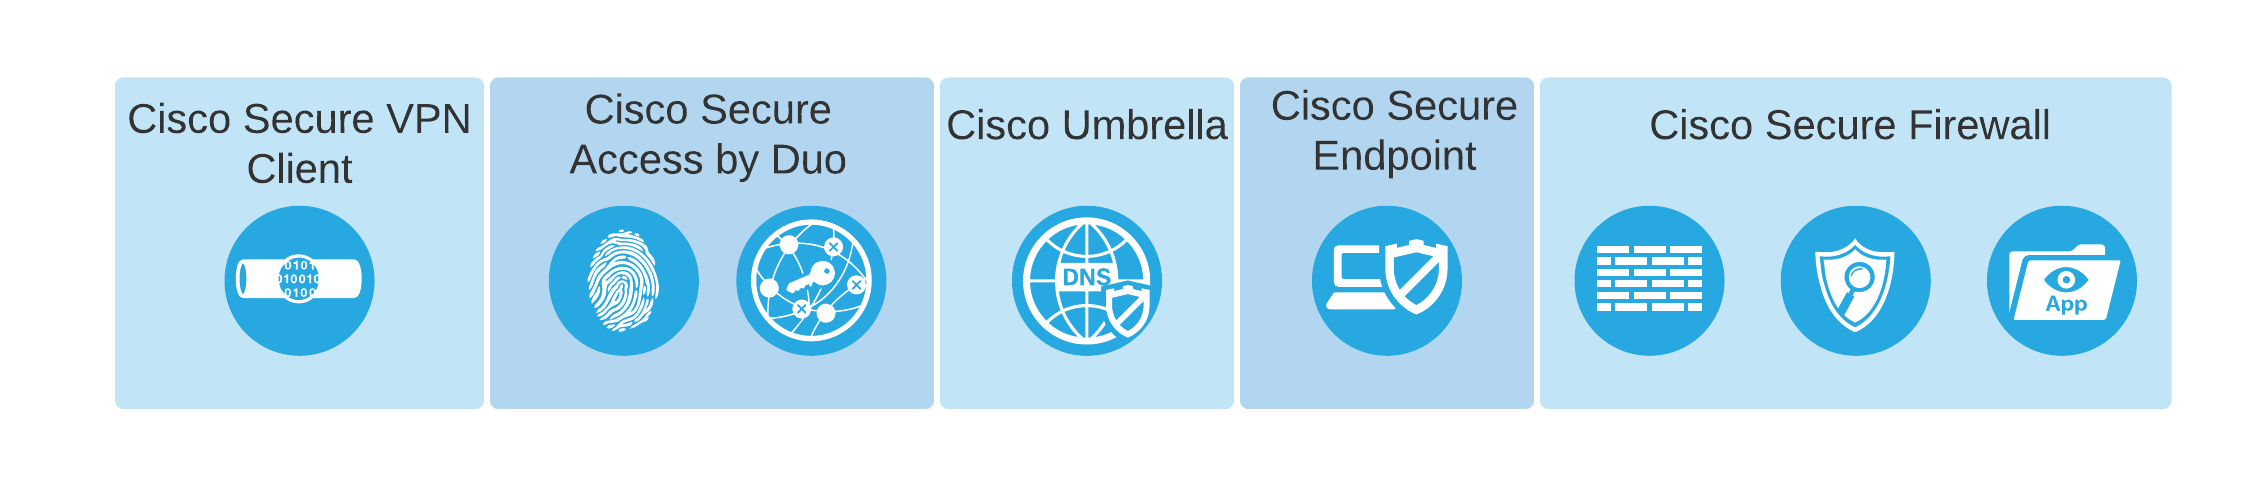
This Cisco Validated Design guide (CVD) covers the following devices and modules to extend security to remote workers.
| Devices / Modules |
Functionality |
| Cisco Secure VPN Mobility Client |
VPN Client for endpoints |
| Cisco Secure Firewall (FTD) |
VPN Gateway / VPN concentrator |
| Cisco Secure Access by Duo |
Multi-factor authentication |
| Cisco Umbrella Roaming Security Module |
Cloud delivered security |
| Cisco Secure Endpoint Enabler |
Anti-Virus and Malware protection for endpoints |
Cisco Secure Access by Duo
Cisco Secure Access by Duo is a user-friendly, scalable way to keep business ahead of ever-changing security threats by implementing part of the Zero Trust security model. Multi-factor authentication from Duo protects the network by using a second source of validation, like a phone or token, to verify user identity before granting access. Duo is engineered to provide a simple, streamlined login experience for every remote user. As a cloud-based solution, it integrates easily with your existing technology and provides administration, visibility, and monitoring.
Cisco Secure Access by Duo integrates with Cisco FTD VPN to add two-factor authentication for Secure VPN logins. Duo supports two-factor authentication for FTD using RADIUS authentication. With this configuration, end-users receive an automatic push or phone call for multi-factor authentication after submitting their primary credentials using the Secure VPN Mobility Client. Users may append a different factor selection to their password entry.
Cisco Secure VPN (formerly AnyConnect Secure Mobility Client)
Cisco Secure VPN empowers remote workers with frictionless, highly secure access to the enterprise network from any device, at any time, in any location while protecting the organization. It provides a consistent user experience across devices, both on and off premises, without creating a headache for your IT teams. Simplify management with a single agent.
Note: Strong encryption license is required in smart account
Cisco Umbrella Roaming Security Module
Cisco Umbrella Roaming Security module for Cisco Secure VPN provides always-on security on any network, anywhere, any time. The Roaming Security module enforces security through Umbrella’s Secure Internet Gateway (SIG). Cisco Umbrella SIG unifies multiple functions in a single solution that traditionally required a set of on-premises security appliances (firewalls, proxies, gateways) or single function cloud-based security solutions. Umbrella provides real-time visibility and control for all internet activity both on and off your network or VPN.
License requirement to enable Umbrella Roaming Security Module:
| License |
Functionality |
| Cisco Umbrella Roaming service |
Enable Umbrella connectivity to roaming clients |
The same Umbrella Roaming Security module is used regardless of the subscription. Subscription is required to enable features.
Cisco Secure Endpoint (AMP) Enabler
Cisco Secure VPN AMP Enabler module is used as a medium for deploying Cisco Secure Endpoint, formerly Advanced Malware Protection (AMP). This approach provides the roaming workforce with an additional security agent that acts as an anti-virus and malware protection system. It detects potential malware threats, removes those threats, and protects the devices from compromise. Cisco Secure Endpoint protects the user both on and off the network or VPN.
Secure Endpoint License Comparison
| Product |
License |
| Cisco Secure Endpoint license |
Essential, Advantage or Premier |
Cisco Secure Firewall
The Cisco Secure Firewall running Firepower Threat Defense (FTD) helps you prevent breaches, get visibility to stop threats fast, and automate operations to save time. A next-generation firewall is a network security device that provides capabilities beyond a traditional, stateful firewall by adding capabilities like virtual private network (VPN), application visibility and control (AVC), Next-Generation IPS (NGIPS), URL filtering, and advanced malware protection. Cisco FTD is available on hardware and as a virtual appliance.
Cisco FTD has the following flexible management and configuration options:
| Management Options |
Detail |
| Firepower management center (FMC) |
Centralized Manager |
| Firepower Device Manager (FDM) |
On-box manager |
| Cisco Defense Orchestrator (CDO) |
Cloud-based (multi-device manager) |
| Application Programing Interface (API) |
Configuration, monitoring and orchestration |
This design guide makes use of Cisco FMC to configure the firewalls.
Note: Licensing requirements for RAVPN can be found in Appendix A. The FTDs in this environment use AnyConnect Plus licenses.
Each product in the Cisco product portfolio has a unique role to play when deploying an RAVPN solution. A key component of this deployment guide is to provide guidance on the integration of these products into a cohesive security solution. In this guide:
● Cisco FTDs are configured to accept VPN connections from Cisco Secure VPN clients
● Cisco Secure Access by Duo is installed to validate the identity of connections from Cisco Secure VPN clients
● Upon successful connection to the VPN, the Cisco Umbrella Roaming Security module is delivered to the clients for cloud security protection when not using the VPN tunnel
● Upon successful connection to the VPN, the Cisco Secure Endpoint package is delivered to the clients for anti-virus and malware protection
Note: Cisco Secure Access by Duo, Umbrella, and Secure Endpoint offer EU (European Union) based locations for customers having to follow EU rules.
Policy Setup for Secure VPN Client Modules
Before doing the Remote Worker deployment steps, the policies for the VPN modules need to be set up first. This will reduce the number of steps in the deployment section and remove unnecessary overhead during that process.
This policy will be applied to any remote workers that are roaming. For this guide, only Umbrella DNS will be used. For a more in-depth Umbrella solution, including Web security, Data Loss Prevention and Remote Browser Isolation see the Cisco Umbrella Security Policy details here.
Step 1. Go to Policies -> Management -> DNS Policies

Step 2. Add a new policy on the top right
![]()
Step 3. Leave everything as the default and click next
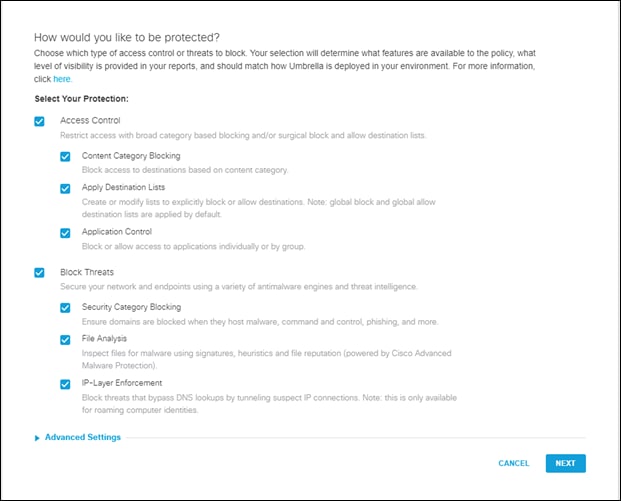
Note: For more information on Umbrella best practices for policy creation, go here.
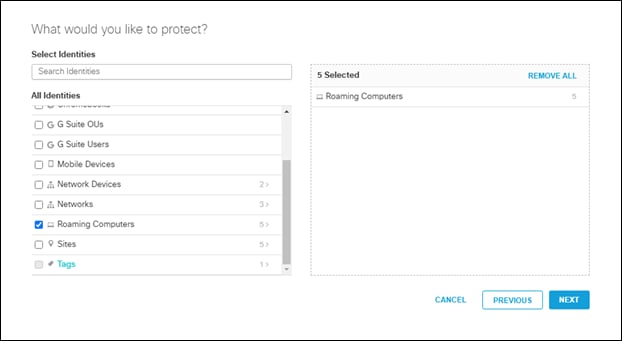
Step 4. Add roaming computers to the policy and click next
Note: For more information on Umbrella Policy precedence, go here.
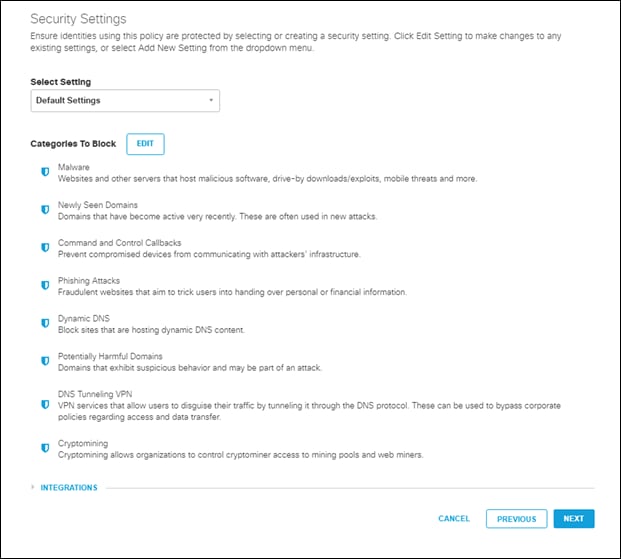
Step 5. Leave the next page with all the defaults and click next
Note: For more information on Umbrella Security Categories, go here.
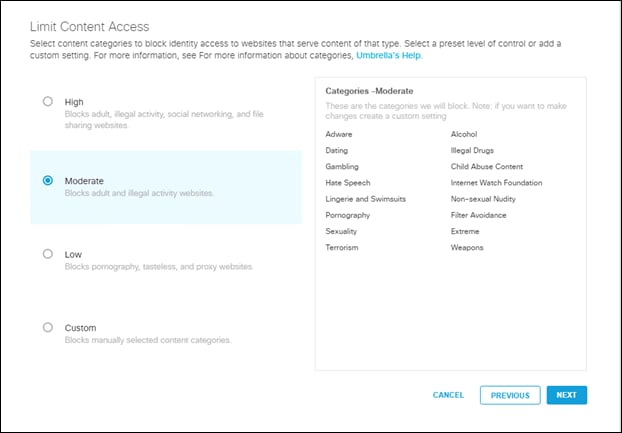
Step 6. Change the Content Access to Moderate and click next
Note: For more information on managing Umbrella Content categories go here.
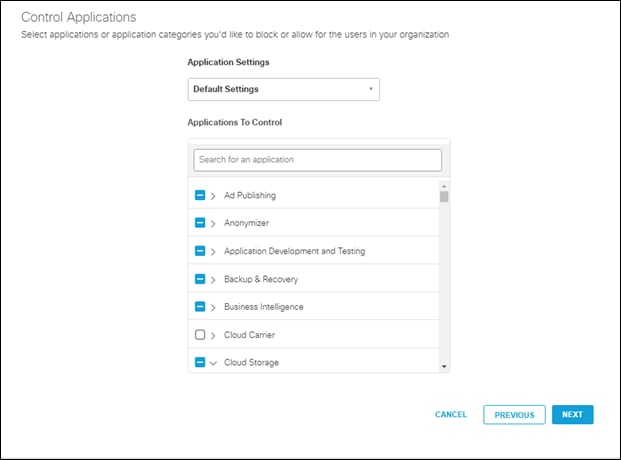
Step 7. The Control Applications section can be left as is, click on next
Note: For more information on Umbrella Application categories, go here.
Step 8. Apply a Destination List to your roaming users. For this design guide, the destination list has been left as default. Click next
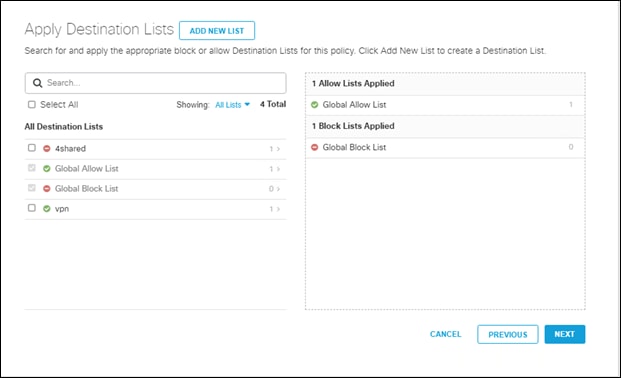
Note: For more information on managing Umbrella Destination Lists, go here.
Step 9. File Analysis in Umbrella is out of scope for this design guide and therefore is disabled. Click next
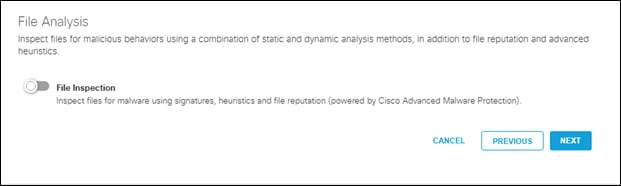
Note: For more information on Umbrella File analysis, go here.
Step 10. Leave the block page as the default
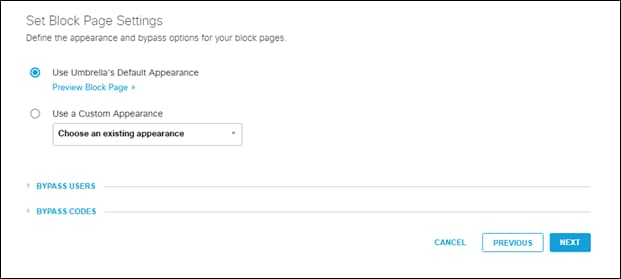
Note: For more information on Umbrella Block pages, go here.
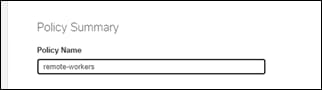
Step 11. On the policy summary page, give the policy a meaningful name and click on Save
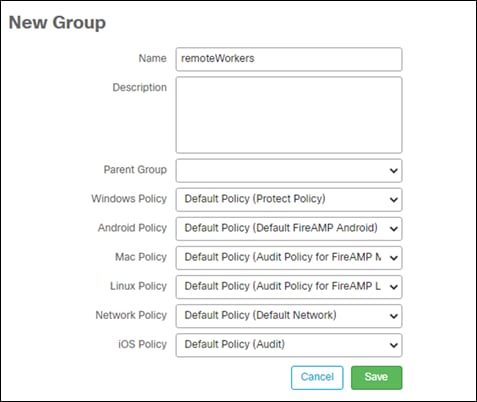
A Secure Endpoint group needs to be created for an AnyConnect module to be created. These steps go over creating that group.
Step 1. Go to Management -> Groups

Step 2. Click on create group on the right side

Step 3. Give the new group a meaningful name and leave everything as the default, then Save
| Product |
Version |
| Cisco Firepower Threat Defense |
7.0 |
| Cisco Secure VPN |
4.10.03 |
| Cisco Umbrella |
N/A |
| Cisco Secure Endpoint Connector |
7.2.11 |
| Cisco Secure Access by Duo |
N/A |
Cisco Firepower Threat Defense
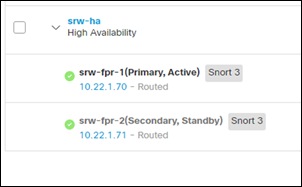
The deployment steps in this design guide assume that the FTD devices are managed by FMC, have been deployed as a High Availability Pair and are accessible over the WAN network. For installation and deployment guides:
Firewall Management Center Virtual Getting Started Guide
Cisco Firepower 4100 Getting Started Guide
Cisco Firepower Split Tunneling Configuration
High Availability for Firepower Threat Defense
Note: This design guide uses the Firepower 4110 for testing and validation. The version needed for your environment may change depending on access requirements. For performance information see the Cisco Firepower 4100 Series Data Sheet.
Once they have been installed, the interfaces, routing, NAT (Network Address Translation), and policy can be applied to the devices.
Interfaces
Typically, a minimum of two interfaces must be configured to have a system that passes meaningful traffic. Normally, you would have an outside interface that faces the upstream router or internet, and one or more inside interfaces for your organizations network(s). For this design guide, the outside interface is used as the ingress interface for VPN connections and the inside interface is used to denote the link to the rest of the network.
For more information on the configuration of Interfaces in Firewall Management Center go here.
Outside Interface
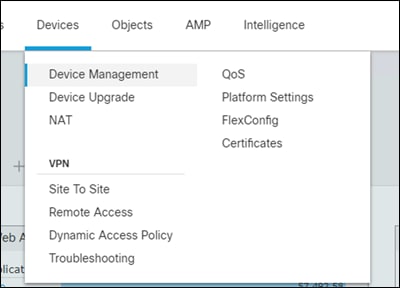
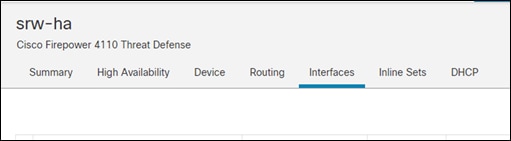
Step 1. Go to Devices -> Device Management in the FMC
Step 2. Click on the FTD or HA (High Availability) pair name

Step 3. Go to the Interfaces tab
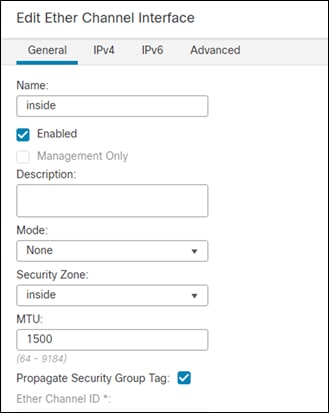
Step 4. Edit the interface that is going to the outside using the pencil icon on the right side. In this case it is port-channel1.
![]()
Step 5. Give it a meaningful name. This guide uses outside.
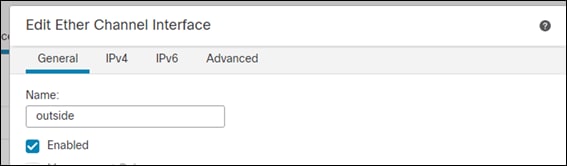
Step 6. In the security zone section, open the dropdown and create a new zone
Step 7. Give it a meaningful name. This guide uses outside. Click OK. This will create a new zone.
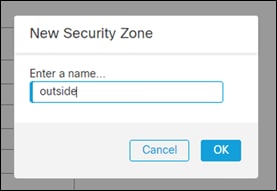
Step 8. Verify that the new zone was created and is filled in on the dropdown

Step 9. Go to the IPv4 tab
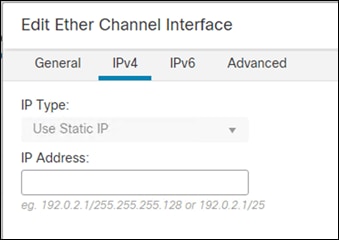
Step 10. Fill in the publicly addressable IP address for your company with a netmask of 255.255.255.254.
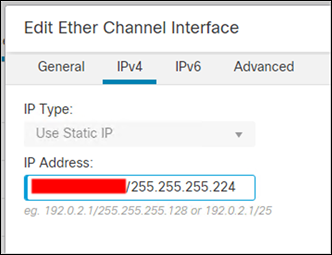
Step 11. Click OK. Verify the interface information is on the device interface page.
![]()
Step 12. Click on Save on the top right to save this configuration

Inside Interface
Step 1. For the inside interface, repeat the same steps taken for the outside interface.
Step 2. Set the internal IP address to be the gateway for all the internal IPs.
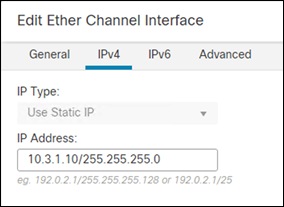
Step 3. Click Ok, verify the information is in the interfaces tab and then save the configuration on the top right.
Routing
Cisco FTD supports several Internet protocols for routing:
● Enhanced Interior Gateway Routing Protocol (EIGRP)
● Open Shortest Path First (OSPF)
● Routing Information Protocol (RIP)
● Border Gateway Protocol (BGP)
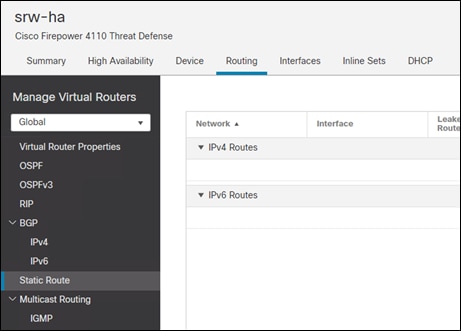
This design guide was validated using static routing, however, more details on setting up dynamic routing on Firewall Management Center can be found here.
Step 1. Go to Devices -> Device Management in the FMC

Step 2. Click on the FTD or HA pair name
Step 3. Go to the Routing tab then to the Static Route section
Step 4. Click on Add Route
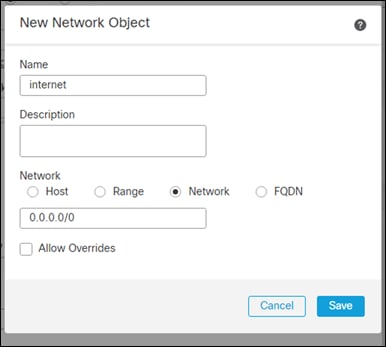
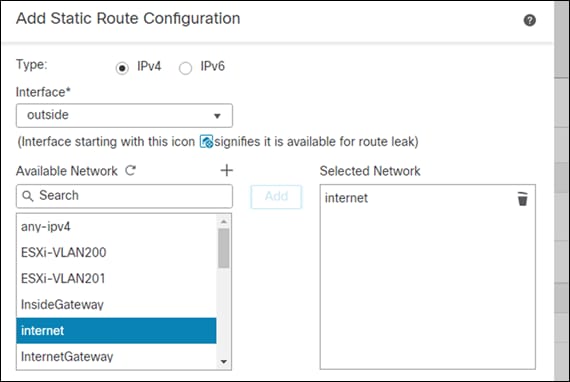
Step 5. Select the outside interface, then create a new Available Network
Step 6. Give it a meaningful name, this guide will use internet, change the network radio button to Network, fill in 0.0.0.0/0 and Save
Step 7. Add the network that was created to the Selected Network section using the Add button
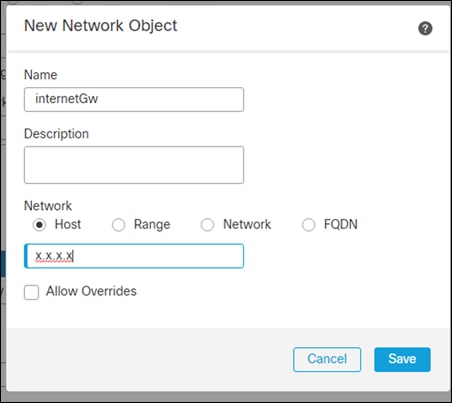
Step 8. Create a new gateway by pressing the plus (+) symbol
Step 9. Give it a meaningful name. This guide uses internetGw. Fill in the host box with the outside interfaces next hop and click Save
Step 10. Verify the information is in the static route page and save the config on the top right of FMC
![]()
NAT
For this design guide, it is assumed that the Cisco FTD pair used for VPN access is also being used as the Internet Edge for the network. To facilitate this, NAT must be deployed for all internal traffic to reach the Internet. This will be used for application updates, on-site workers, FMC, and any other needs of different applications that may need the Internet.
Note: If the Internet edge is located in another part of the network, skip this step, and create a route between the VPN firewall and the edge router(s).
For additional information on NAT go here.
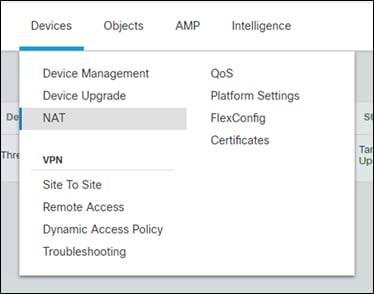
Step 1. Go to Devices -> NAT
Step 2. Create a new policy using the Threat Defense NAT option
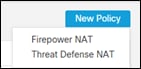
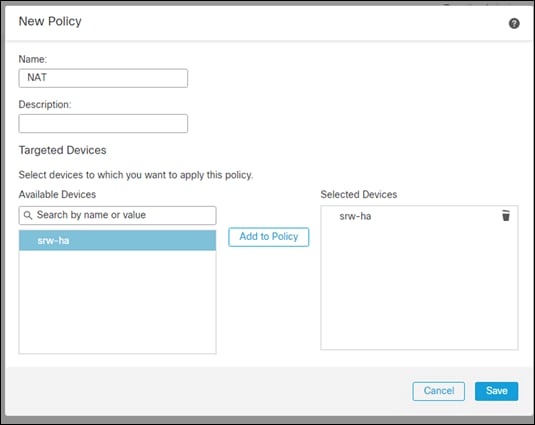
Step 3. Add a meaningful Name to the policy, Add the FTD device to the Selected Devices section, and click Save
Step 4. Edit the new NAT policy using the pencil icon and create a new rule on the right side
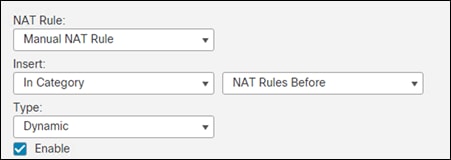
Step 5. Make the NAT rule a Manual NAT Rule with a Type Dynamic
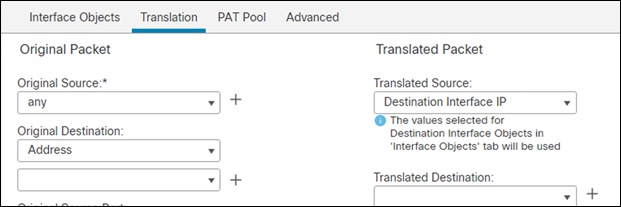
Step 6. In the Translation tab, change the Original Source to any, Original Destination to Address and Translated Source to Destination Interface IP
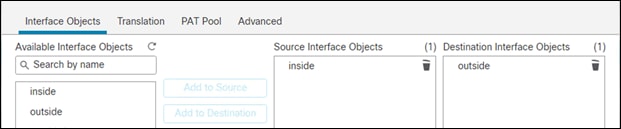
Step 7. In the Interface Objects tab, add inside to Source Interface Objects and outside to the Destination Interface Objects, then Save
Step 8. Verify the rule is in the rule list and click Save on the top right
![]()
Policy
If you created a basic Block all traffic access control policy when you registered the FTD with the FMC, then you need to add rules to the policy to allow traffic through the device. If NAT was configured in the previous section, this procedure will show you how to create a rule that allows internal devices to communicate to the Internet, Policies to allow traffic from the VPN subnet to the internal network will be shown later in the document.
For more advanced security rules, see the Firewall Management Center Configuration Guide.
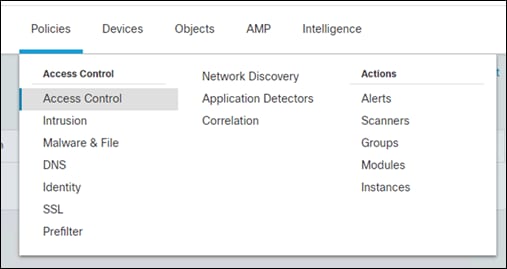
Step 1. Go to Policies -> Access Control
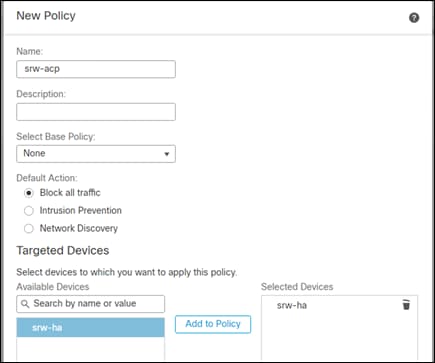
Step 2. Create a new policy on the right and give it a meaningful name. Add the FTD device to the selected devices and click Save.
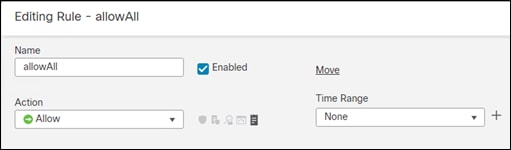
Step 3. Edit the new policy using the pencil icon and click + Add Rule

Step 4. Add a meaningful Name to the policy, with the action Allow
Step 5. On the Networks tab, Add your internal address scheme to the Source Networks. Save the rule
Step 6. Verify there are two rules, a default deny and an allow for all internal traffic to get out. Save this policy

Deploy
Step 1. Go to Deploy -> Deployment
Step 2. Verify there is the FTD pending a deployment

Step 3. Select the FTD and deploy

Step 4. FTD initial setup is finished once it has successfully deployed

To install the authentication proxy, please follow the Cisco Firepower Threat Defense VPN with AnyConnect document.
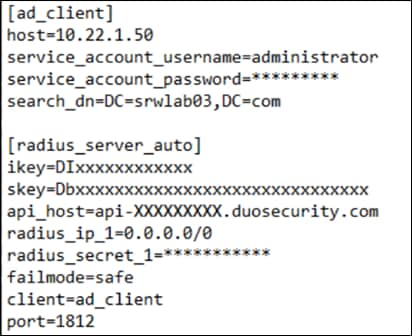
Auth Proxy
The auth proxy config should look like this:
Directory Sync
So that we do not need to make a new user each time someone needs to login, we can make use of the Duo Directory Sync. This allows Duo to get the users and groups from the AD server using the authentication proxy. You can setup the Directory Sync using these directions.
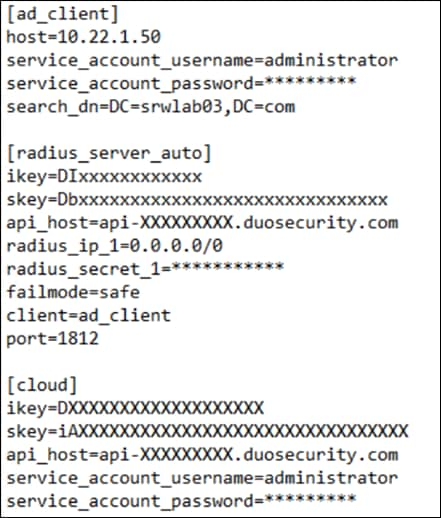
Note: Since the authentication proxy has already been installed, you can add a new cloud section to the configuration instead of installing a second authentication proxy.
The authentication proxy configuration file should now look like this:
Duo Security Policy
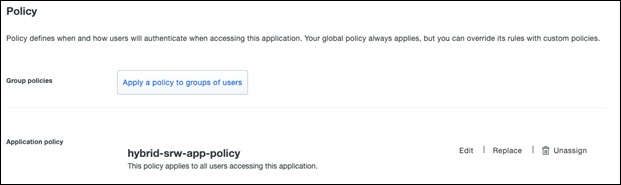
We will change the policy for the FTD VPN application was created in Duo so that it will only allow connections from specific IP addresses and block all others.
Step 1. In the Duo administration dashboard go to Applications
Step 2. Select the application that is used to protect VPN connection to the FTD
Step 3. Go to Policy and in the Application Policy section, click edit
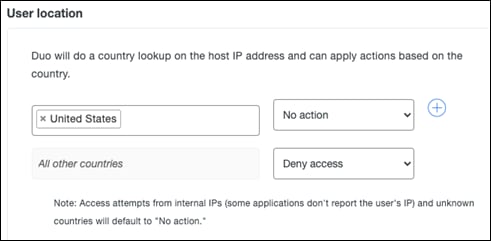
Step 4. Under User Location, click the search bar and choose the countries that will be enabled for VPN access. Next to All other countries, choose Deny access.
Step 5. Click Save Policy.
Cisco Secure VPN allows employees to access a company’s internal resources while remote and ensures those connections are secure.
The following deployment steps will cover:
● Downloading the Secure VPN files and adding them to FMC
● Navigating the Remote Access VPN wizard, including the integrations of Umbrella, Duo and Secure Endpoint.
File Download
Step 1. Download the Secure VPN (AnyConnect) files: https://software.cisco.com/download/home/286281283/type/282364313/release/4.10.03104
Note: For this design guide the windows and mac headend files are used, however, download any others you may need for your specific needs.
Step 2. Additionally, download the Profile Editor (Windows only) to make modifications to the Secure VPN package that will be attached to FMC.


Step 3. Upload to
Upload Files to FMC
Step 1. Go to Objects -> Object Management

Step 2. Go to VPN -> AnyConnect File
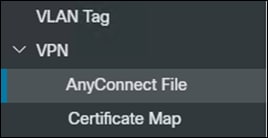
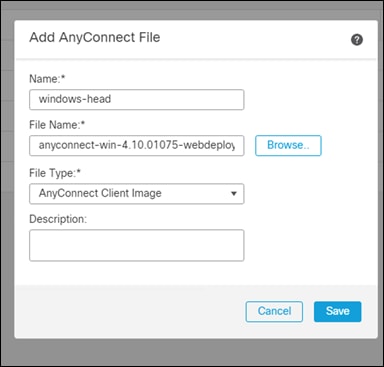
Step 3. Click Add AnyConnect File

Step 4. Provide a meaningful Name to the file.
Step 5. Click Browse and add the windows headend file that was downloaded in the previous section.
Step 6. Select AnyConnect Client Image as the file type.
Step 7. Click Save.
Step 8. Repeat as necessary for each of the operating systems that was downloaded.
Remote Access Policy Wizard
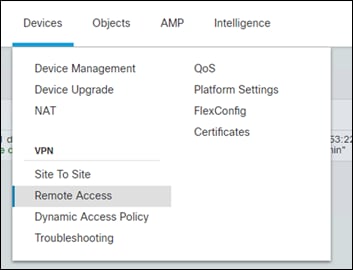
Step 1. Go to Devices -> Remote Access
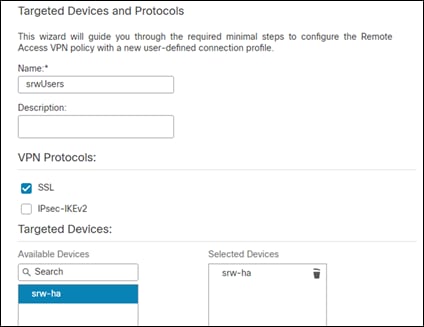
Step 2. Click Add on the top right, bringing you to a RA VPN Wizard
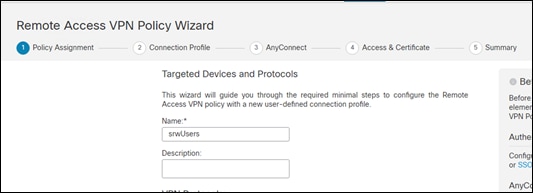
Step 3. Give the policy a meaningful name. Check the protocols you would like to use (this guide is using SSL) and add the FTD device to the Selected Devices section. Go to the next page
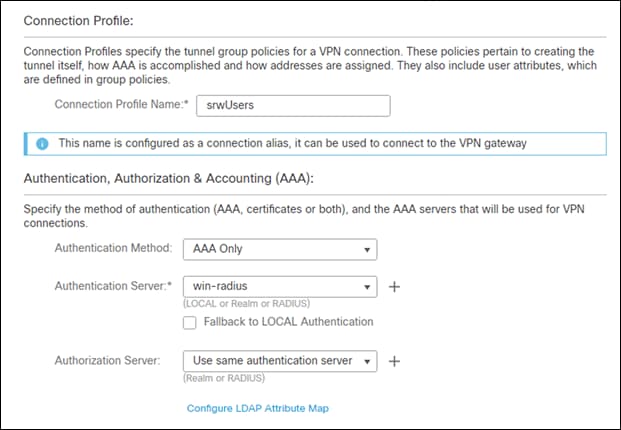
Step 4. In the Connection Profile make sure the authentication method is AAA Only, the authentication server is set to the Duo Authentication proxy that was created earlier.
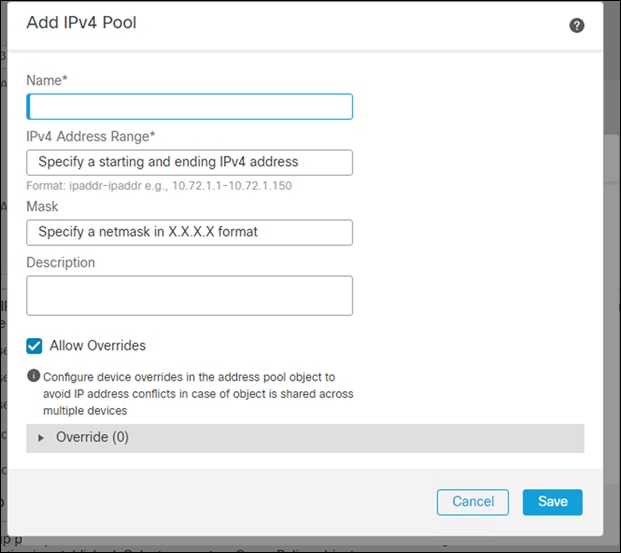
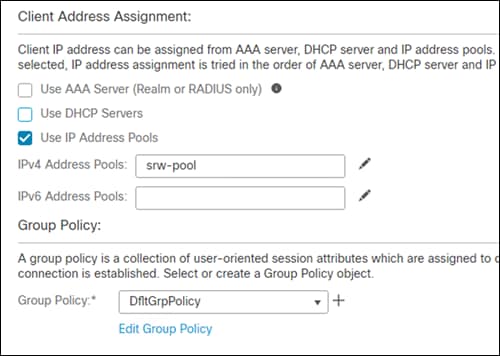
Step 5. In the Client Address Assignment, edit the IPv4 pool and add a new one
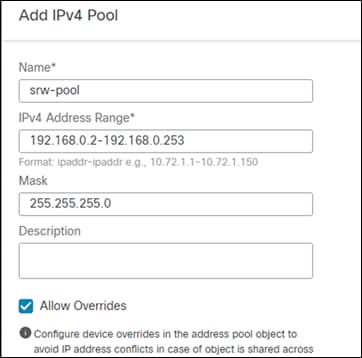
Step 6. Give the address pool a meaningful name. Enter a network range and netmask to be assigned to your remote users. Click Save
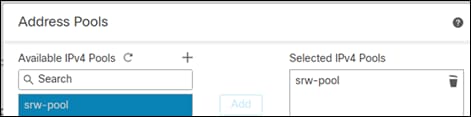
Step 7. Add the newly created pool to the Selected IPv4 Pools section. Click Ok
Step 8. Leave everything else as is and click next
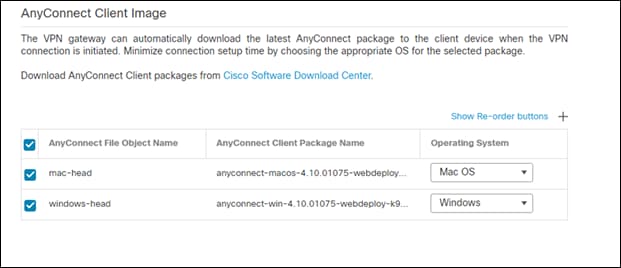
Step 9. Select the AnyConnect images that were downloaded in the previous section. Click Next
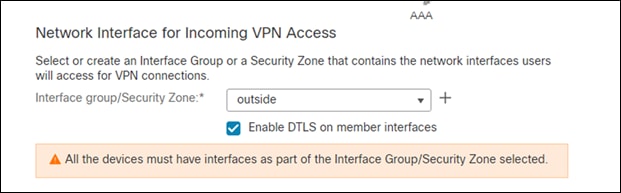
Step 10. Set the network interface to outside
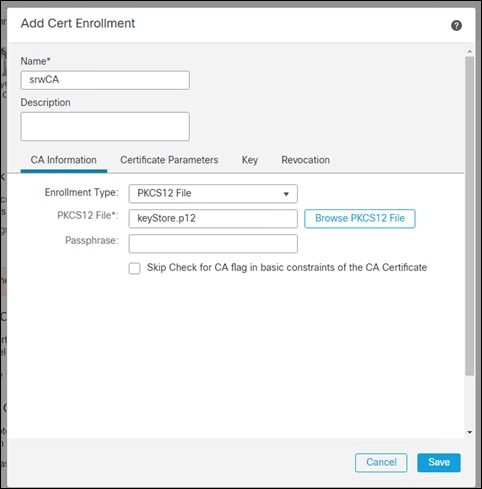
Step 11. In the Device Certificates section, add a new certificate
Note: Obtaining a certificate for the FTD, also known as PKI enrollment, is explained in Firepower Threat Defense Certificate-Based Authentication. This chapter contains a full description of configuring, enrolling, and maintaining certificates in FMC.
Step 12. Give the certificate a meaningful Name. This design guide makes use of a PKCS12 File from Active Directory. Add the certificate option that best suits your network from the note above. Click Save
Step 13. Click Next

Step 14. Verify the information is correct on the last page and click finish
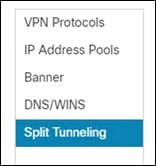
Split Tunneling
In this guide only traffic that is destined for our internal network will be sent down the VPN tunnel
Step 1. Go to Devices -> Remote Access and edit the VPN profile that was created in the previous section
Step 2. Edit the group policy and go to the Split Tunneling section
Step 3. Change the IPv4 and IPv6 split tunneling dropdowns to tunnel networks specified below.
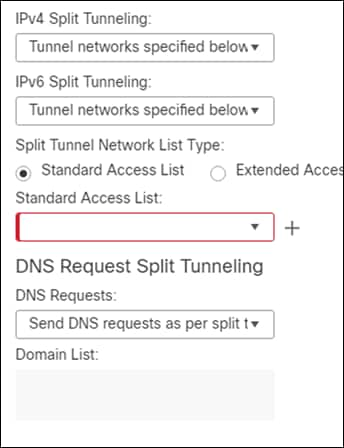
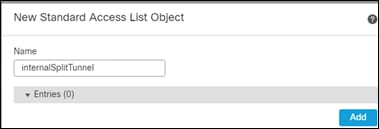
Step 4. Create a new Standard Access List by clicking on the plus sign
Step 5. Give it a meaningful name and click on the Add button.
Step 6. Leave it as an allow and add the subnet(s) for your internal network into the Selected Network box.
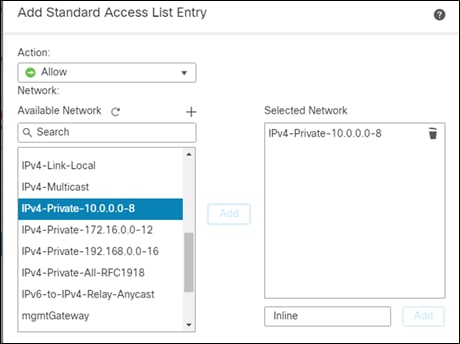
Step 7. Click on Add, then Save the configuration
Step 8. The new ACL that was created should fill in the access list box
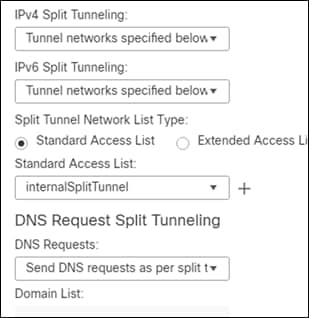
Step 9. Save the group policy, save the VPN profile, and save the policy.
Step 10. Go to Policies -> Access Control and edit the policy attached to the VPN FTD
Step 11. Create a new allow rule and give it a meaningful name

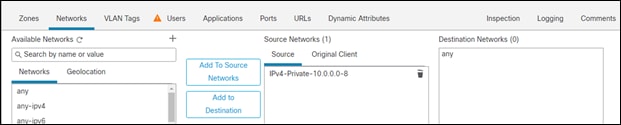
Step 12. Add the outside zone to the source zones and inside zone to the destination zones.
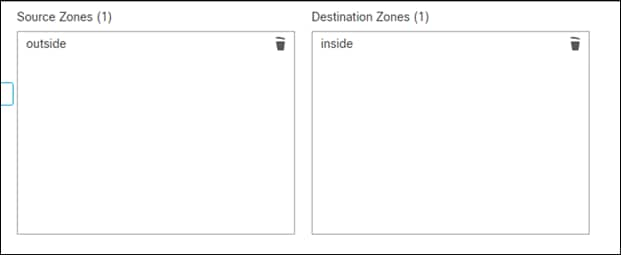
Step 13. On the Networks tab, add the VPN address pool to the source networks and the internal net to destination address.

Step 14. Click Save
Cisco Umbrella Roaming Security module
The Cisco Umbrella Roaming Security module will be used to protect users while on or off the VPN
Download umbrella roaming security profile
Step 1. Login into your umbrella account at dashboard.umbrella.com
Step 2. Go to Deployments -> Roaming Computers
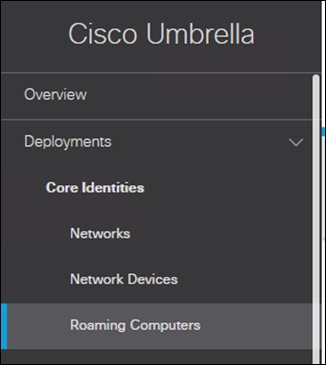
Step 3. Click on the Roaming Client download button

Step 4. Download the module profile at the bottom of the download window
Step 5. It should download as OrgInfo.json

Add profile to VPN profile
Step 6. On the FMC, go to Devices -> Remote Access VPN and edit the VPN policy created previously
Step 7. Edit the connection profile that was created in the previous steps, then edit the Group Policy
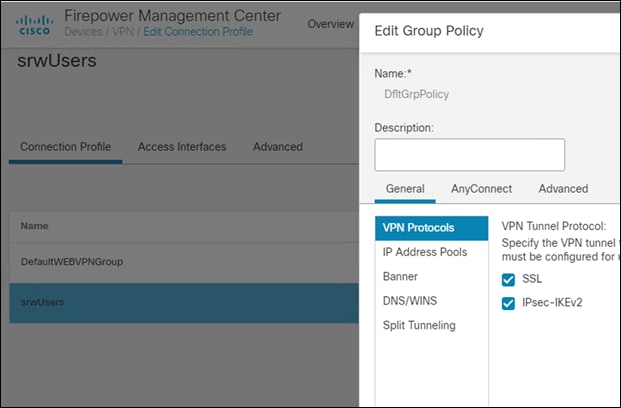
Step 8. Go to the AnyConnect tab and then to Client Modules
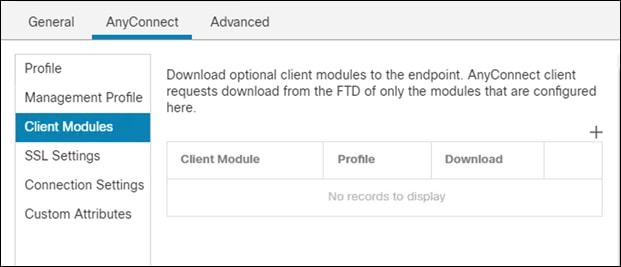
Step 9. Click the plus sign to add a new module

Step 10. Change the Client Module to Umbrella Roaming Security
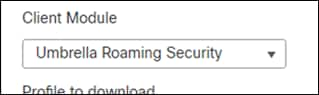
Step 11. Then click on the plus sign to add a new profile
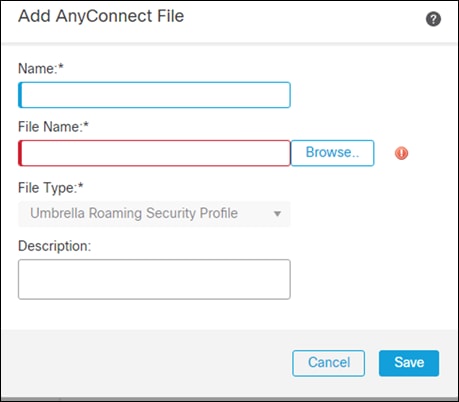
Step 12. Give it a meaningful name and browse to the OrgInfo.json file. Click Save

Step 13. Make sure the profile is the new one that was created with the Umbrella orgInfo file and check the Enable Module Download box
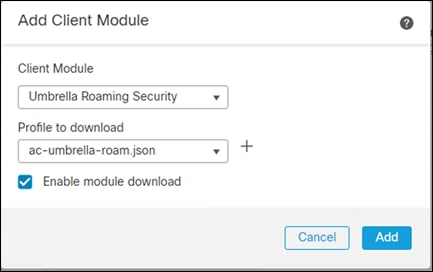
Step 14. Click Add
Cisco Secure Endpoint Connector
Secure Endpoint connector will be used to secure the roaming client from malicious files and activity.
Download Connector
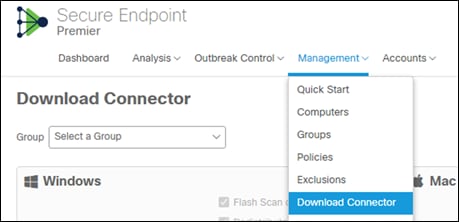
Step 1. Go to Management -> Download Connector
Step 2. Select the group that was created earlier in this guide
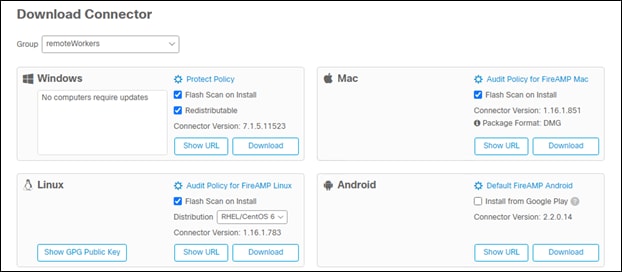
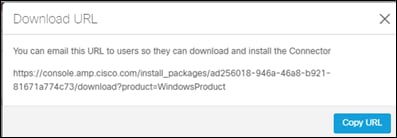
Step 3. Show the URL for the windows and mac connectors, then copy them to a notepad file for future use
Create AMP Profile
Step 1. Install the AnyConnect profile editor that was downloaded in the AnyConnect headend file steps
![]()
Step 2. After it has been installed, open the AMP Enabler Profile Editor

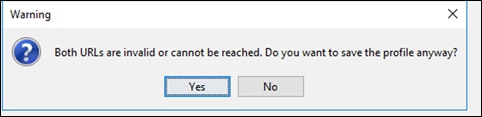
Step 3. Leave the radio on Install AMP Enabler and put the two URLs (uniform resource locators) for the connectors in their respective boxes
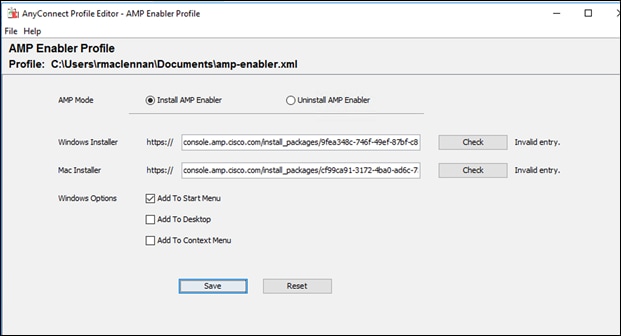
Note: If the check fails, paste the URL into a browser and see if it downloads. If it does, then you may save this configuration
Step 4. Save the profile and accept the message about the URLs (uniform resource locators) being invalid
Step 5. The file should now be saved as amp-enabler.xml in your documents folder

Add AMP enabler to the RA VPN profile
Step 1. Go back to the RAVPN for Client Modules on the FMC
Step 2. Click the plus sign to add a New Module
Step 3. Change the client module to AMP Enabler and add a new profile.
Step 4. Give it a meaningful name and upload the amp-enabler xml file. Click Save
Step 5. Check the Enable Module Download box and click on Add.
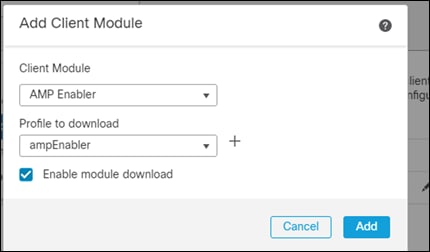
Step 6. Click on Save, Save, and Save once more
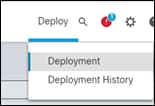
Step 7. Deploy these changes

Step 8. Connect to the VPN and make sure the modules get installed

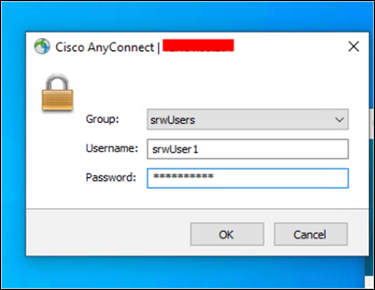
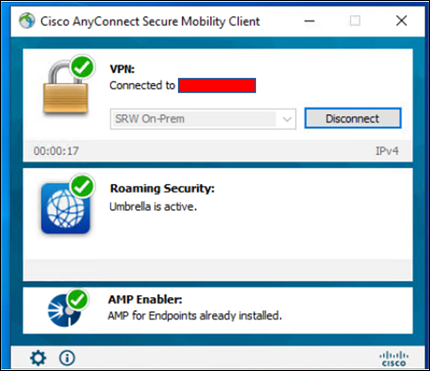
Test Case 1– Cisco Duo two-factor authentication (2FA)
Step 1. On a roaming device, open AnyConnect Secure Mobility Client
Step 2. Select the network to be connected to and press Connect.
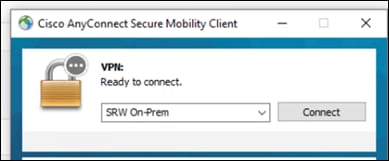
Step 3. Enter the credentials for a valid user and press OK.
Step 4. If configured correctly, you will get a Duo push notification
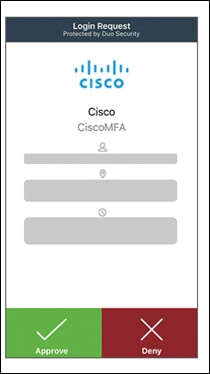
Step 5. Approve the request and finish the connection
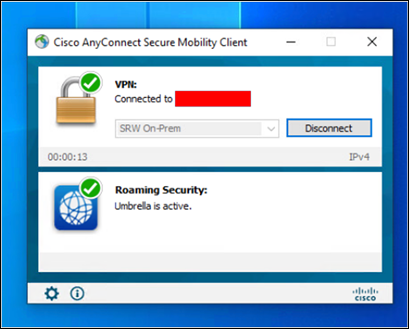
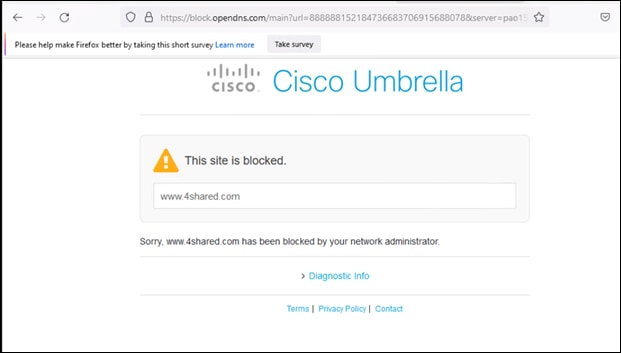
Test Case 2 – Cisco Umbrella Roaming Security Module (DNS layer protection)
Step 1. Open AnyConnect Secure Mobility Client and verify the Roaming Security module is active
Step 2. Open any browser and connect to 4shared.com. Verify it has been blocked.
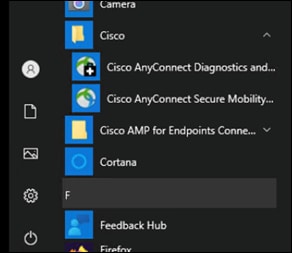
Test Case 3 – Cisco Secure Endpoint AMP enabler (File blocking)
Step 1. Verify the AMP enabler is installed
Step 2. Go to eicar.org
![]()
Step 3. Download the eicar.com file
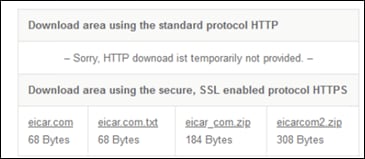
Step 4. After saving the file, it should either fail or be removed immediately

Step 5. In the Secure Endpoint Dashboard, navigate to the Analysis -> Event page
Step 6. There should be a block for the file in the events
![]()
Test Case 4 – Geolocation blocking
This test will validate that the geo block in Duo is successfully blocking connection attempts from devices outside of the geographical range set in Duo.
Step 1. Connect to the VPN from a region that is allowed to connect and login.
Step 2. A Duo prompt should be pushed to the device and allow access
Step 3. Check the Duo reports page, there should be a User approved connection

Step 4. Disconnect and attempt to connect from a region that has not been enabled by your organization.
Note: If you do not have a means of testing with a device outside of your region, temporarily change the allow list to block the current region you are in to test that a region block will be successful.
Step 5. A Duo prompt should not come up and it should continue to ask for login information.
Step 6. Check the Duo reports page, there should be a block with a reason of Location restricted

Appendix A - Licensing information
This section defines the packaging structure and licensing information for the Cisco Secure VPN. The following Secure VPN licenses are available:
● Plus subscription license
● Plus perpetual license
● Apex subscription license
● VPN only perpetual license
Subscription licenses are term-based licenses available in terms of 12 to 60 months (about 5 years).
Perpetual licenses are permanent licenses.
Plus license includes basic VPN services such as device and per-application VPN, trusted network detection, basic device context collection, FIPS compliance, Network Access Manager 802.1X supplicant, the Cloud Web Security module, and the Cisco Umbrella Roaming module. The existing Secure VPN customers should think of AnyConnect Plus like the previous AnyConnect Essentials.
Apex license includes more advanced services such as endpoint posture checks (host scan through FTD VPN, or ISE Posture through the Cisco Identity Services Engine), network visibility, next-generation VPN encryption, and clientless remote access VPN as well as all the capabilities of AnyConnect Plus. The existing Secure VPN customers should think of AnyConnect Apex like the previous AnyConnect Premium and Premium Shared Licenses.
● Clientless (browser-based) VPN termination on the Cisco Adaptive Security Appliance
● VPN compliance and posture agent in conjunction with the Cisco Adaptive Security Appliance
● Unified compliance and posture agent in conjunction with the Cisco Identity Services Engine 1.3 or later
● Next-generation encryption (Suite B) with Secure VPN and third-party (non-Secure VPN) IKEv2 VPN clients
● Network Visibility Module
● All Plus services described above
VPN-only licenses are perpetual based, clientless, and may only be used on a single FTD. The web security module, cisco umbrella roaming, ISE posture, network visibility is not supported. VPN-only license provides the following functionality:
● VPN functionality for PC and mobile platforms, including per-application VPN on mobile platforms, Cisco phone VPN, and third-party (non-Secure VPN) IKEv2 VPN clients
● Clientless (browser-based) VPN termination on the Cisco Adaptive Security Appliance
● VPN-only compliance and posture agent in conjunction with the Cisco Adaptive Security Appliance
● FIPS compliance
● Next-generation encryption (Suite B) with Secure VPN and third-party (non-Secure VPN) IKEv2 VPN clients
The Secure VPN Licenses are supported on the following platforms:
● Cisco Adaptive Security Appliance (Physical and Virtual)
● Cisco Next-Generation Firewall (Physical and Virtual)
| Acronym |
Definition |
| ACL |
Access control list |
| AD |
Active Directory |
| AMP |
Advanced Malware Protection |
| AMP4E |
Advanced Malware Protection for Endpoints |
| ASAv |
Adaptive Security Virtual Appliance |
| ASDM |
Adaptive Security Appliance Device Manager |
| AVC |
Application Visibility and Control |
| CDO |
Cisco Defense Orchestrator |
| CVD |
Cisco Validated Design |
| FDM |
Firepower Device Manager |
| FMC |
Firewall Management Center |
| FQDN |
Fully Qualified Domain Name / Domain Name System (DNS) Name |
| FTD |
Firepower Threat Defense |
| MFA |
Multi Factor Authentication |
| PIN |
Place in network |
| RAVPN |
Remote Access Virtual Private Network |
| VPN |
Virtual Private Network |
Secure Remote Worker for AWS Design Guide
Secure Remote Worker for Azure Design Guide
Cisco Firepower 4100 Series Data Sheet
Cisco Firepower 9300 Series Data Sheet
Firewall Management Center Virtual Getting Started Guide
Cisco Firepower 4100 Getting Started Guide
Cisco Firepower 9300 Getting Started Guide
Cisco Firepower Split Tunneling Configuration
High Availability for Firepower Threat Defense
Cisco AnyConnect Secure Mobility Client
Cisco AnyConnect Secure Mobility License Ordering Guide
Cisco Umbrella Module for AnyConnect
Duo for Cisco AnyConnect VPN with ASA or Firepower
If you have feedback on this design guide or any of the Cisco Security design guides, please send an email to ask-security-cvd@cisco.com