SAFE Certificate Management Design Guide
Available Languages
Bias-Free Language
The documentation set for this product strives to use bias-free language. For the purposes of this documentation set, bias-free is defined as language that does not imply discrimination based on age, disability, gender, racial identity, ethnic identity, sexual orientation, socioeconomic status, and intersectionality. Exceptions may be present in the documentation due to language that is hardcoded in the user interfaces of the product software, language used based on RFP documentation, or language that is used by a referenced third-party product. Learn more about how Cisco is using Inclusive Language.
In Cisco SAFE, the Management domain includes the management of devices and systems using centralized services for consistent policy deployment, workflow change management and the ability to keep systems patched. The Management coordinates policies, objects, and alerting.
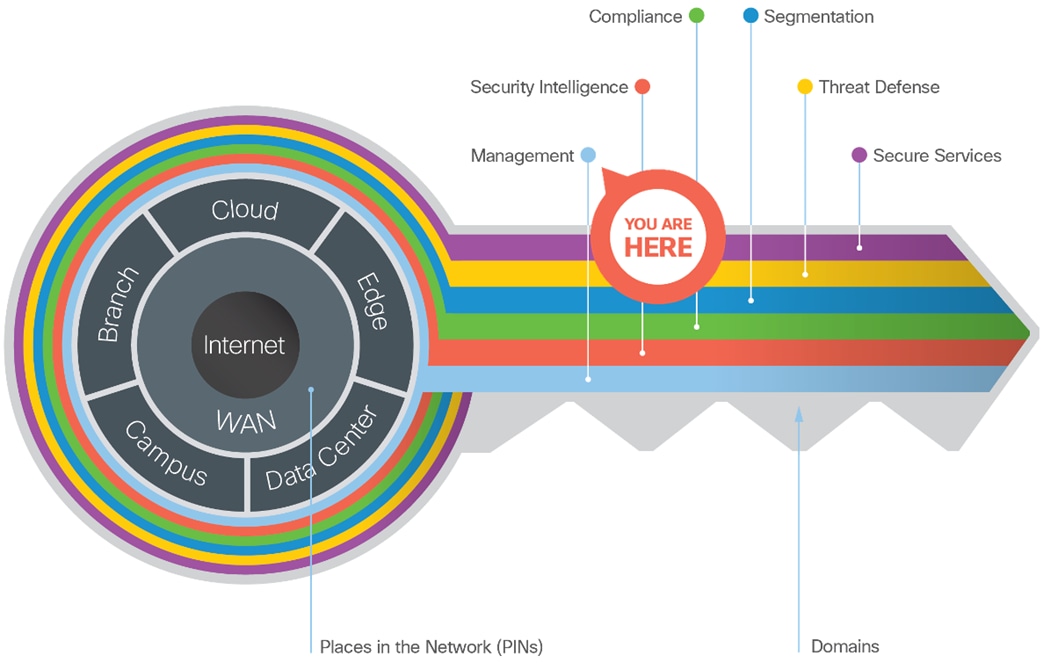
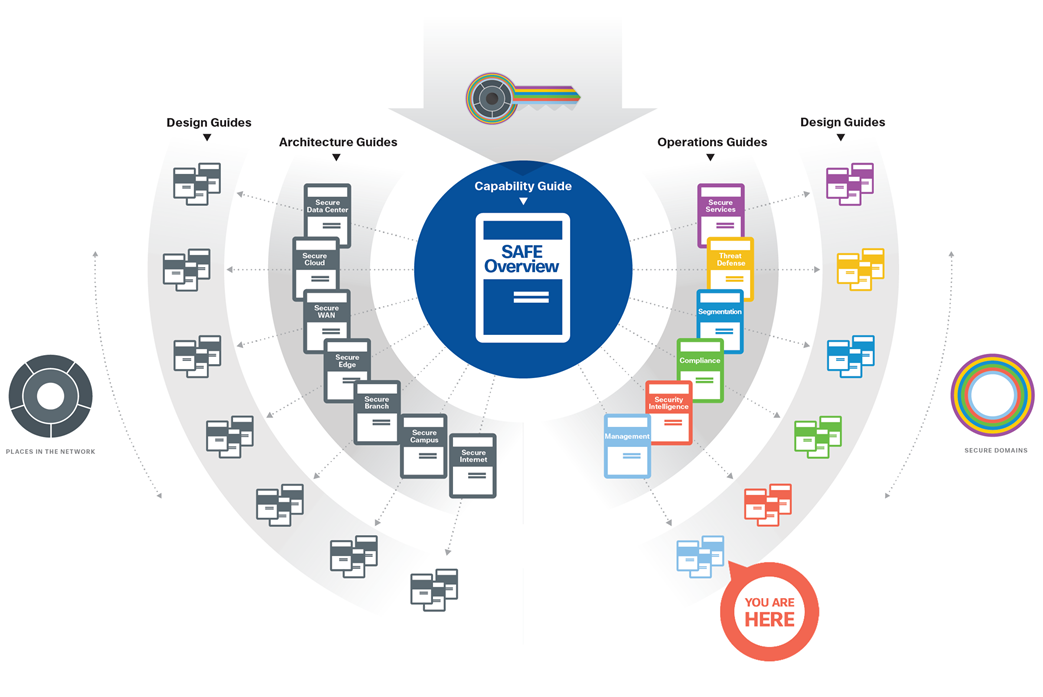
SAFE provides the Key to simplify cybersecurity into Secure Places in the Network (PINs) for infrastructure and Secure Domains for operational guidance.
SAFE simplifies security by starting with business flows, then addressing their respective threats with corresponding security capabilities, architectures, and designs. SAFE provides guidance that is holistic and understandable.
This operations design guide contains instructions for certificate management required by the Zero Trust: Network and Cloud Security design guide.
This guide is focused on Active Directory (AD) as an external certificate authority (CA). The guidance is provided for configuring certificates on security components that integrate with the Platform Exchange Grid (pxGrid) provided by Identity Services Engine (ISE). Guidance is also provided on how to setup Administrator certificates.
Create Externally Signed ISE Certificates for pxGrid and Admin Services
Integrating Secure Firewall with pxGrid requires that the Firewall Management Center (FMC) trust the root CA used to sign the ISE MNT server Admin certificate and the ISE pxGrid certificate.
This section will cover
● how to use ISE to generate Certificate Signing Requests (CSRs) for the pxGrid and Admin certificates
● the process of creating a template for the CSRs in AD
● the process for generating certificates from the CSRs in AD
● the process for adding the CA root certificate as a trusted CA in ISE.
Active Directory Certificate Authority: Export a Root Certificate
The external CA root certificate should be trusted in ISE before importing any certificates signed by the external CA.
Step 1. To export a root certificate from an Active Directory CA, Access the CA server by appending /certsrv/ to the AD server hostname, e.g.
● adserver.example.com
● adserver.example.com/certsrv/
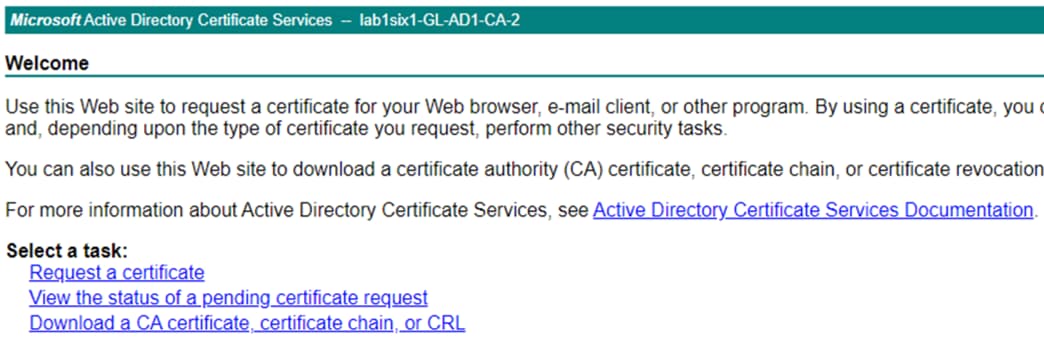
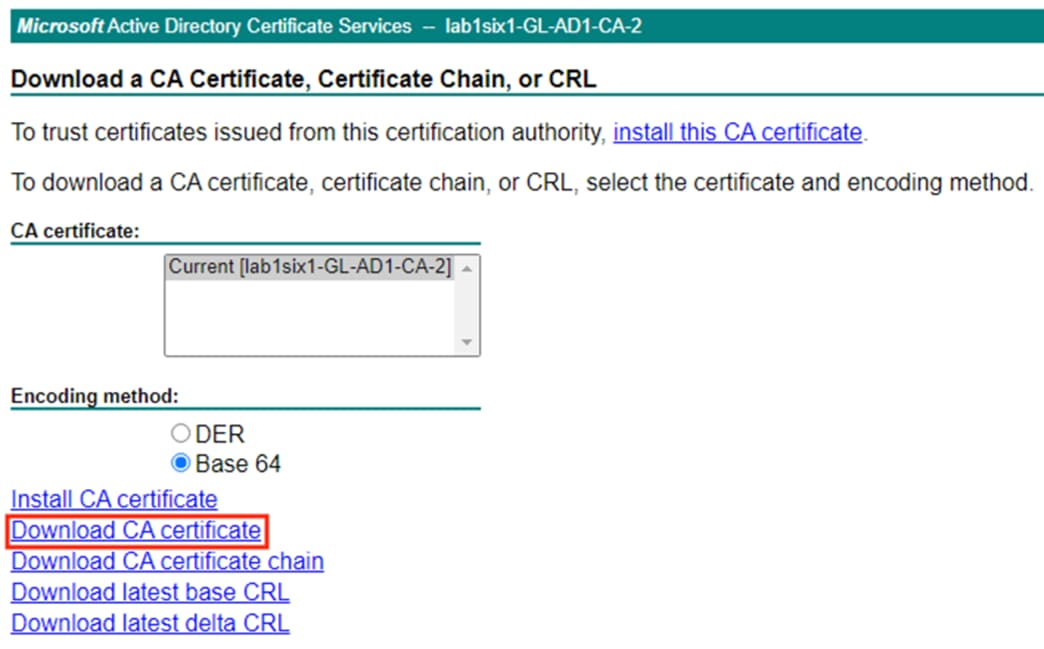
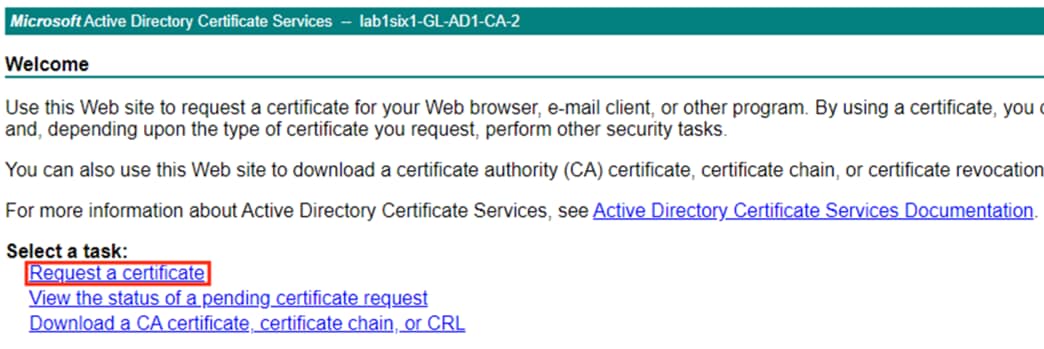
Step 2. Click the Download a CA certificate, certificate chain, or CRL option.
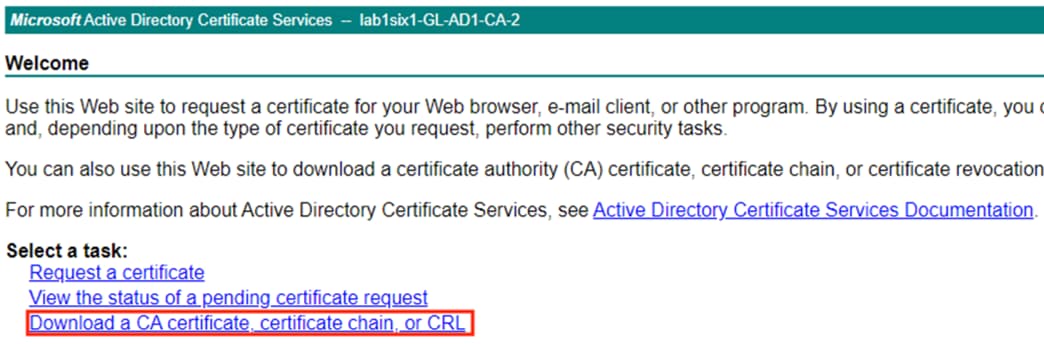
Step 3. Set the encoding method if desired, then click Download CA certificate.
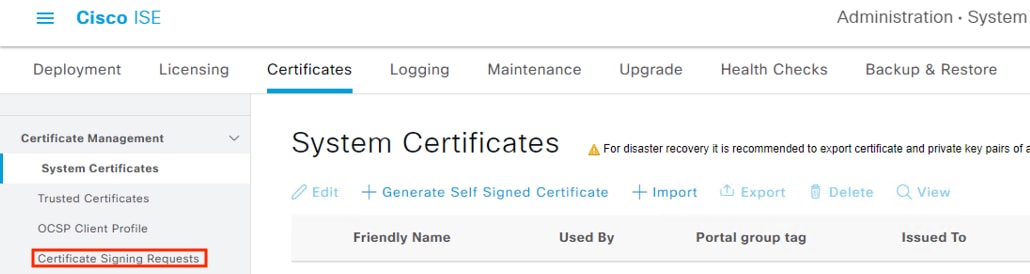
ISE: Add an External Certificate to the Trusted Certificate Store
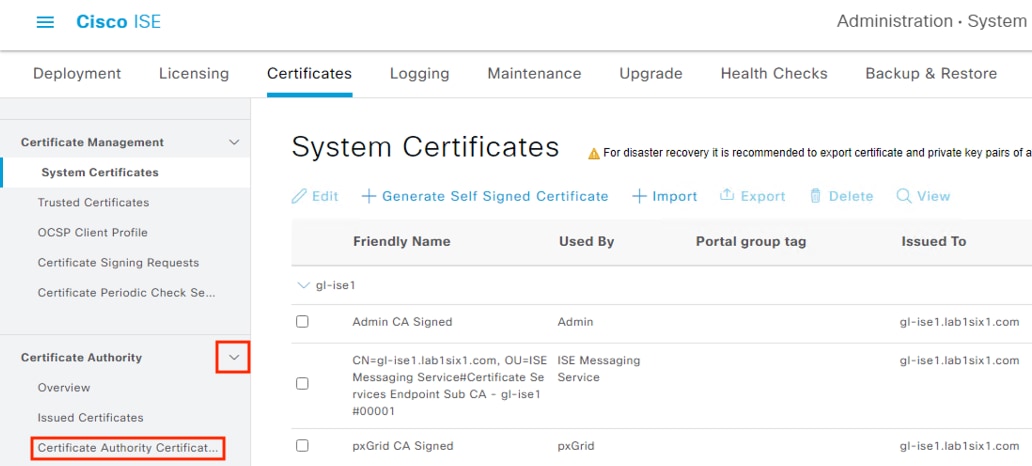
Step 1. Within ISE, click the Menu icon (![]() ) and navigate to Administration à System à Certificates.
) and navigate to Administration à System à Certificates.
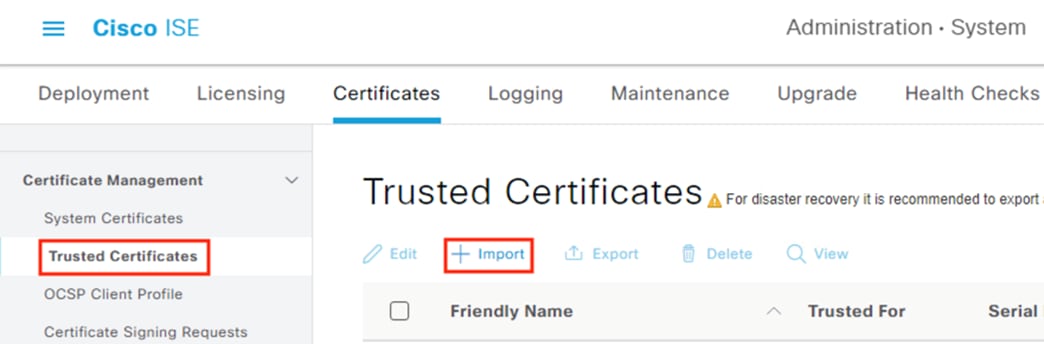
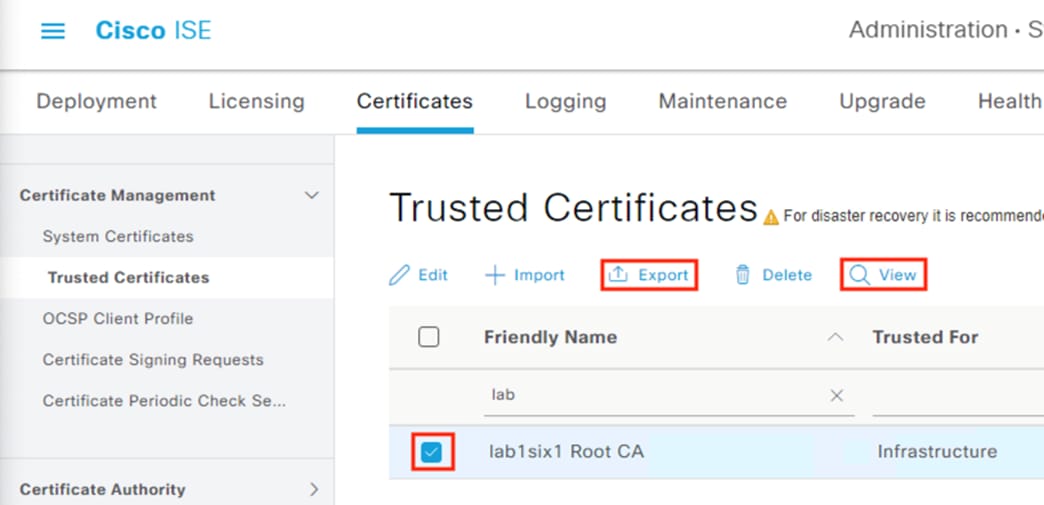
Step 2. Click on Trusted Certificates, then click Import.
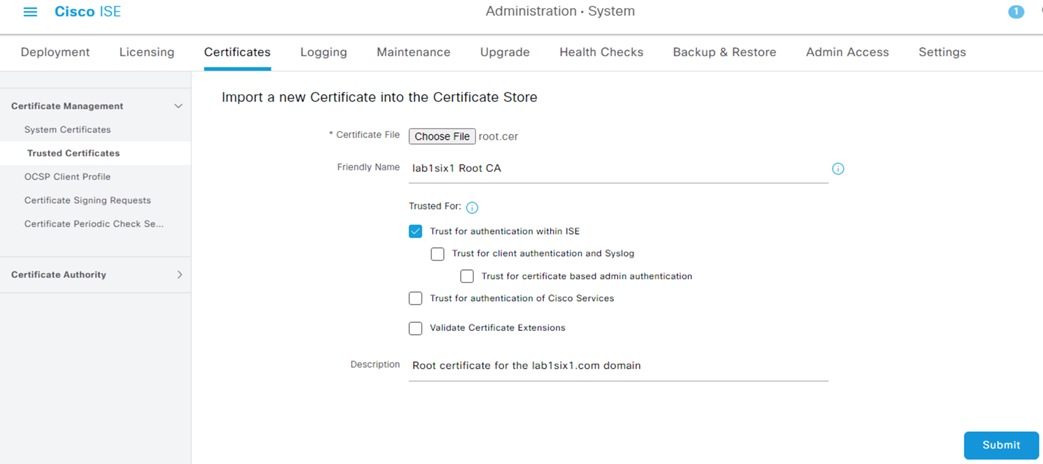
Step 3. Select Choose File and upload the root certificate collected previously. Enter a Friendly Name, Description, and set the Trusted For fields for the certificate (this example uses the default setting for authentication within ISE, but more options can be checked). Click Submit.
Step 4. Use the filter option to search for the friendly name and verify that the certificate has been imported.
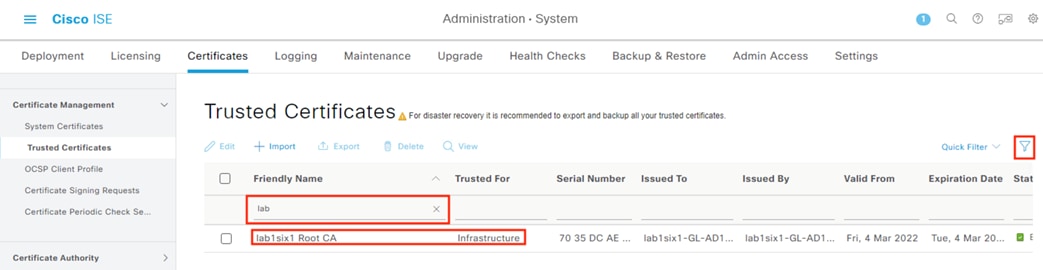
Additionally, the View and Export options can be used to check hash and certificate details for any uploaded certificate.
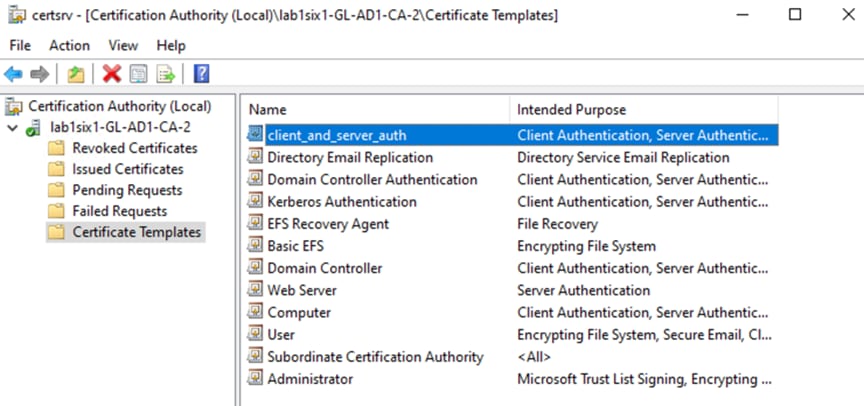
Active Directory: Create a Client and Server Authentication Template
The default ISE certificates for pxGrid and Admin are configured for both Client Authentication and Server Authentication. However, Active Directory does not have a default template to create certs with both Client and Server Authentication. This section covers how to create a CA template that will produce certificates with the Client Auth and Server Auth fields.
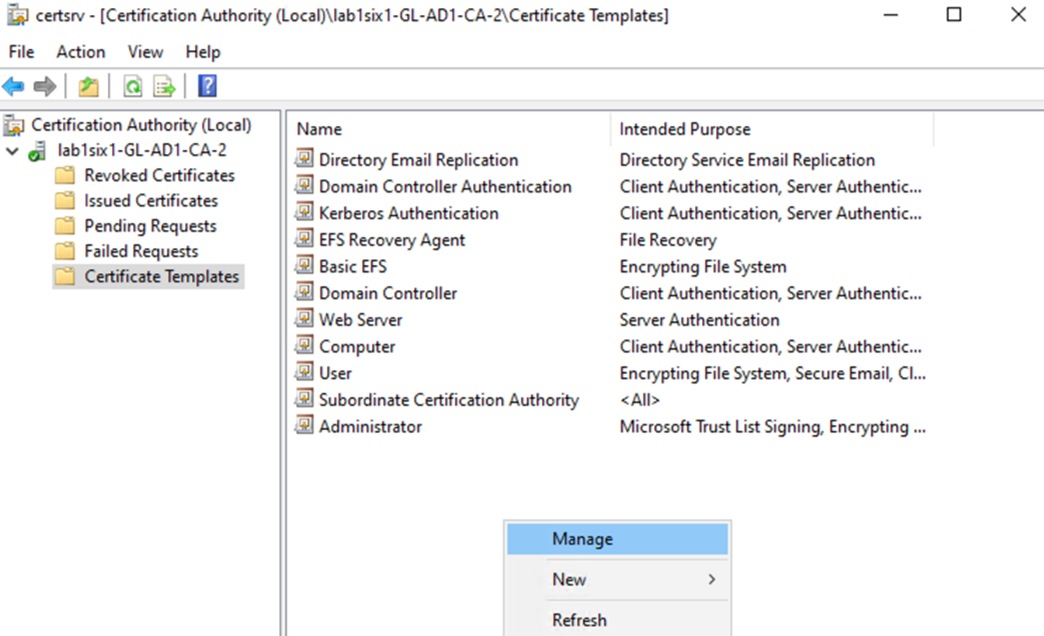
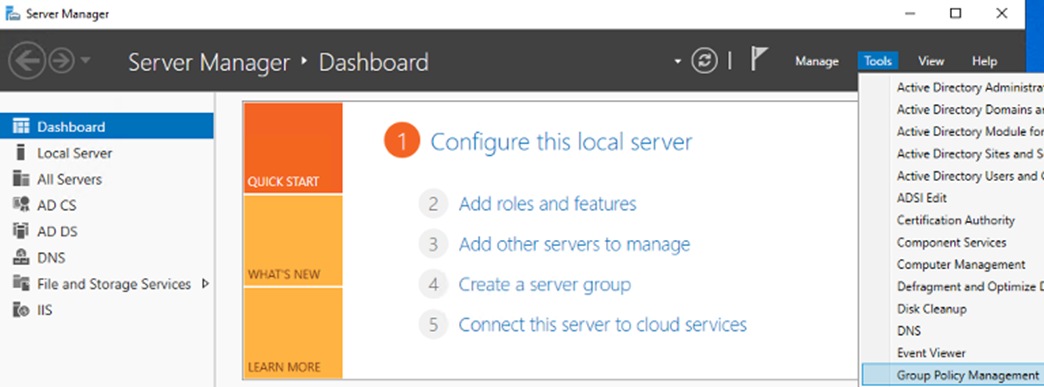
Step 1. Access Active Directory, open Server Manager, then select Tools à Certificate Authority.

Step 2. Expand the CA server dropdown on the left menu, select Certificate Templates, right-click the empty space in the right side of the window, then select Manage.
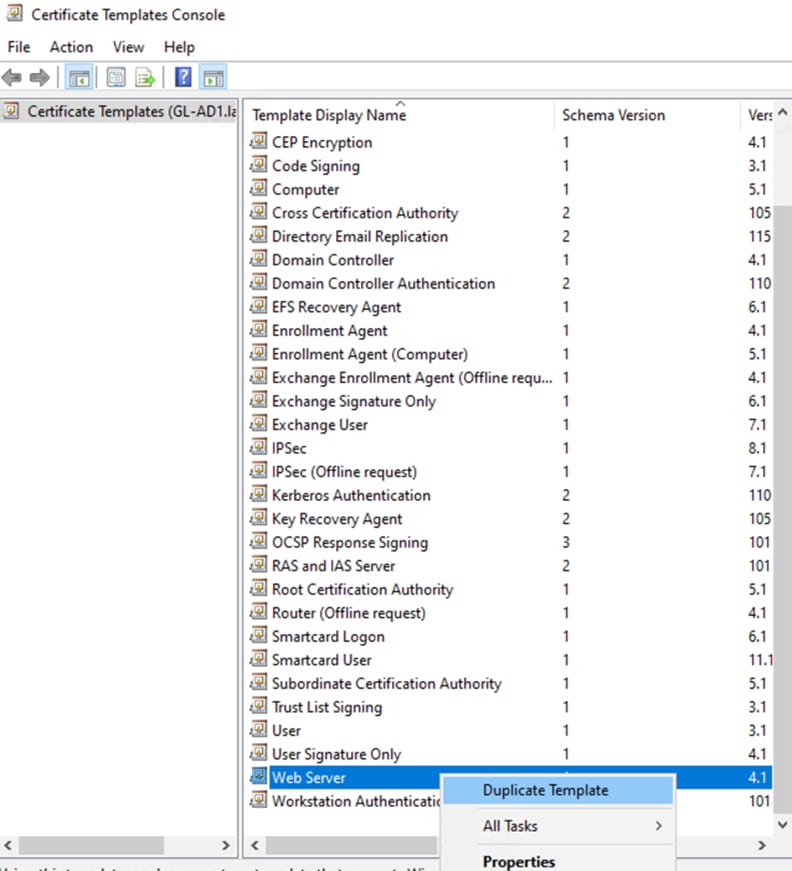
Step 3. Select the Web Server template, right-click it, then click Duplicate Template.
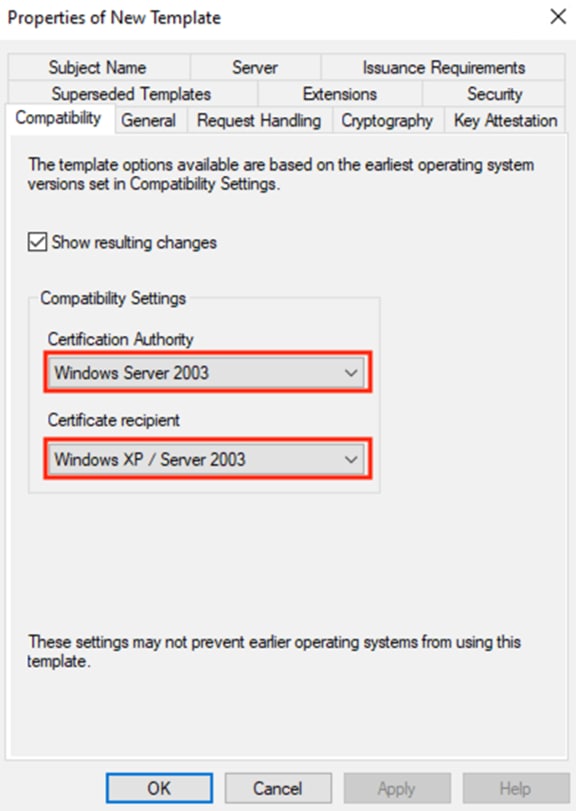
Step 4. Certification Authority and Certificate Recipient can be changed if desired or left at the default of 2003 for greatest compatibility. Click Apply if changes were made.
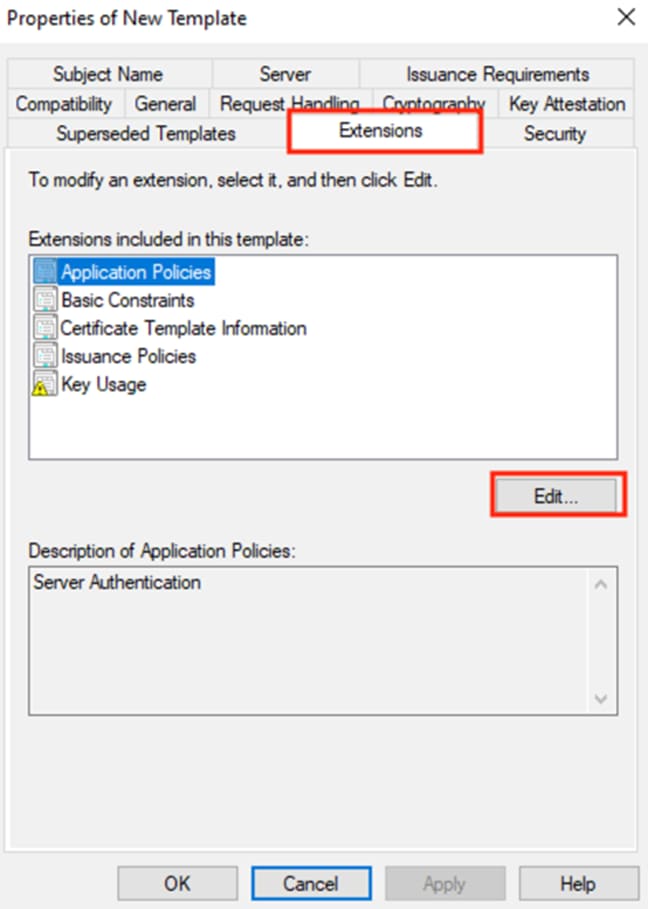
Step 5. Click on the Extensions tab, leave Application Policies selected, then click the Edit button.
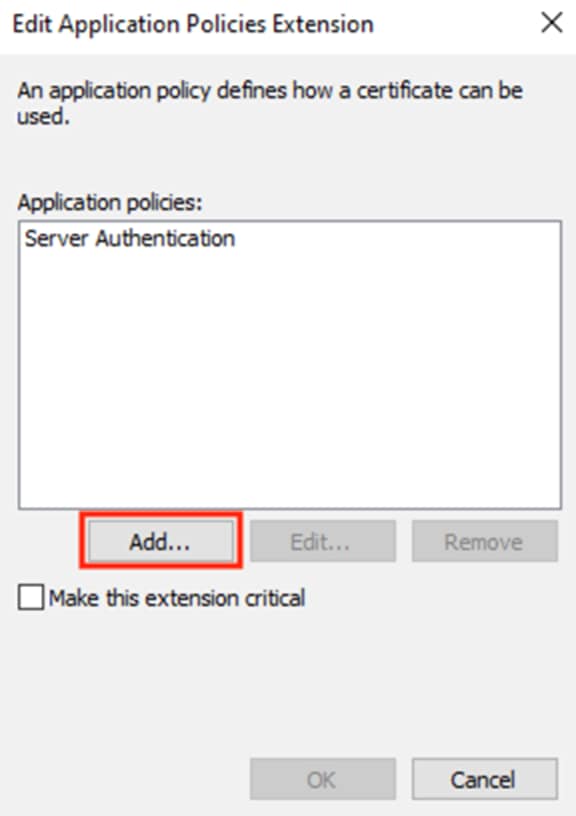
Step 6. Click the Add button.
Note: Server Authentication is added by default.
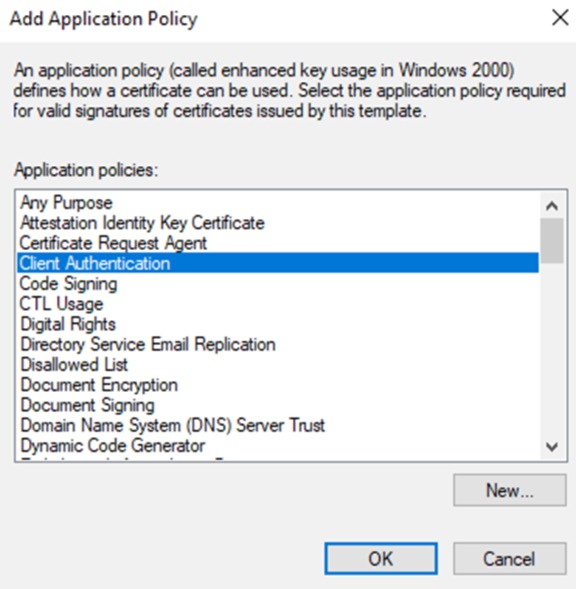
Step 7. Select Client Authentication and click OK.
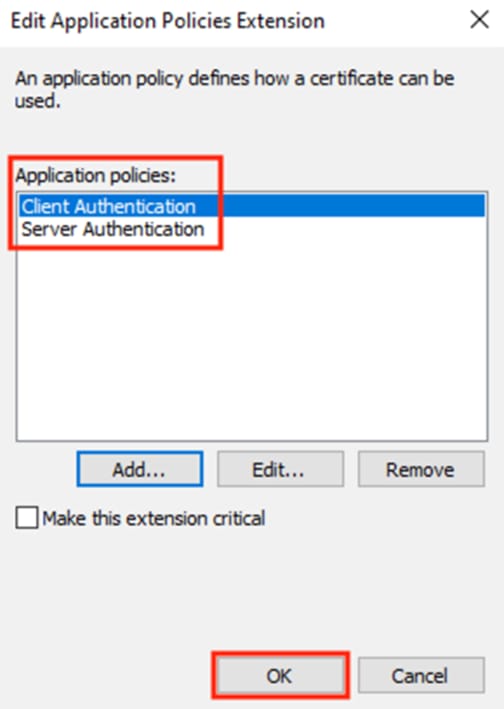
Step 8. Confirm that both Client Authentication and Server Authentication are now listed. Click OK.
Step 9. Optional: while still on the Extensions tab, select Key Usage and click Edit.
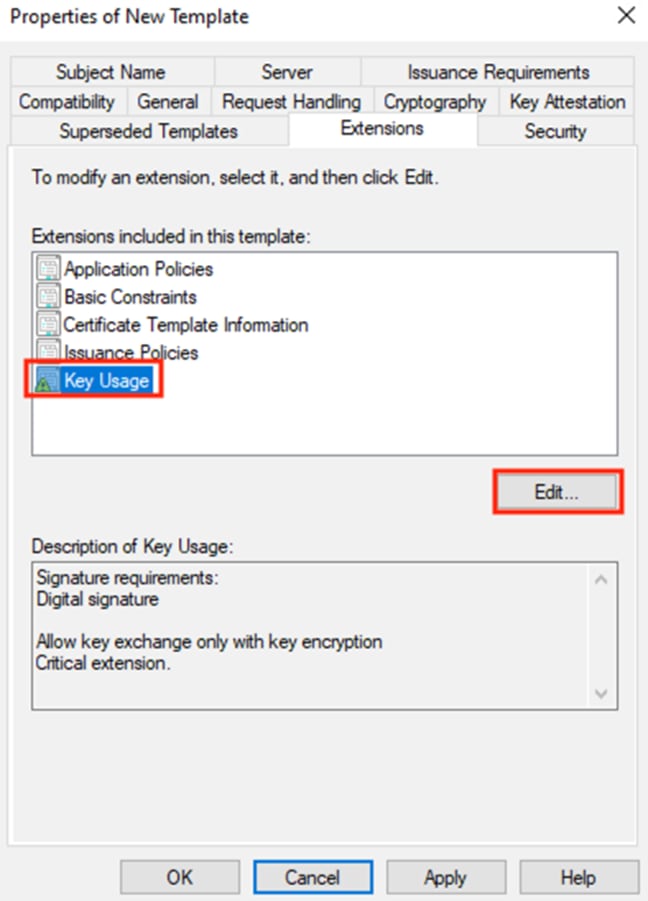
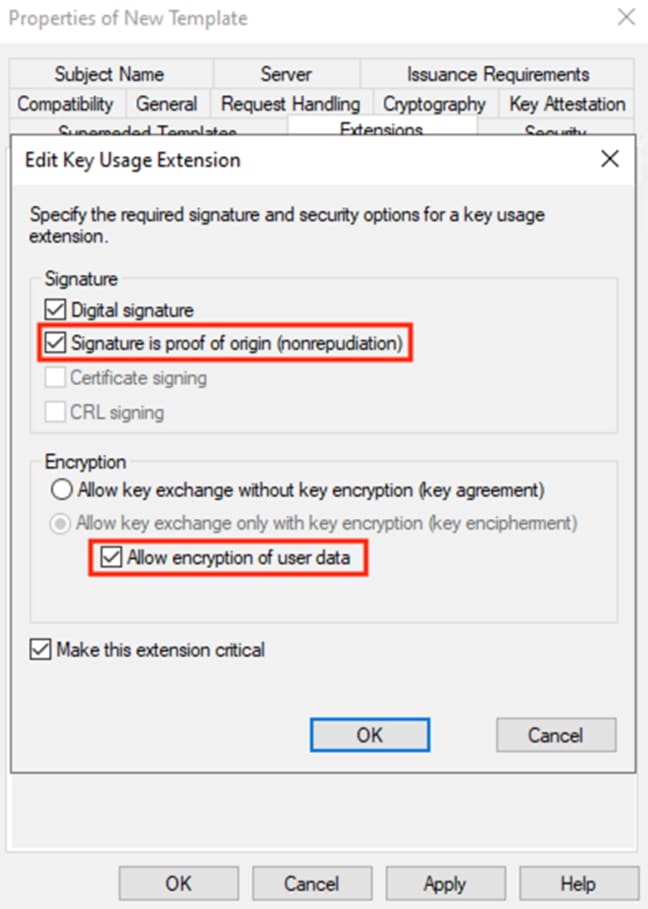
Step 10. Enable nonrepudiation and encryption of user data. Click OK.
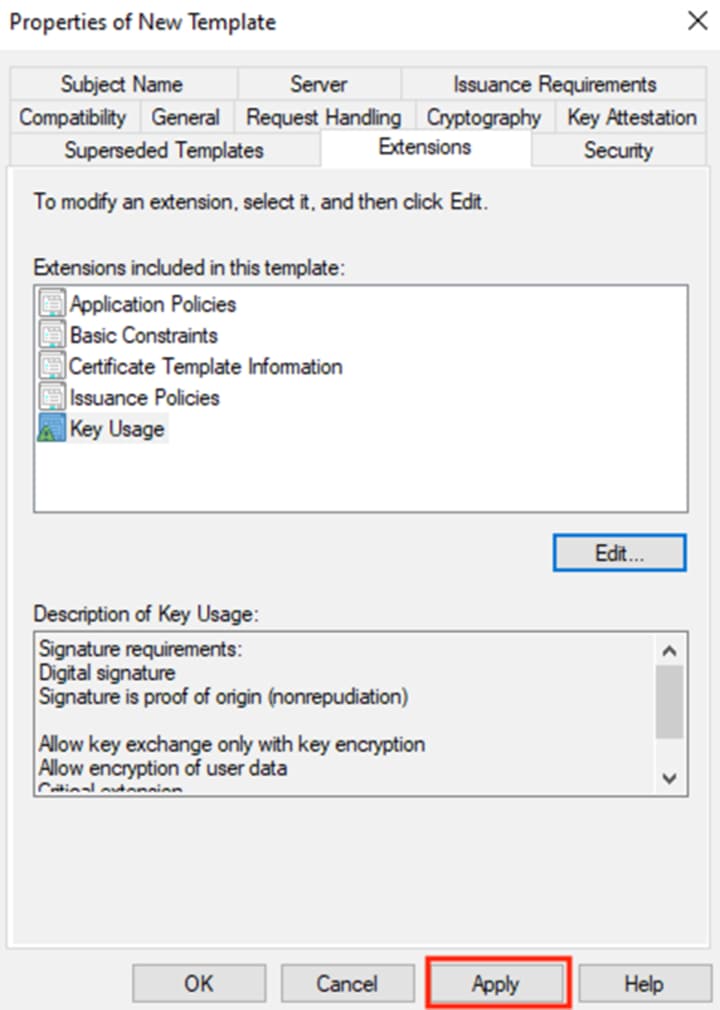
Step 11. Click Apply.
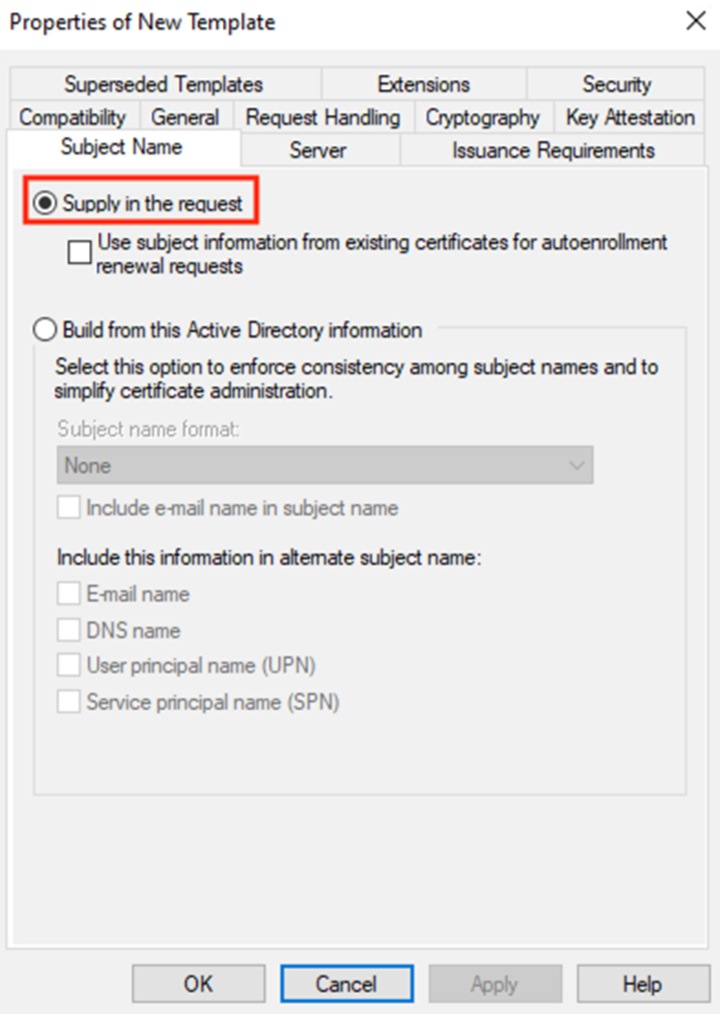
Step 12. Click on the Subject Name tab and verify that ‘Supply in the request’ is selected. If it is not, select it. Click OK.
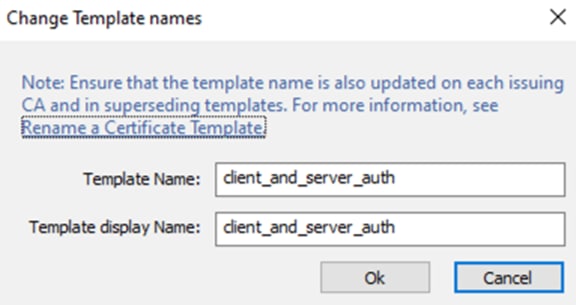
Step 13. Right click on the newly created copy and select Change Names.
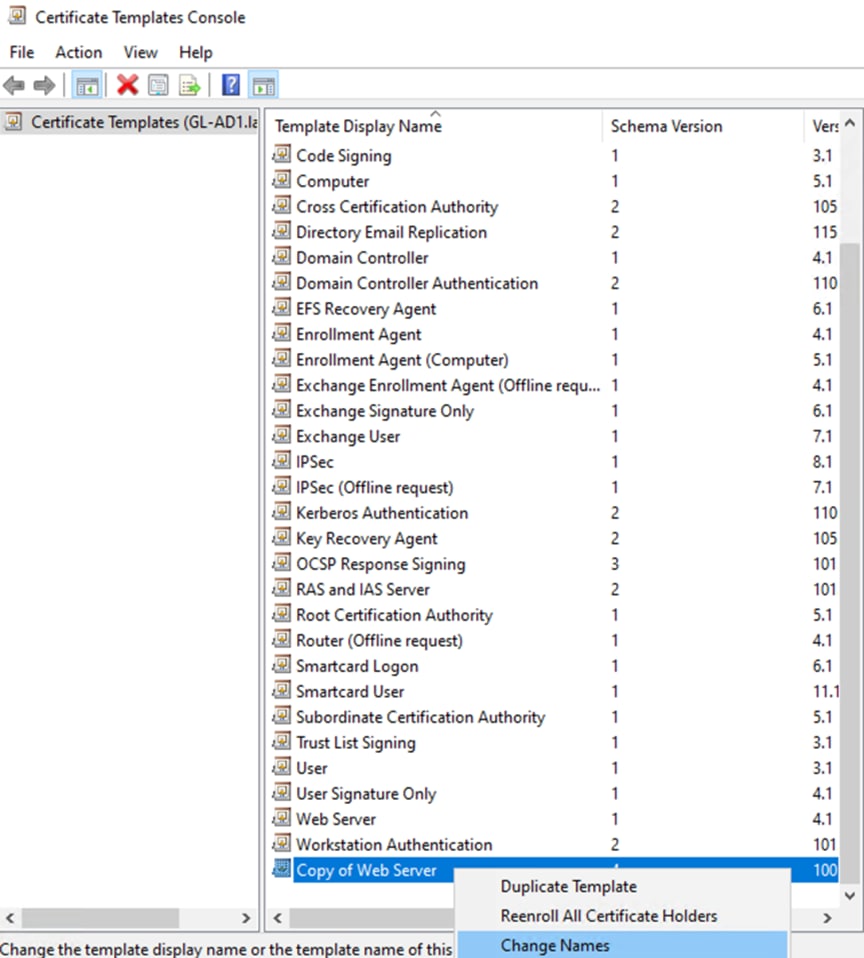
Step 14. Set a name, then click OK.
Step 15. Close the Certificate Templates Console.

Step 16. Back on the Certificate Templates page, right-click the empty space in the right window and select New à Certificate Template to Issue.
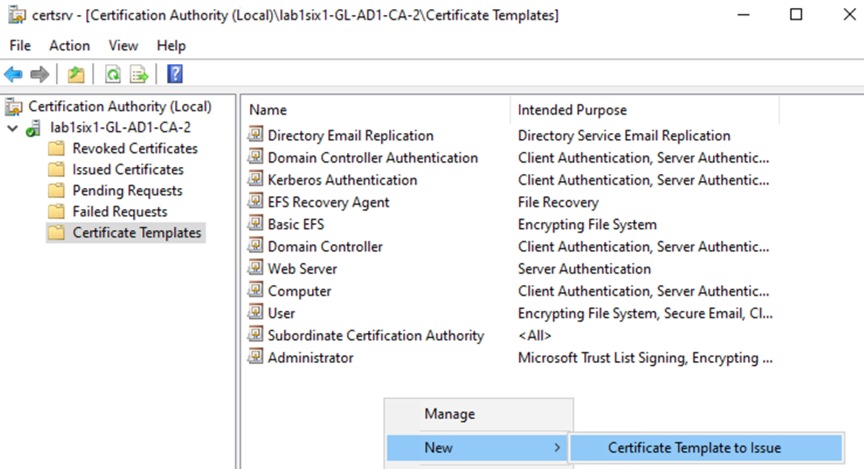
Step 17. Select the template created previously and click OK.
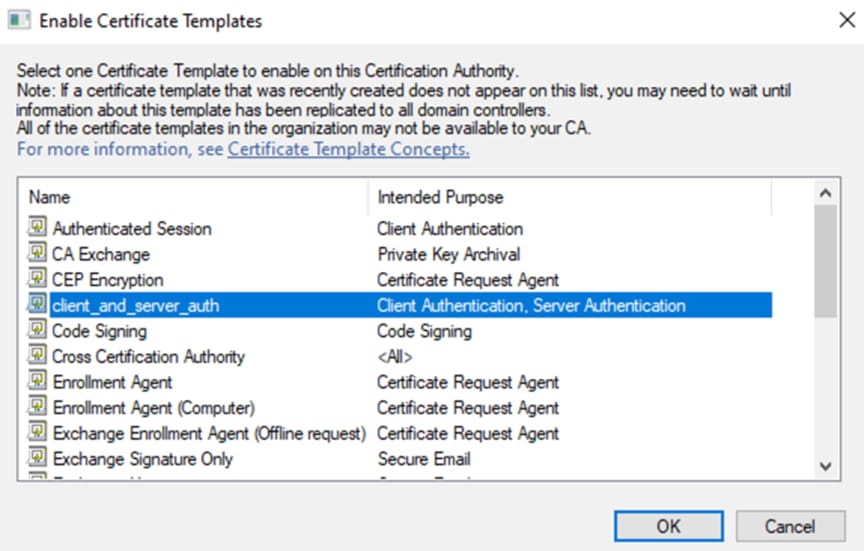
Step 18. Verify the new template now appears in the list of Certificate Templates.
ISE: Generate Certificate Signing Request for the pxGrid Role
Step 1. In the Cisco ISE Graphical User Interface (GUI), click the Menu icon (![]() ) and choose Administration à System à Certificates.
) and choose Administration à System à Certificates.
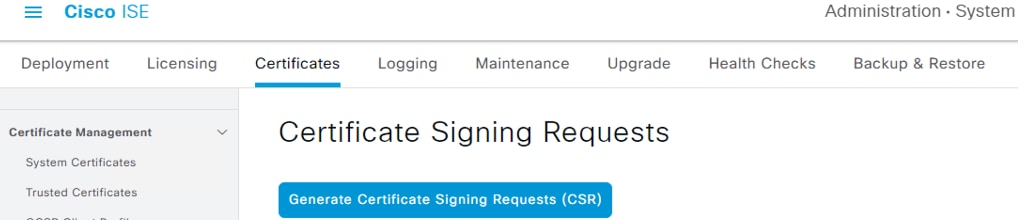
Step 2. Click on Certificate Signing Requests in the left menu.
Step 2. Click the Generate Certificate Signing Requests button.
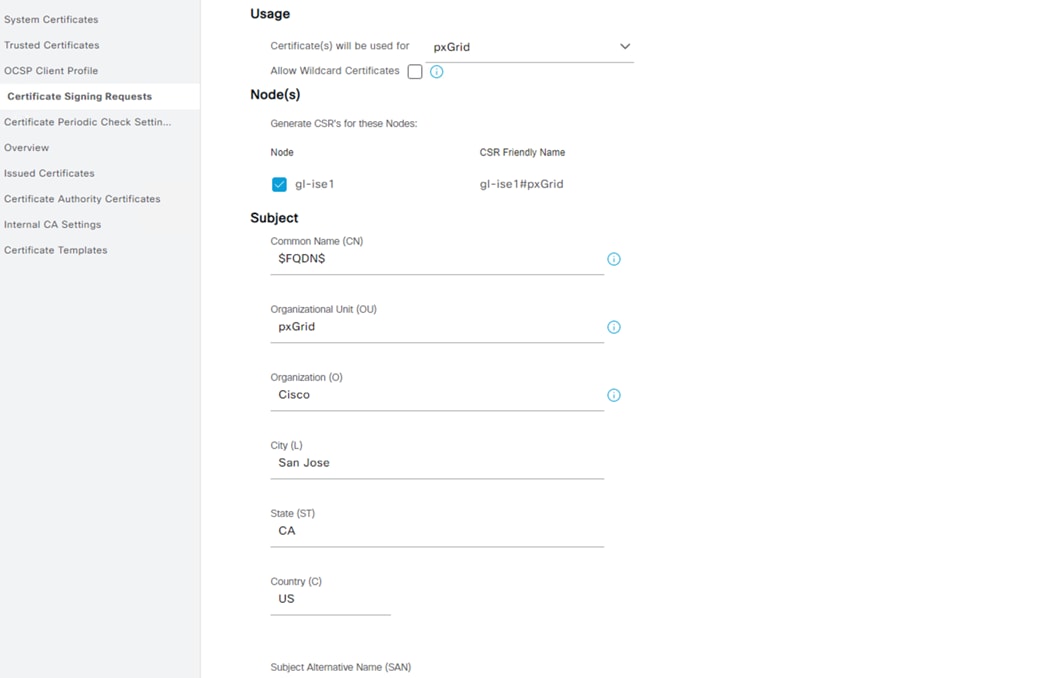
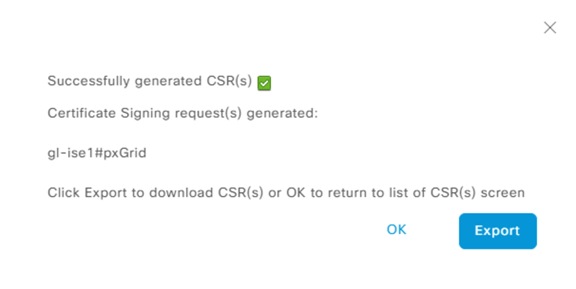
Step 3. Set the Certificate Usage to pxGrid, fill in Subject information, set SAN fields, and review Key Type, Length, and Digest. Click Generate when finished.
Note: ISE does not allow multiple certificates with the same Subject fields. In the example below, pxGrid is set as the OU to create a unique Subject combination.

Step 4. Export the CSR file.
ISE: Generate Certificate Signing Request for the Admin Role
Step 1. Continuing from the prior section (Administration à System à Certificates à Certificate Signing Requests) click the Generate Certificate Signing Requests button.
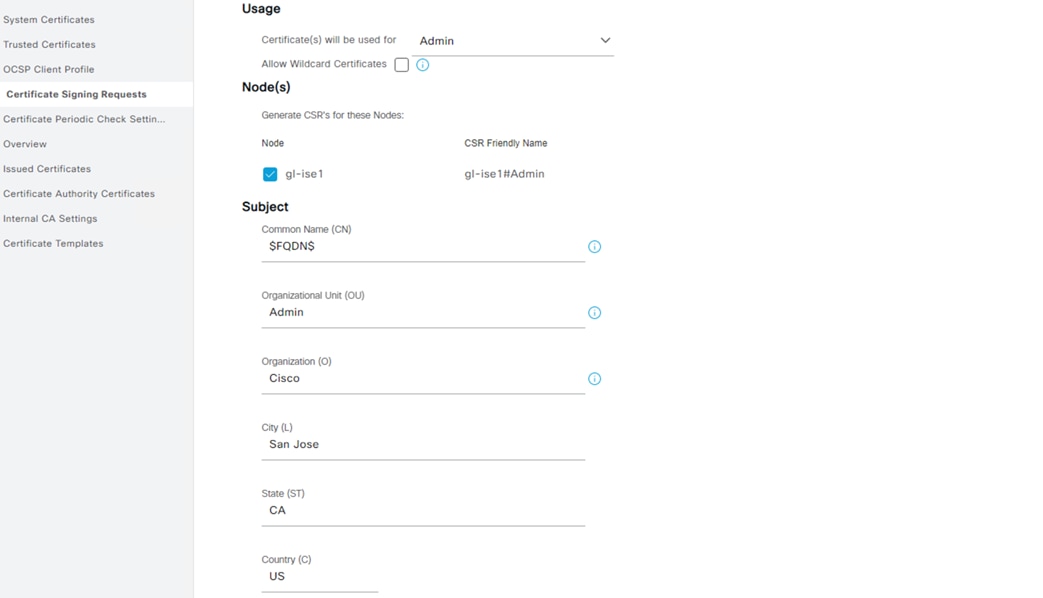
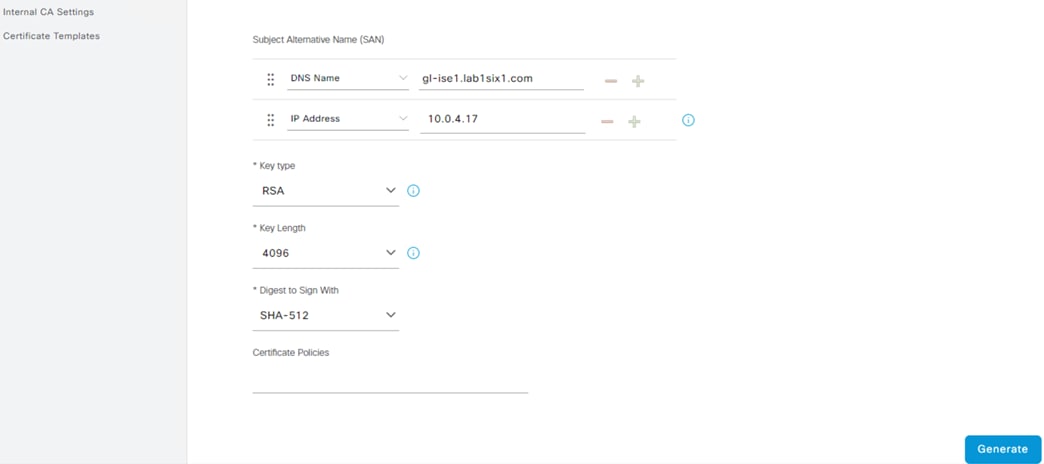
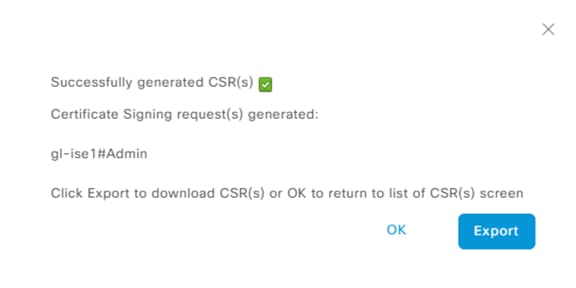
Step 2. Set the Certificate Usage to pxGrid, fill in Subject information, set SAN fields, and review Key Type, Length, and Digest. Click Generate when finished.
Note: ISE does not allow multiple certificates with the same Subject fields. In the example below, Admin is set as the OU to create a unique Subject combination.
Step 3. Export the file.
Active Directory: Create Certificates from Certificate Signing Requests
Before starting this section, generate CSRs using the steps in the prior section (or other methods such as OpenSSL, if preferred).
Step 1. Access the CA server by appending /certsrv/ to the AD server hostname, e.g.
● adserver.example.com
● adserver.example.com/certsrv/
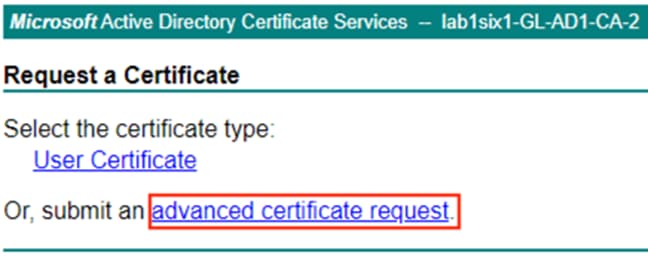
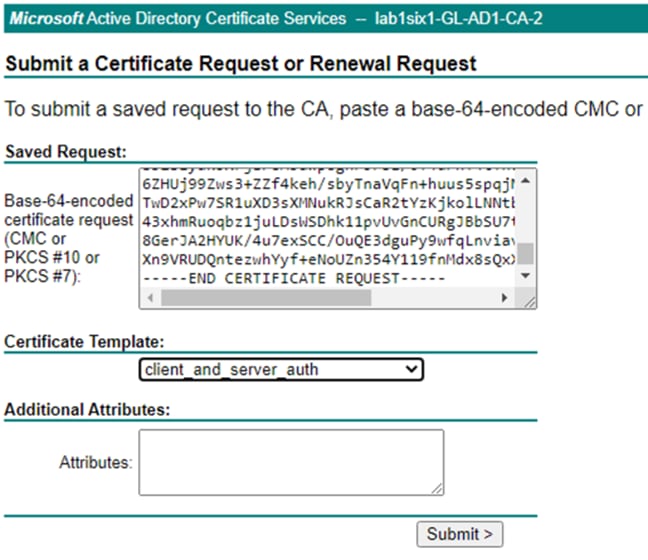
Step 2. From the CA server, click the Request a certificate link.
Step 3. Select the advanced certificate request option.
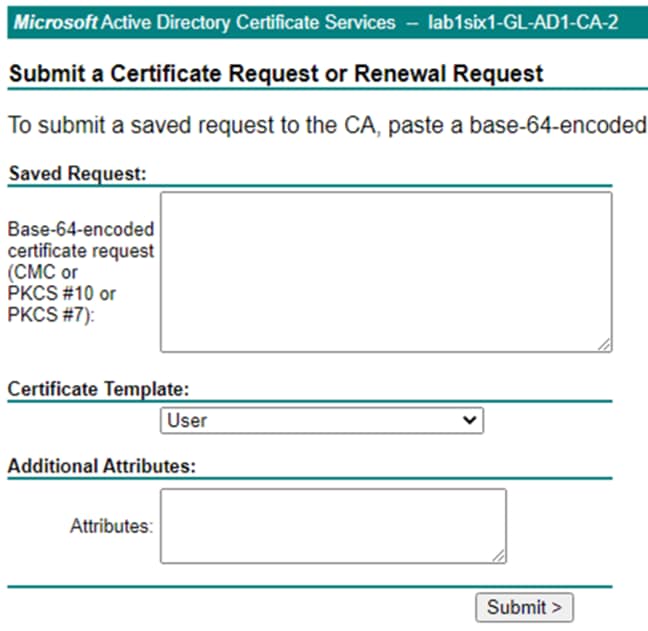
The advanced certificate request page prompts for entry of a CSR in text format.
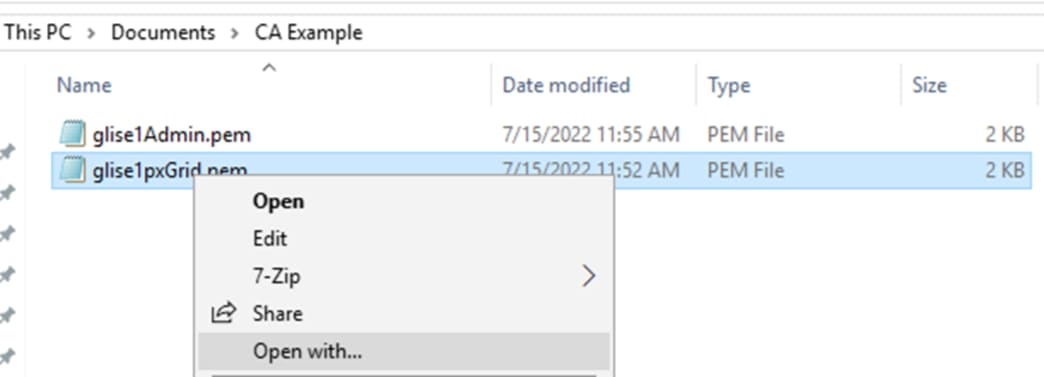
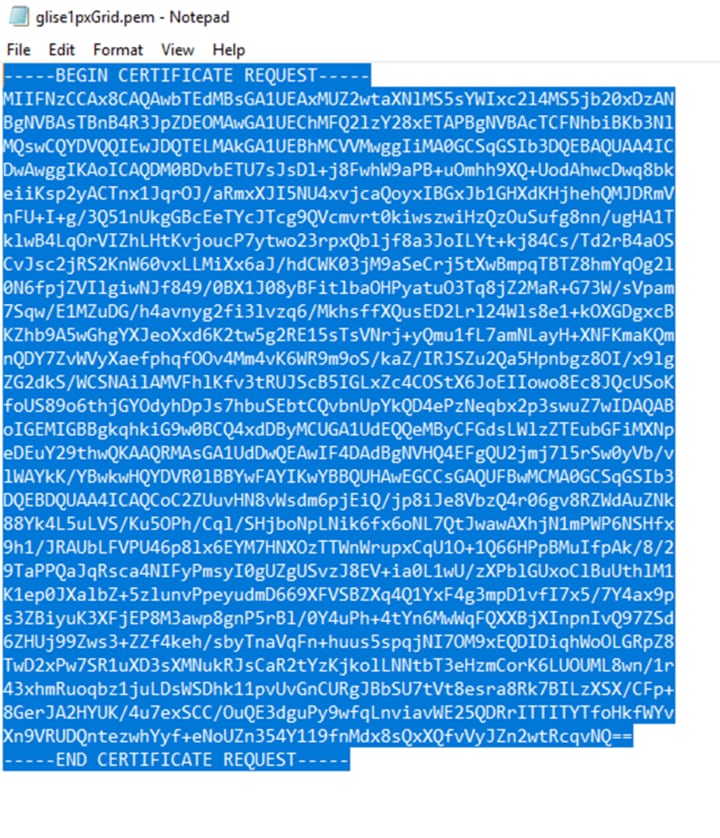
Step 4. Locate the CSR file to upload and open with a text editor (right-click the CSR file and select ‘Open with…’ if the CSR is not associated with a text editor by default).
Step 5. Copy the entire block of text starting with the BEGIN line and ending with the END line.
Step 6. Return to the CA server and paste the copied text into the Request field. Set the Certificate Template to the one configured in the prior Create a Client and Server Authentication Template section. Click Submit.
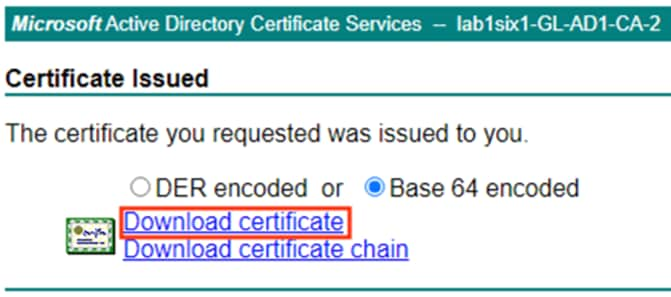
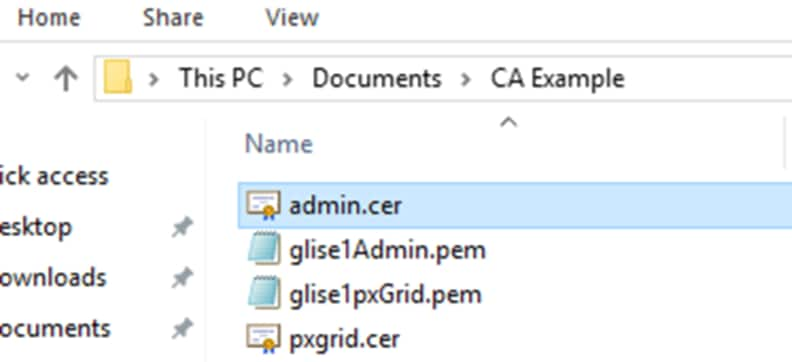
Step 7. Select Base 64 encoded and click either the Download certificate or Download certificate chain option. It is recommended to rename the file to denote the certificate type (in this case, the Admin certificate). This example uses the ‘Download certificate’ option for simplicity, as AD generates the certificate in .cer format, which can be imported directly into ISE. The chain option generates the certificate in .p7b format, which requires conversion to an ISE compatible format via OpenSSL.
Step 8. Repeat the above steps to generate the pxGrid certificate, which also uses the client_and_server_auth template.
Windows: Verify Certificate Details
Step 1. Double click the newly created certificate to open it.
Note: Only the .cer format will open using this method; the .p7b format created from the chain option will not.
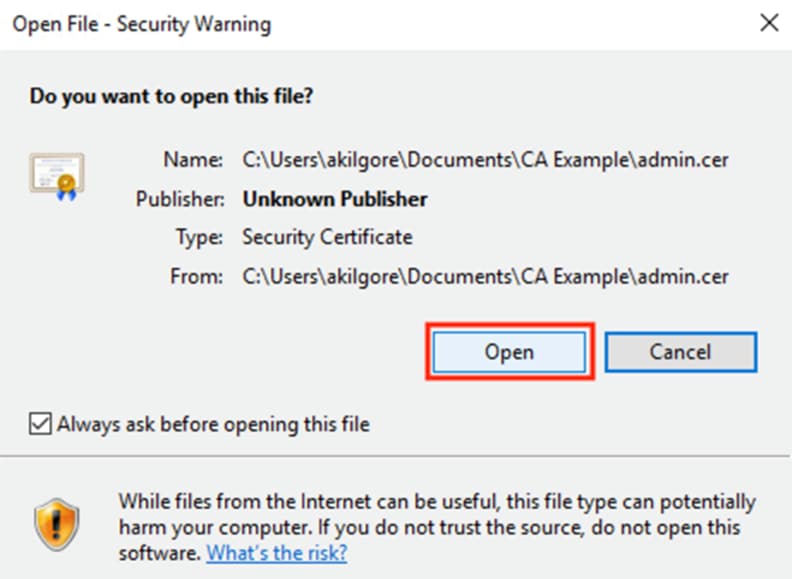
Step 2. If a Security Warning prompt appears, click Open.
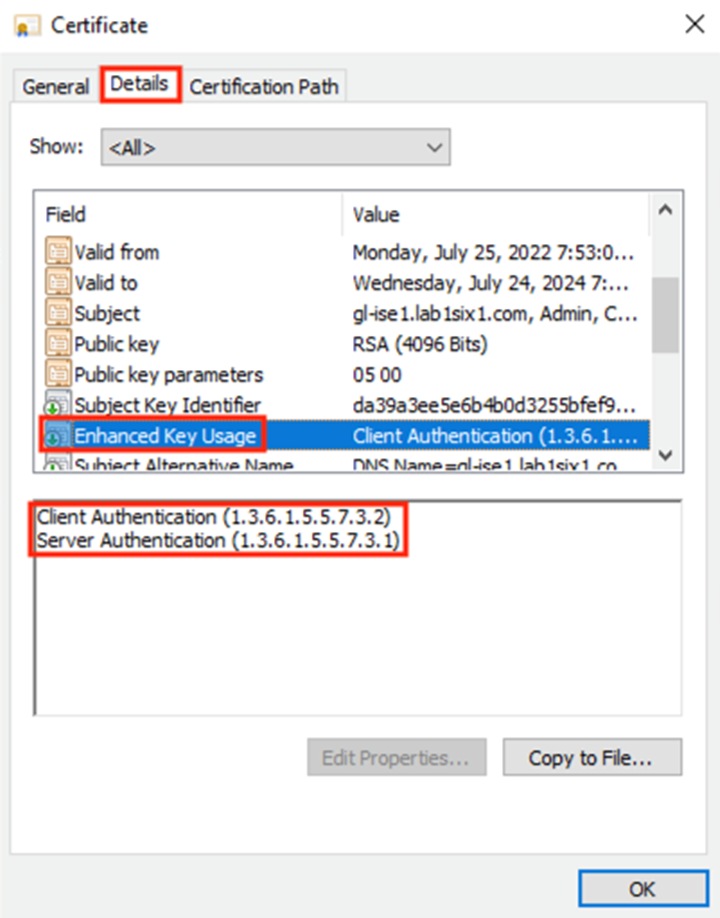
Step 3. Click the Details tab and select Enhanced Key Usage. Verify that both Client Authentication and Server Authentication are available. Click OK to close.
ISE: Bind Certificates to CSR Requests and Assign Certs to Roles
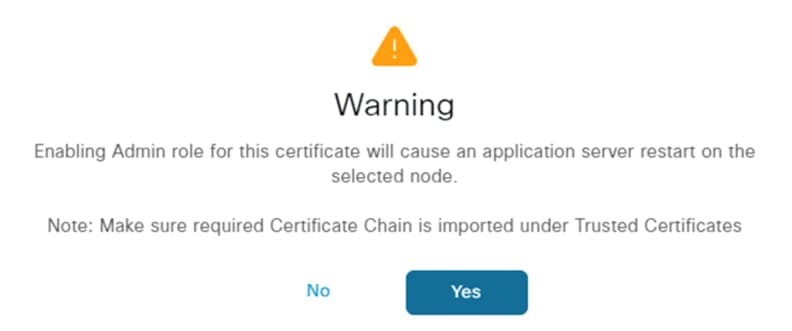
Before starting, note that changing the Admin certificate will cause the application server to restart.
Step 1. Click the Menu icon (![]() ) and navigate to Administration à System à Certificates.
) and navigate to Administration à System à Certificates.
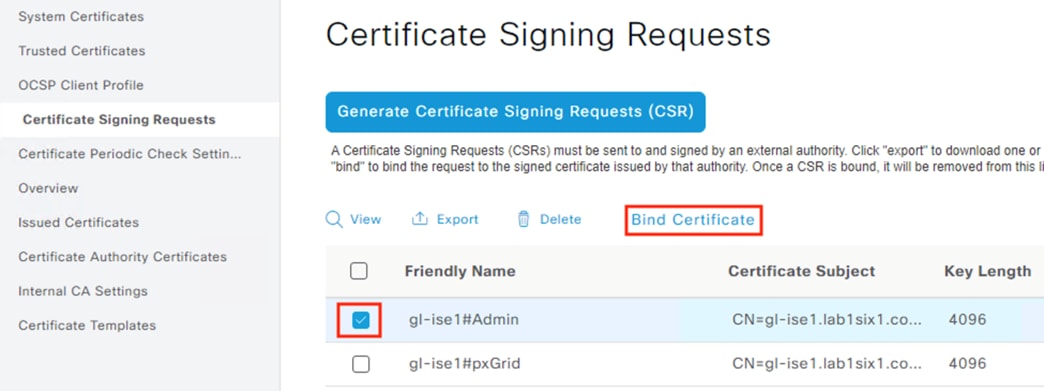
Step 2. Click on Certificate Signing Requests.
Step 3. Locate the CSRs created in the Generate Certificate Signing Requests step. Check the box next to the Admin entry, then click Bind Certificate (the bind action will bind the generated certificate to the private key ISE created when the CSR was made).
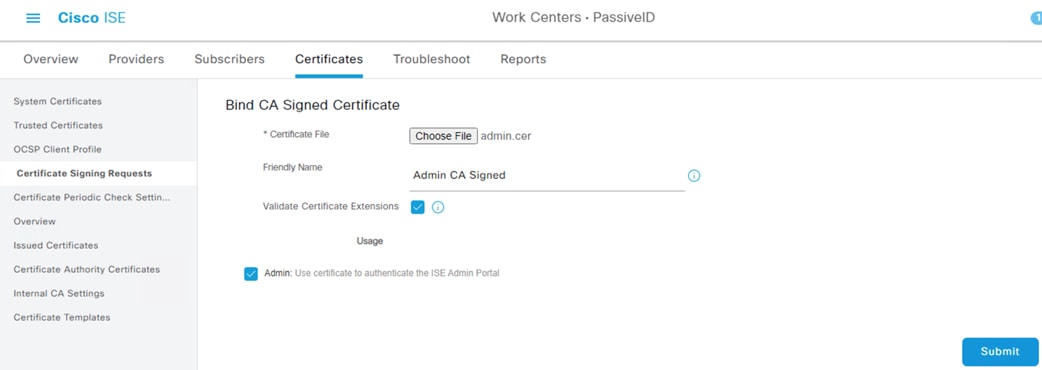
Step 4. Click the Choose File button and upload the Admin Certificate created in the Create Certificates from CSRs step. Enter a Friendly Name for the certificate and check the Validate Certificate Extensions box. Click Submit.
Step 5. An alert will appear stating that changing the Admin certificate will restart the application server. If a service outage is currently acceptable for the node, select Yes. If not, click No and reschedule for a change window.
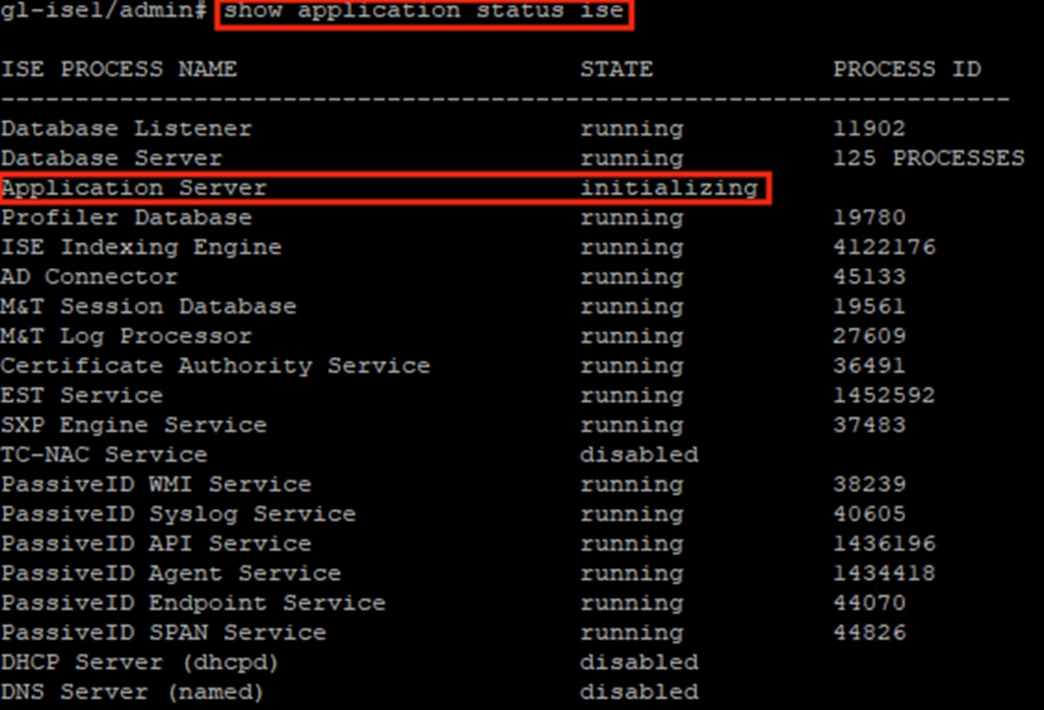
Step 6. To verify when the Application Server is up, access the ISE node Command Line Interface (CLI) and run the command ‘show application status ise’. The screenshot below shows output for the Application Server in an Initializing state.
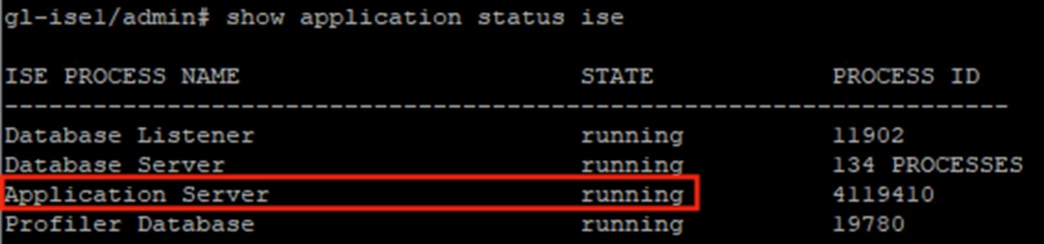
Once the Application Server has fully restarted, the State will change to running.
Step 7. Repeat the steps above to import the pxGrid certificate, which does not require a restart of the Application Server.
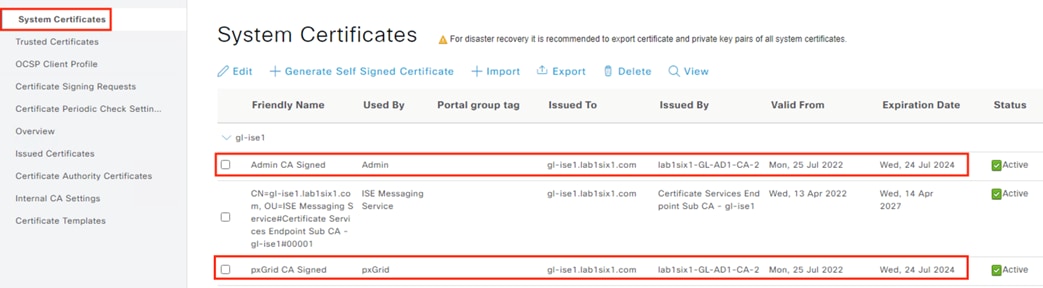
Step 8. Verify the uploaded certificates by clicking on the System Certificates link and confirming the Friendly Name and certificate details of the uploaded certificates.
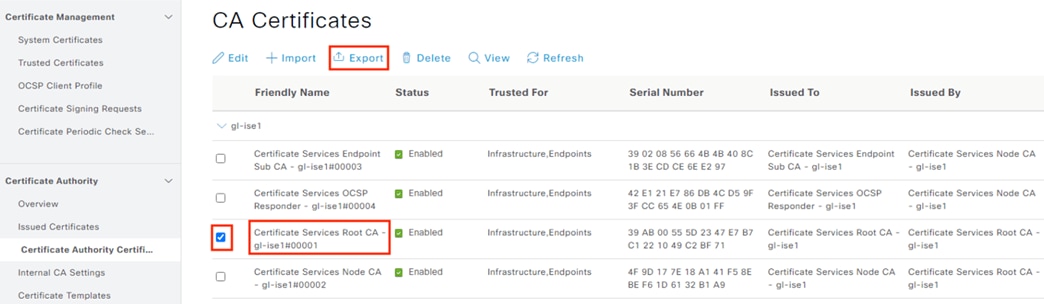
ISE: Export an ISE Root Certificate
While using an external CA is recommended, ISE does have CA capability that can be used in the absence of an outside CA. This section details how to locate and export the ISE root certificate.
Step 1. Click the Menu icon (![]() ) and navigate to Administration à System à Certificates.
) and navigate to Administration à System à Certificates.
Step 2. Expand Certificate Authority, then select Certificate Authority Certificates on the left menu.
Step 3. Check the box next to the Certificate Services Root CA, click Export, and download the file.
Active Directory: Distribute Machine Certificates via Group Policy Object
The certificates created and distributed in this step can be used for a machine authorization check in ISE. The AD Certificate Authority has a preconfigured certificate template labelled ‘Computer’ that creates certificates with client and server authentication. However, since we will only be using these certificates for client authentication, we will first create a new template that only has client auth set.
Step 1. Configure Group Policy
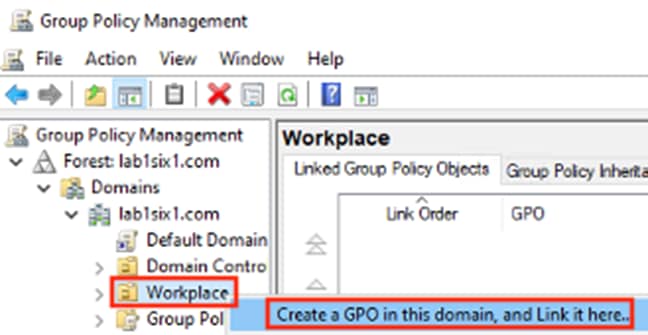
Step 2. Click on Tools à Group Policy Management.
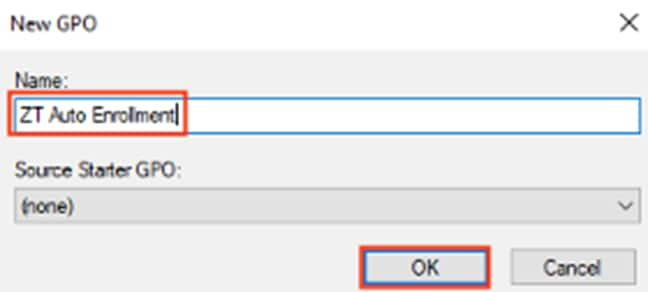
Step 3. Right click on the target domain and click ‘Create a GPO in this domain’.
Step 4. Enter a name and click OK.
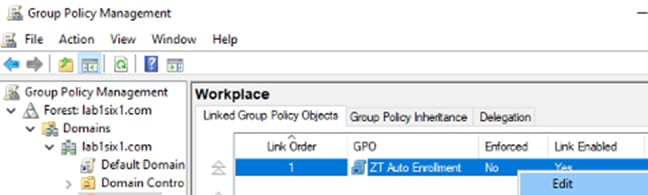
Step 5. Right click on the newly created GPO and click edit.
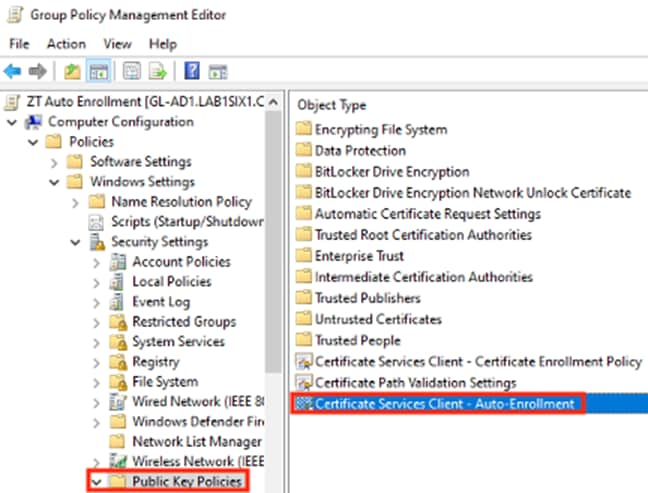
Step 6. Expand the tree to Computer Configuration à Policies à Windows Settings à Security Settings then click Public Key Policies. Double click on Certificate Services Client – Auto-Enrollment.
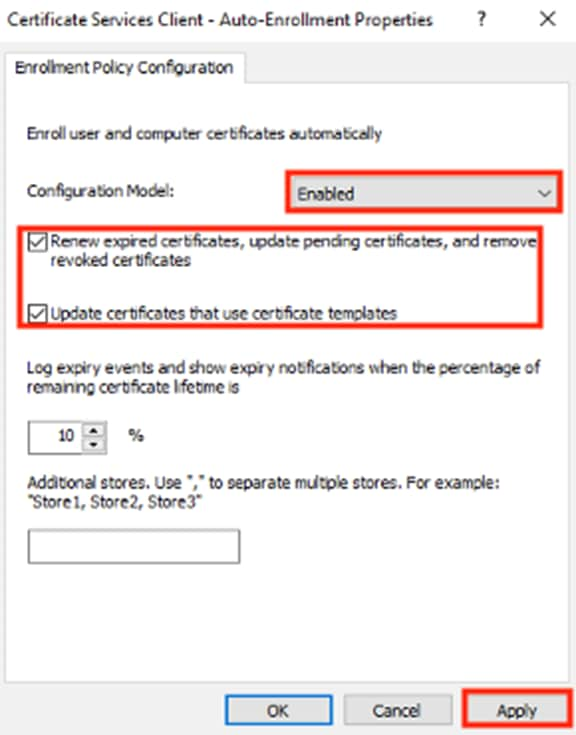
Step 7. Set Configuration Model to Enabled and check the boxes to renew and update certificates. Click Apply, then click OK.
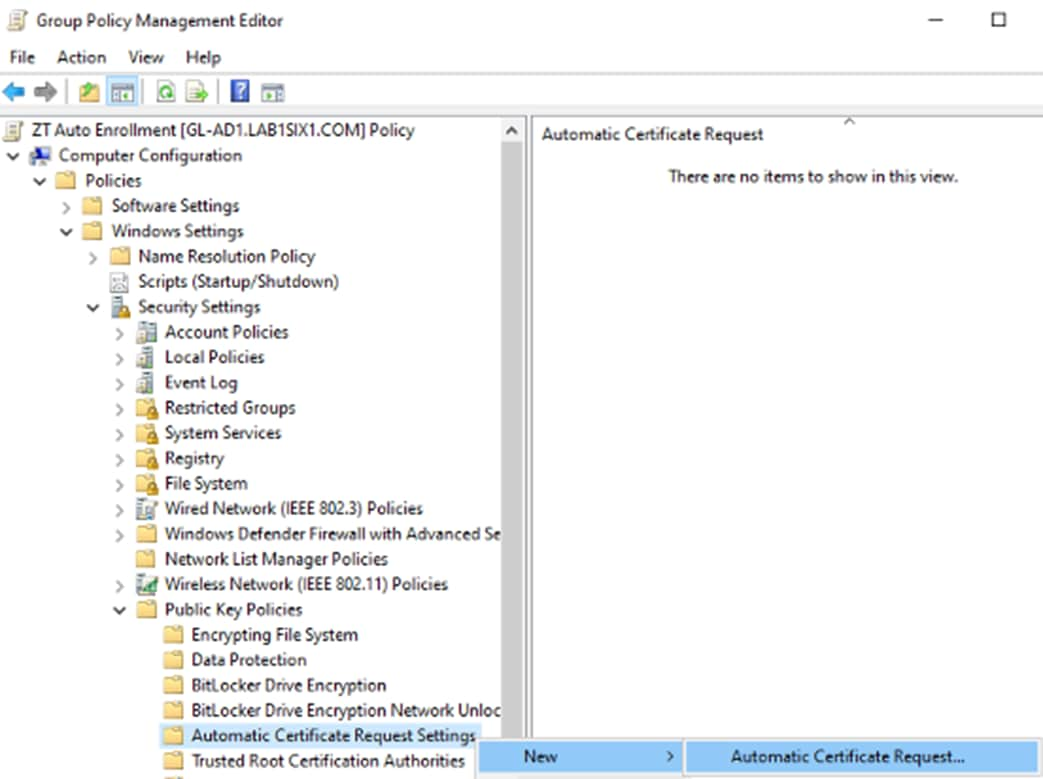
Step 8. Right click on Automatic Certificate Request Settings, select New, then select Automatic Certificate Request.
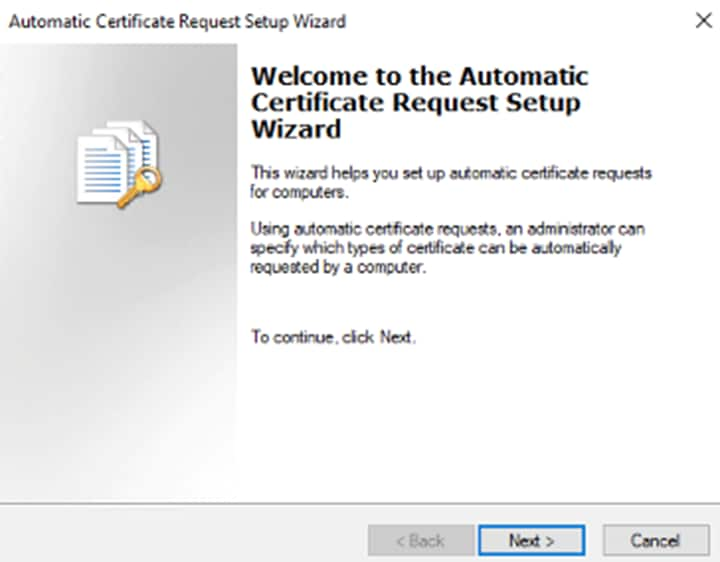
Step 9. Click Next.
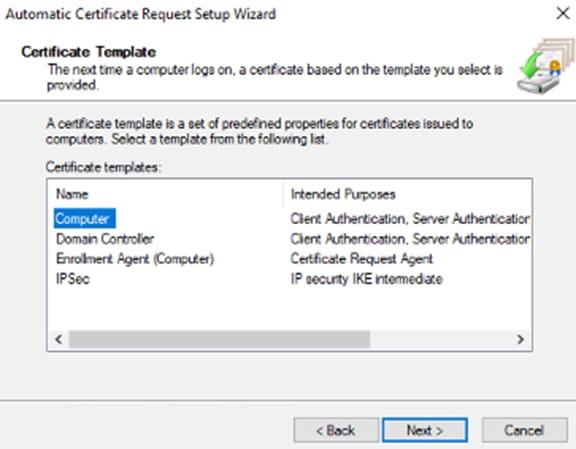
Step 10. Select the Computer template, then click Next.
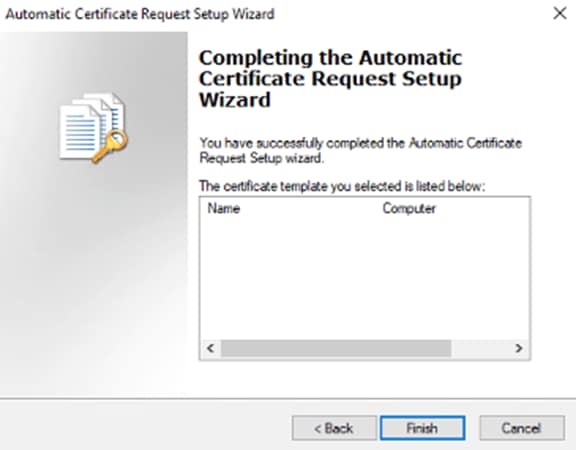
Step 11. Click Finish.
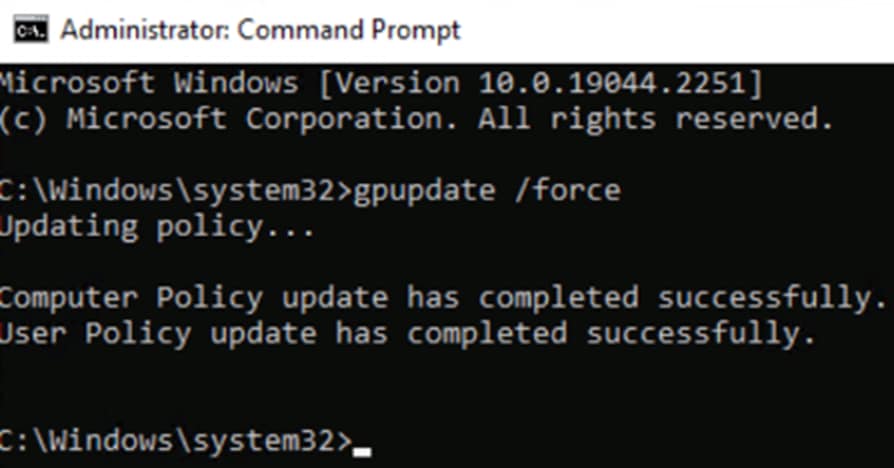
Step 12. Close the Group Policy windows. From the AD CS, launch a command line and run gpupdate /force.
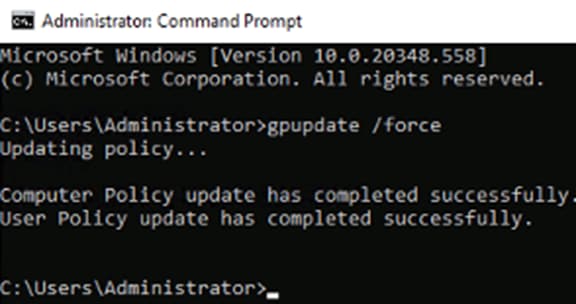
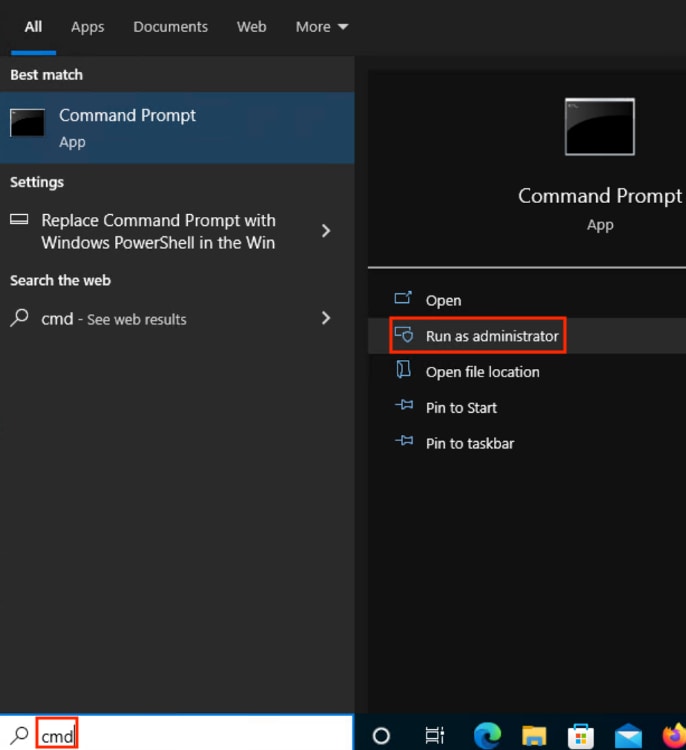
Step 13. Access the Windows workstation that is to receive the certificate and run command line as administrator, entering the same gpupdate /force command as above.
Verify Certificate Install
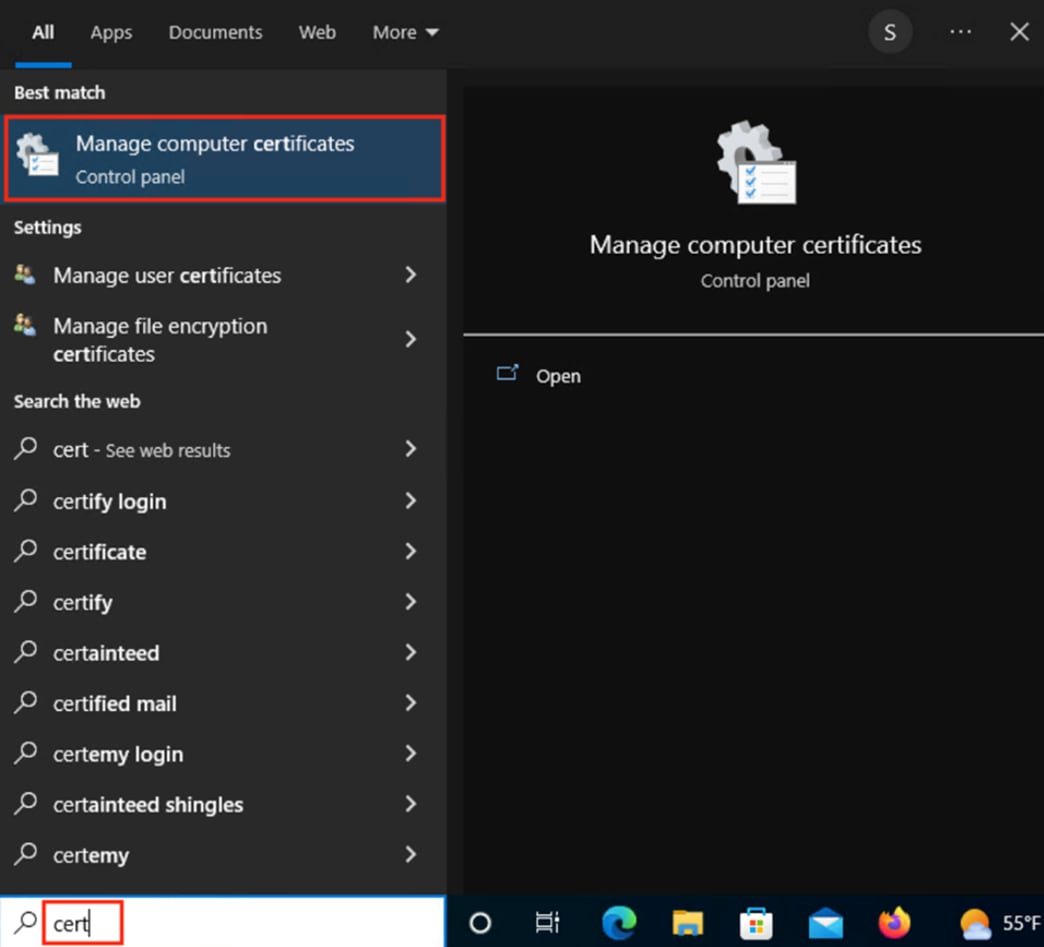
Step 1. From the Windows host, type ‘cert’ into the search bar and select ‘Manage computer certificates’.
Step 2. Expand the dropdown on the Personal folder and click on Certificates. Identify the machine certificate in the right pane and double click on it.
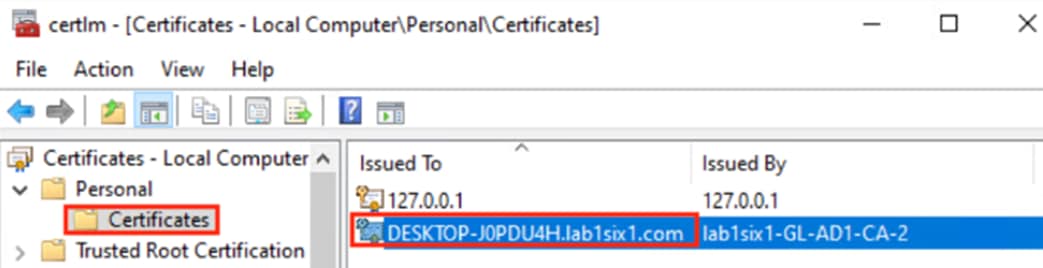
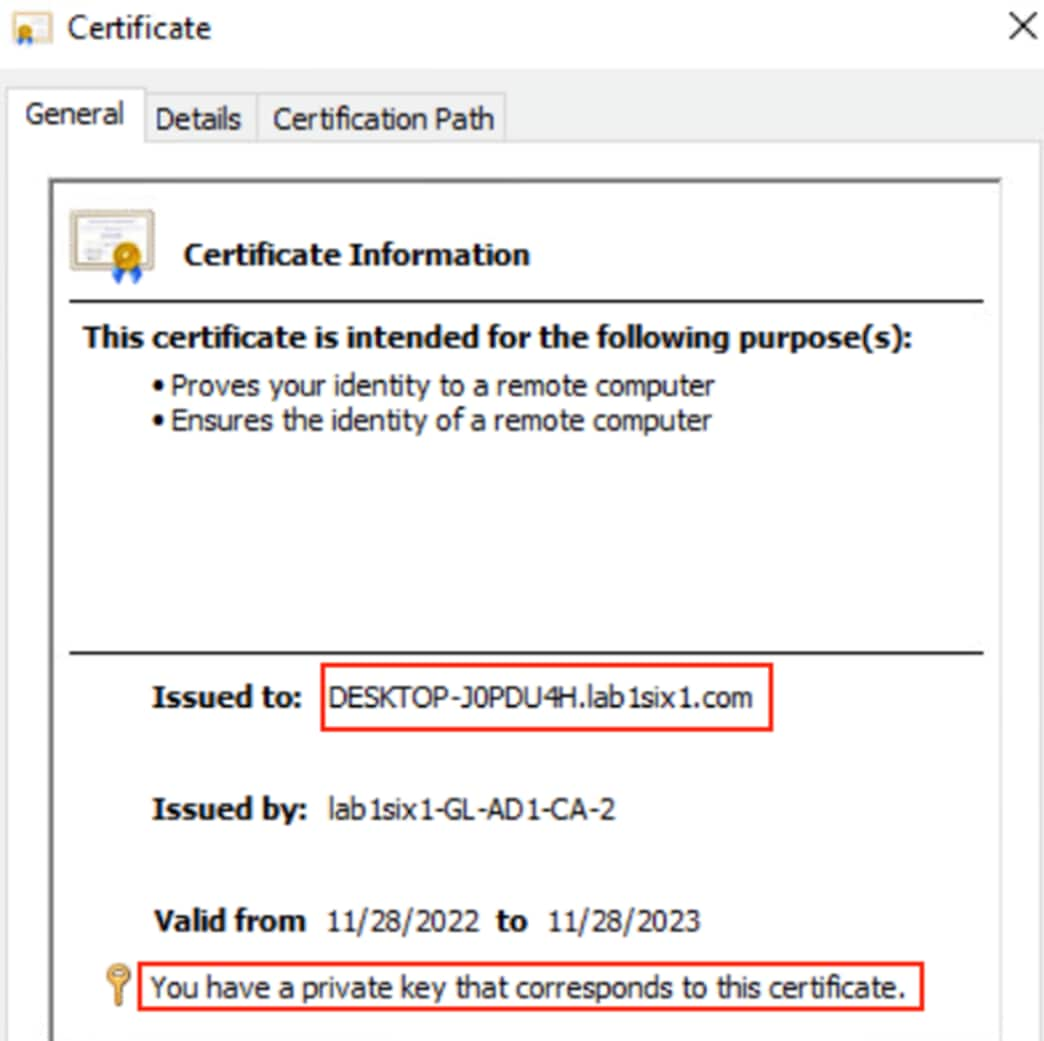
Step 3. The certificate should have a name that corresponds to the device name and a local private key.
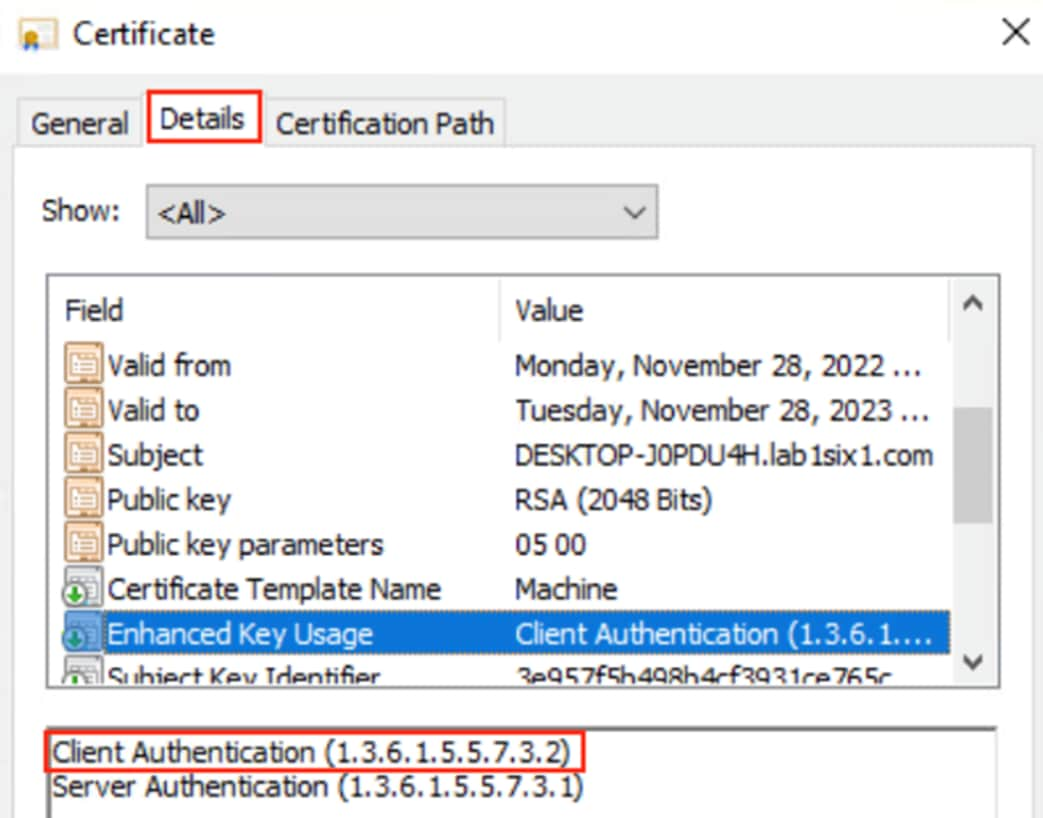
Step 4. Click on the Details tab and scroll down to Enhanced Key Usage. Verify that the certificate has Client Authentication.
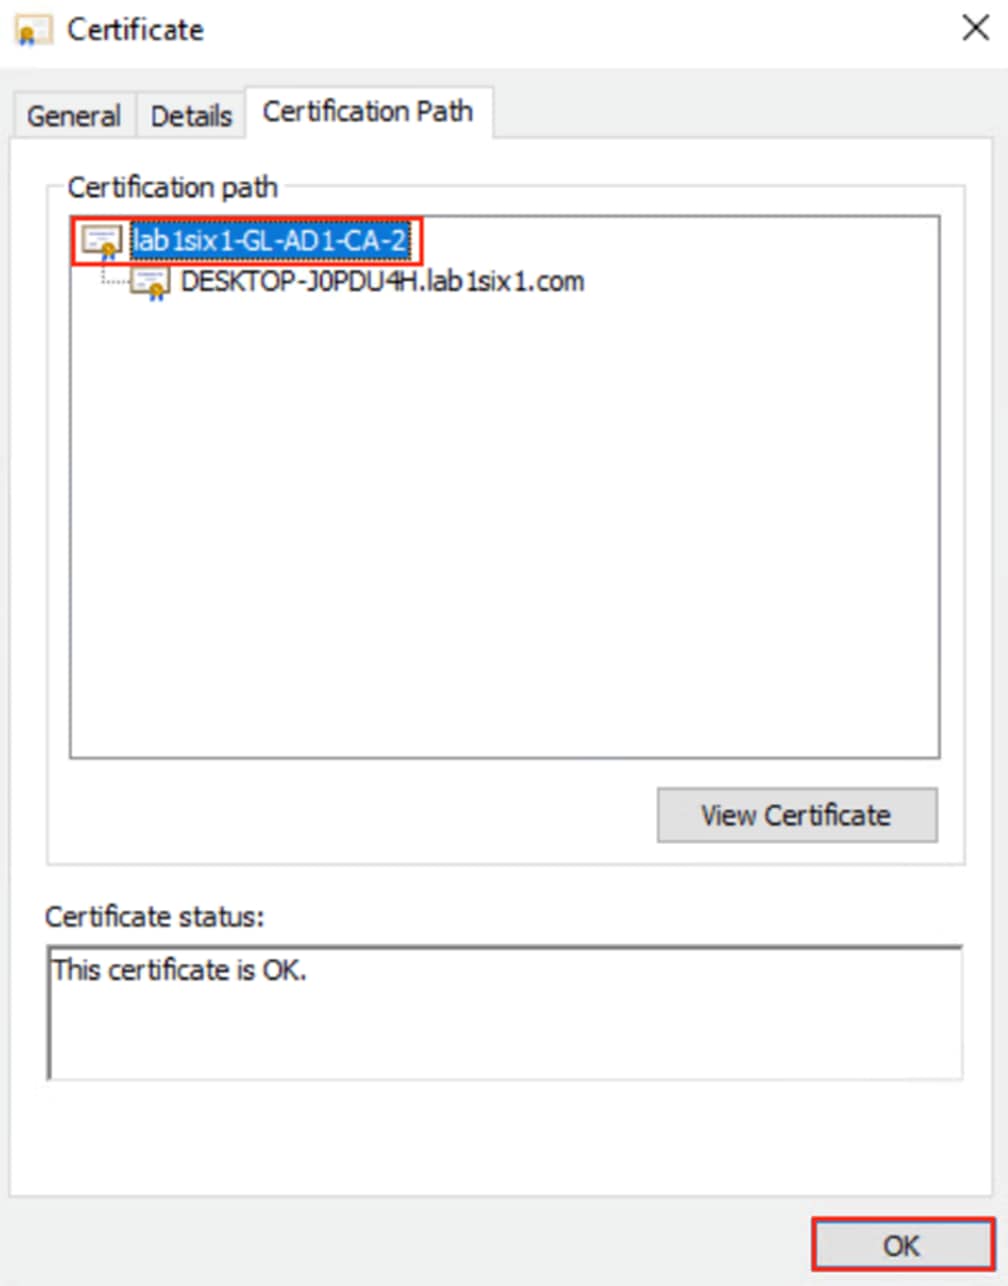
Step 5. Click on the Certification Path tab and verify the certificate chain. The root certificate and any intermediate certificates need to be trusted in ISE. Click OK.
| Acronym |
Definition |
| CA |
Certificate Authority |
| CSR |
Certificate Service Request |
| GPO |
Group Policy Object |
| GUI |
Graphical User Interface |
| ISE |
Identity Services Engine |
| pxGrid |
Cisco Platform Exchange Grid |
● Cisco Zero Trust Architecture Guide
● Cisco Zero Trust: User and Device Security Design Guide
If you have feedback on this design guide or any of the Cisco Security design guides, please send an email to ask-security-cvd@cisco.com.